Self-Service BI on a Budget
Today, let’s explore how to build a self-service BI solution on a budget. We will use a combination of open-source tools and AI to create a powerful and cost-effective solution that can help you and your team make data-driven decisions.
Table of Contents
- 0. Preparation
- 1. Let’s get started: IaC
- 2. Spin up the stack
- 3. Add and explore the database in Cloudbeaver
- 4. Add and explore the database in Metabase
- 5. Supplement the data in n8n
- 6. Next level: Metabase MCP
- Bonus: Cloudflare Tunnel
- 7. Shut down your stack
- References
0. Preparation
If you want to follow along with this self-service BI workshop, let’s get a few basics ready:
What you need
- Your laptop
- Docker Desktop installed (works on Windows, Mac, and Linux). You can download it for free from here: Docker Desktop.
Docker Desktop makes it possible to run containers on your laptop, which helps to keep the codes and applications secure and isolated from your laptop’s operating system. It is also a prerequisite for running the apps Metabase, n8n and Postgres locally during the workshop.
What I strongly recommend
These days most students have a subscription to either ChatGPT, Claude or Gemini. Do you know that all three come with a coding agent these days that can help you write code and manage a repository? If are paying for
- ChatGPT, you can use ChatGPT with Codex. The latest version of the ChatGPT desktop app comes with Codex built-in
- Google Gemini, you can use Antigravity, which is a coding agent built into Gemini
- Anthropic Claude, then I am sure you are familiare with Claude Code
Got none of them? No worries, you can also use VS Code with GitHub Copilot to help you write code and manage your repository. It is actually my preferred option because of the rich IDE. You can get a limited set of Copilot features for free if you have a GitHub Student Developer Pack activated.
It would also be very helpful if you have an API key ready for any of the platforms above.
No OpenAI or Anthropic API key yet? No worries. You can deploy a model on Azure Foundry and get an API key for free (details below)
And what is nice to have
- A domain name (which you can get for free through the GitHub Student Developer Pack)
- A free Cloudflare account, connected to your domain
Azure student credits
If you do not have an OpenAI or Anthropic API key, you can still follow along by deploying a model on Azure Foundry for free. As a student, you can get $100 in free credits for 12 months. You can sign up for the Azure for Students program to get your free credits.
You can find the sign-up steps here: Sign Up for Azure for Students
Once your Azure student account is active, you can deploy a model on Azure Foundry. You can follow the full deployment guide here: Deploying a model on Azure Foundry. For this workshop, I recommend the gpt-5.6-terra model.
1. Let’s get started: IaC (10:00)
As mentioned during the presentation, the first step to use AI and save a lot of time, is to have an AI coding agent write our IaC: Infrastructure as Code. This is a way to describe your infrastructure in code, which can then be deployed automatically in Docker containers. This is a very powerful way to manage your infrastructure, and it is also a great way to learn how to use AI to write code.
Prompt your AI coding agent to write the stack code
Open a new project self-service-bi in your AI coding agent (ChatGPT, Gemini, Claude or VS Code with GitHub Copilot) and prompt it to write the following code:
1
2
3
4
5
6
7
8
9

I want a local dev environment for a business intelligence stack with:

- **Database server** (PostgreSQL) running in Docker
- **AdventureWorks sample data** auto-loaded data from https://github.com/lorint/AdventureWorks-for-Postgres when the database starts
- **CloudBeaver** web UI to query and browse the database
- **n8n** workflow automation tool for data pipelines
- All services networked together and stored in volumes

Write the docker-compose.yml, database initialization scripts, and any configuration files needed to spin everything up with `docker compose up`.
To save time, and because the output of an LLM and harness various randomness, I have already prepared a repository with the code for you.
You can find it here: https://github.com/pimatskku/business-intelligence-stack
Clone the repository or extract the zip file
If you are already familiar with Git, you can go to your Developer folder and clone the repository using the following command:
1

git clone https://github.com/pimatskku/business-intelligence-stack.git
If you are less familiar with Git, you can also download the zip file from the repository and extract it to your Developer folder.
- On the repository page, click on the green “Code” button and select “Download ZIP”.
- Once the download is complete, extract the zip file to a folder
- Remember where you extracted the folder, as you will need to navigate to it in the next step
You may open this folder in Visual Studio Code or your AI coding agent of choice (ChatGPT, Gemini, Claude or VS Code with GitHub Copilot) to explore, explain and modify the code if you want to.
2. Spin up the stack (10:10)
Open Docker Desktop
Before we can spin up our IaC stack, we need to make sure that Docker Desktop is running on your laptop. Open Docker Desktop and wait for it to start. This may take a few minutes, depending on your system.
Check if Docker Desktop is running by looking for the Docker icon in your system tray (Windows) or menu bar (Mac).
Open the folder in your terminal
Find the folder where you cloned the repository or extracted the zip file.
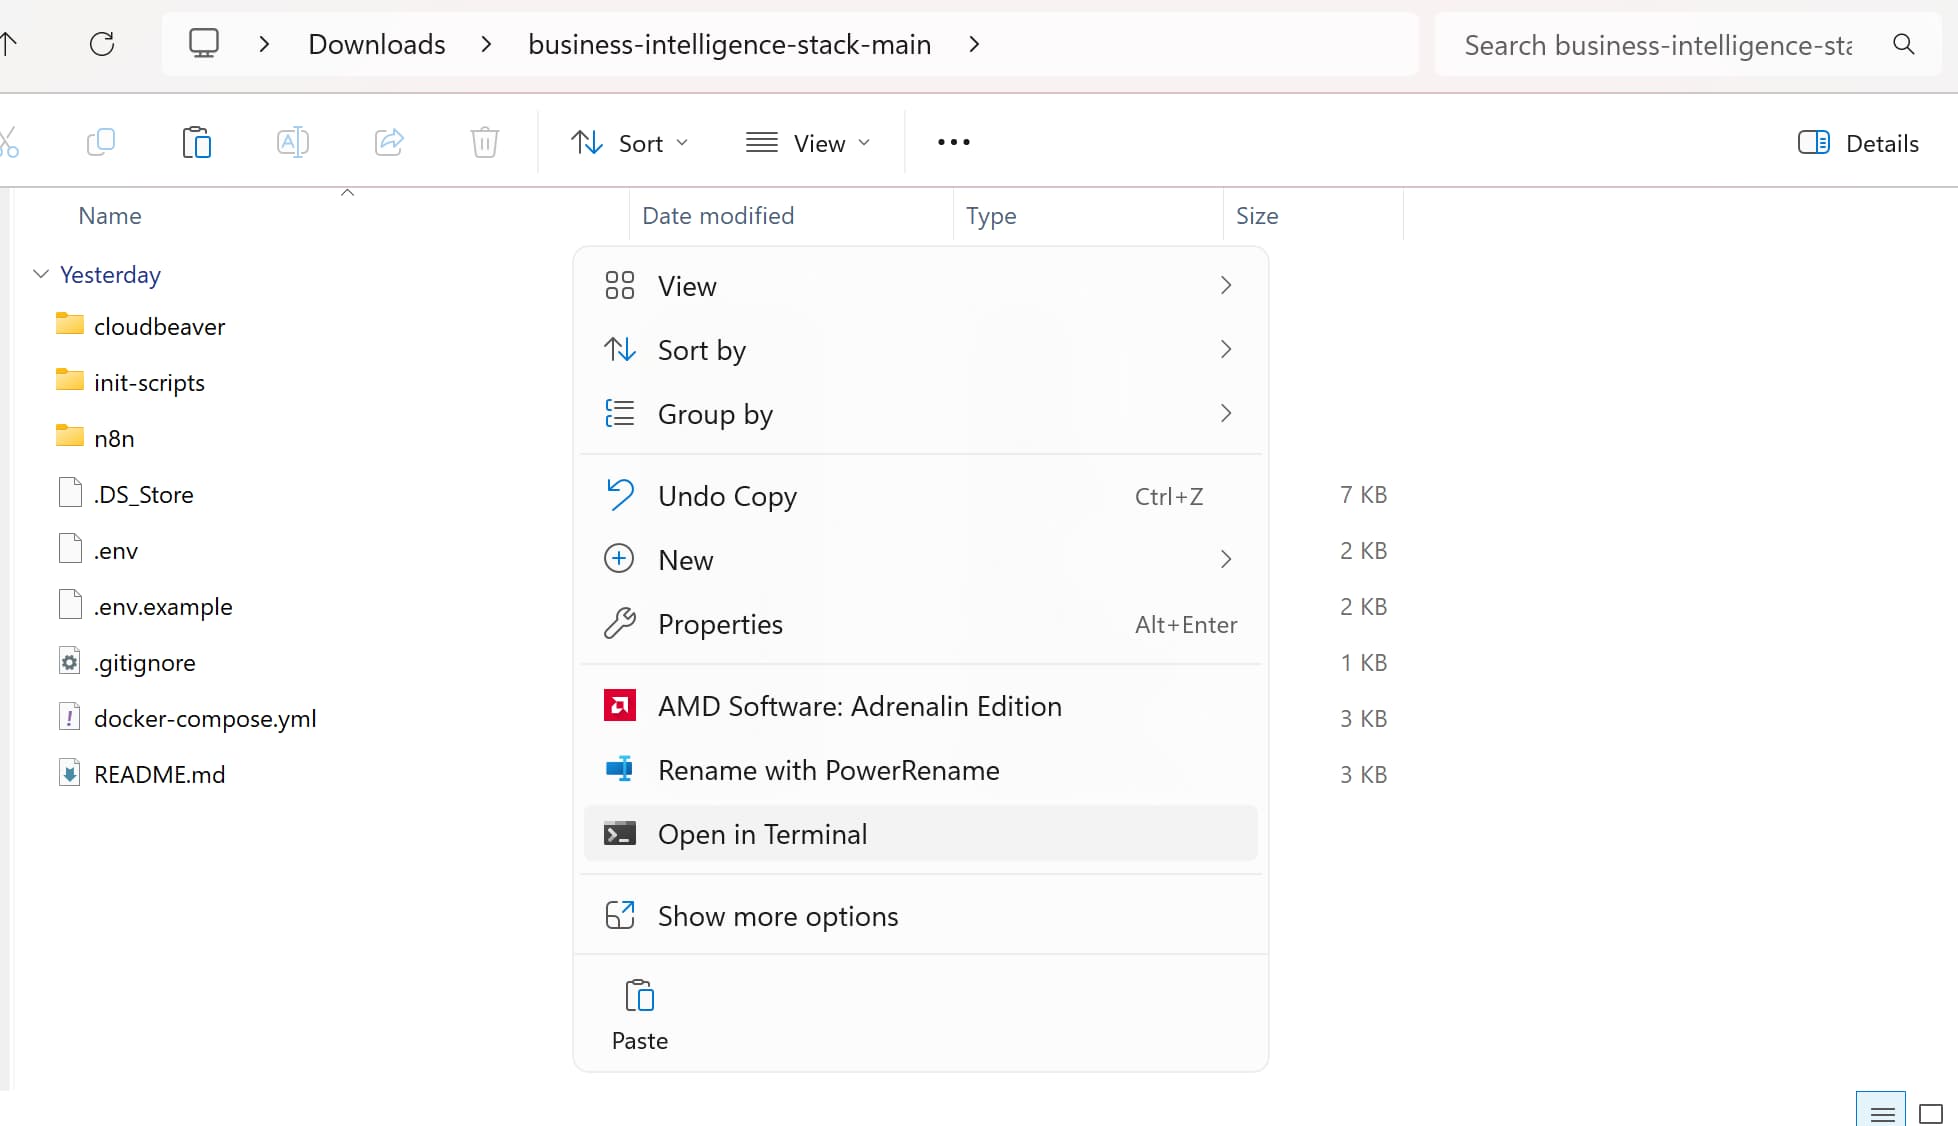
- If you are in Windows, you can right click in the folder and select
Open in TerminalorOpen in Command Prompt. - If you are in Mac, you can open the folder in Finder, right-click on the folder and select
New Terminal at Folder.
Copy the .env.example file to .env
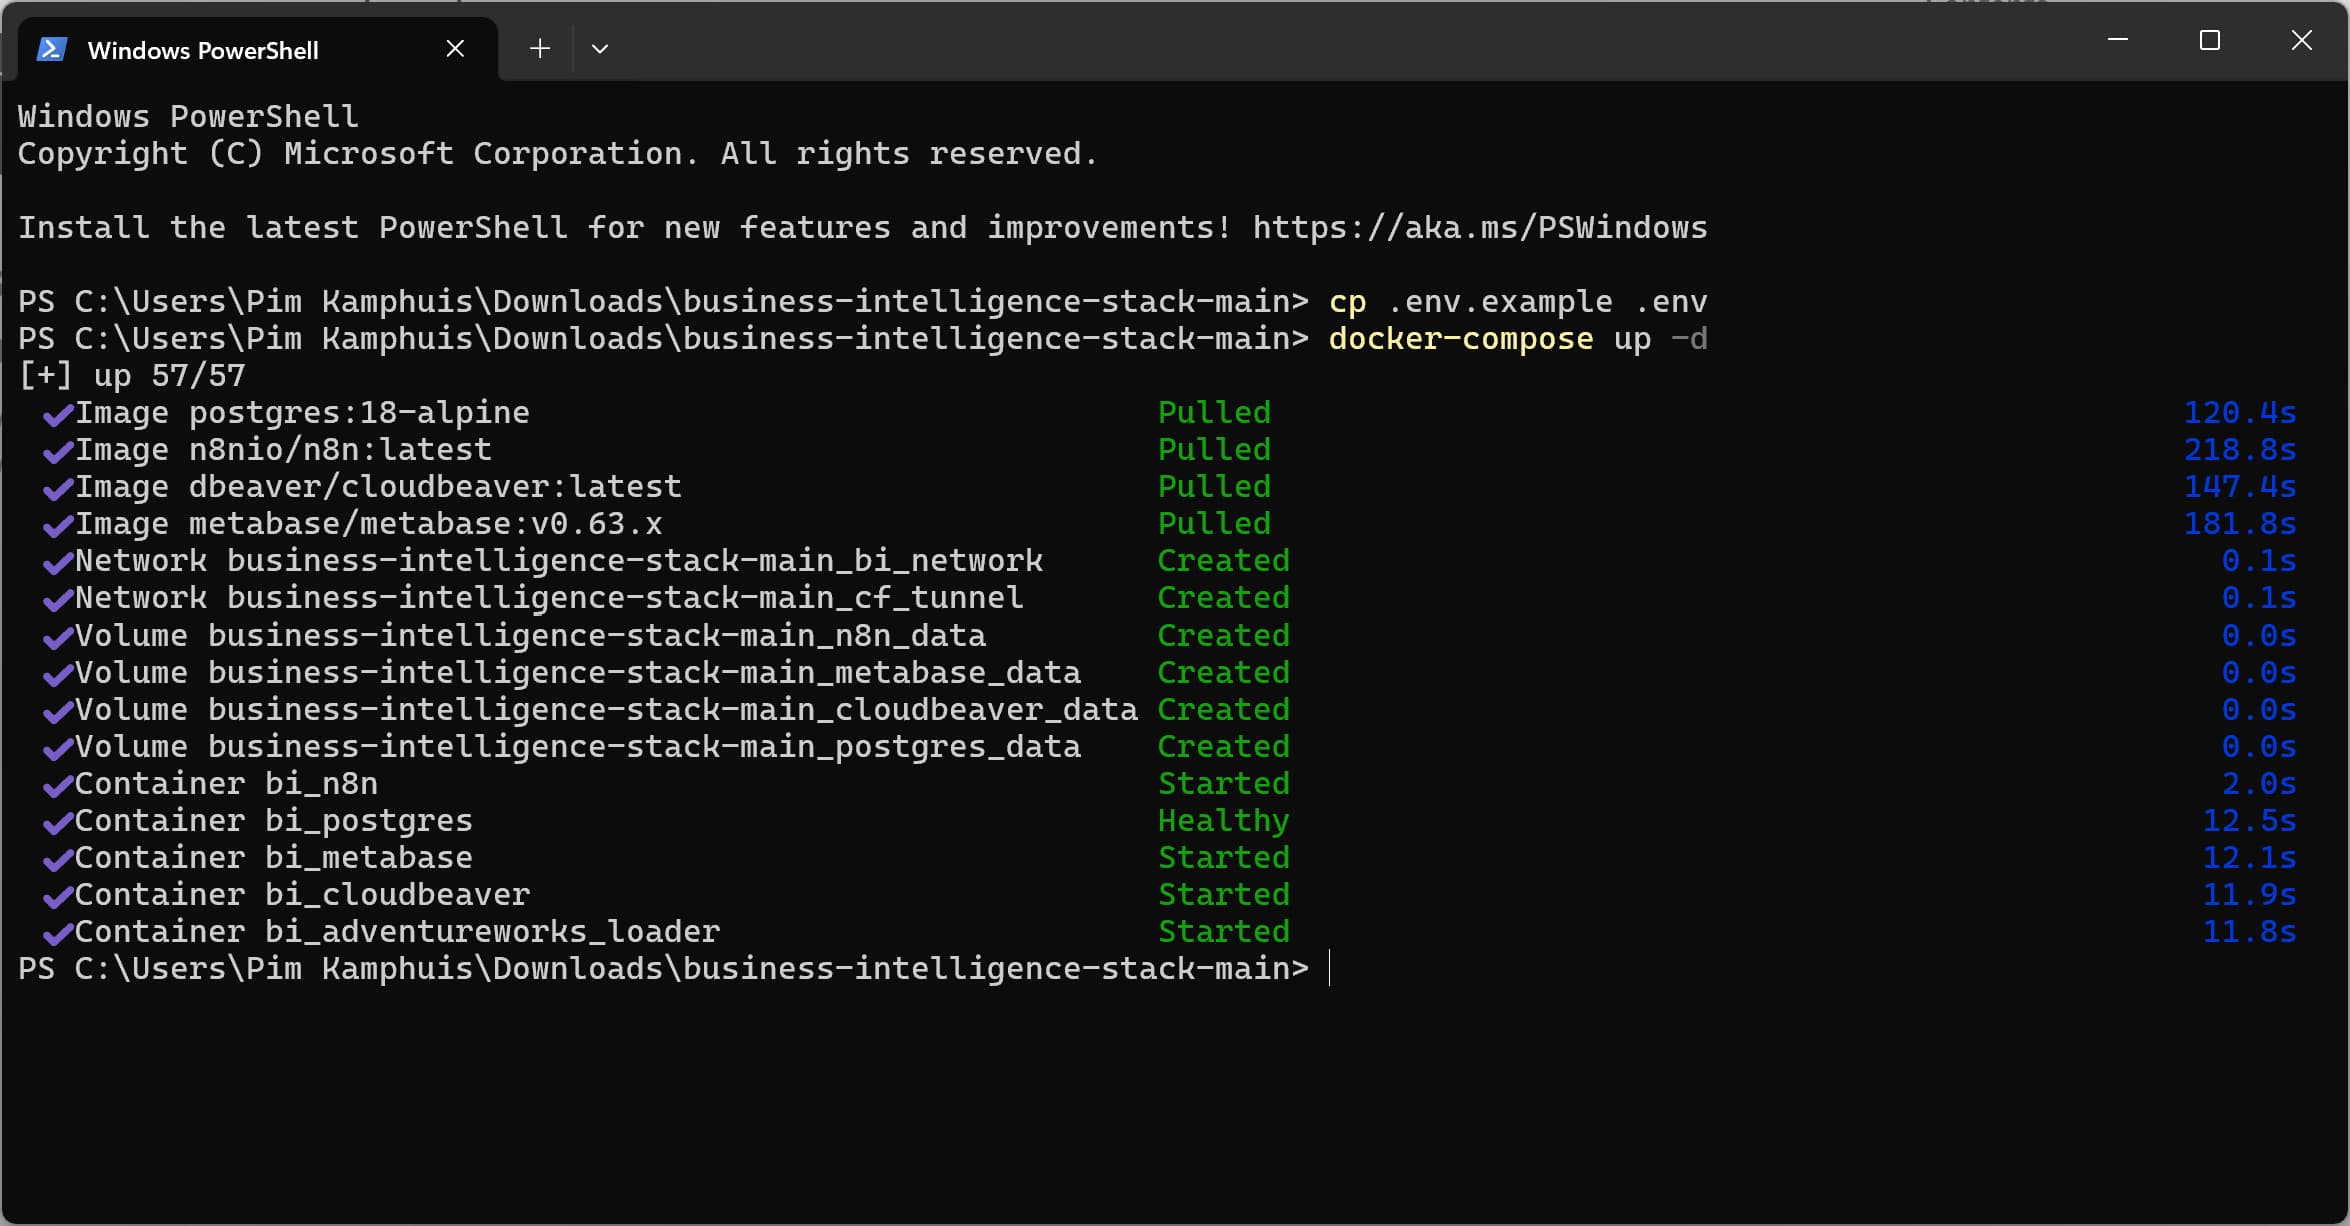
In the terminal, run the following command to copy the .env.example file to a new file called .env:
1

cp .env.example .env
We do this to create a new environment file that will be used by Docker Compose to set environment variables for the containers.
Open the .env file in your IDE or text editor to see the variables and their values. Keep the file open, as we will need to use the values for the database credentials later in the workshop.
Spin up the stack
In your terminal then run the next command to spin up the stack:
1

docker-compose up -d
This will download the necessary Docker images and start the containers for Postgres, Metabase and n8n. This may take a few minutes, depending on your internet connection and system performance.
Explore the stack
You can now explore the stack by open the Docker Desktop dashboard and checking the containers that are running. You should see the following containers:
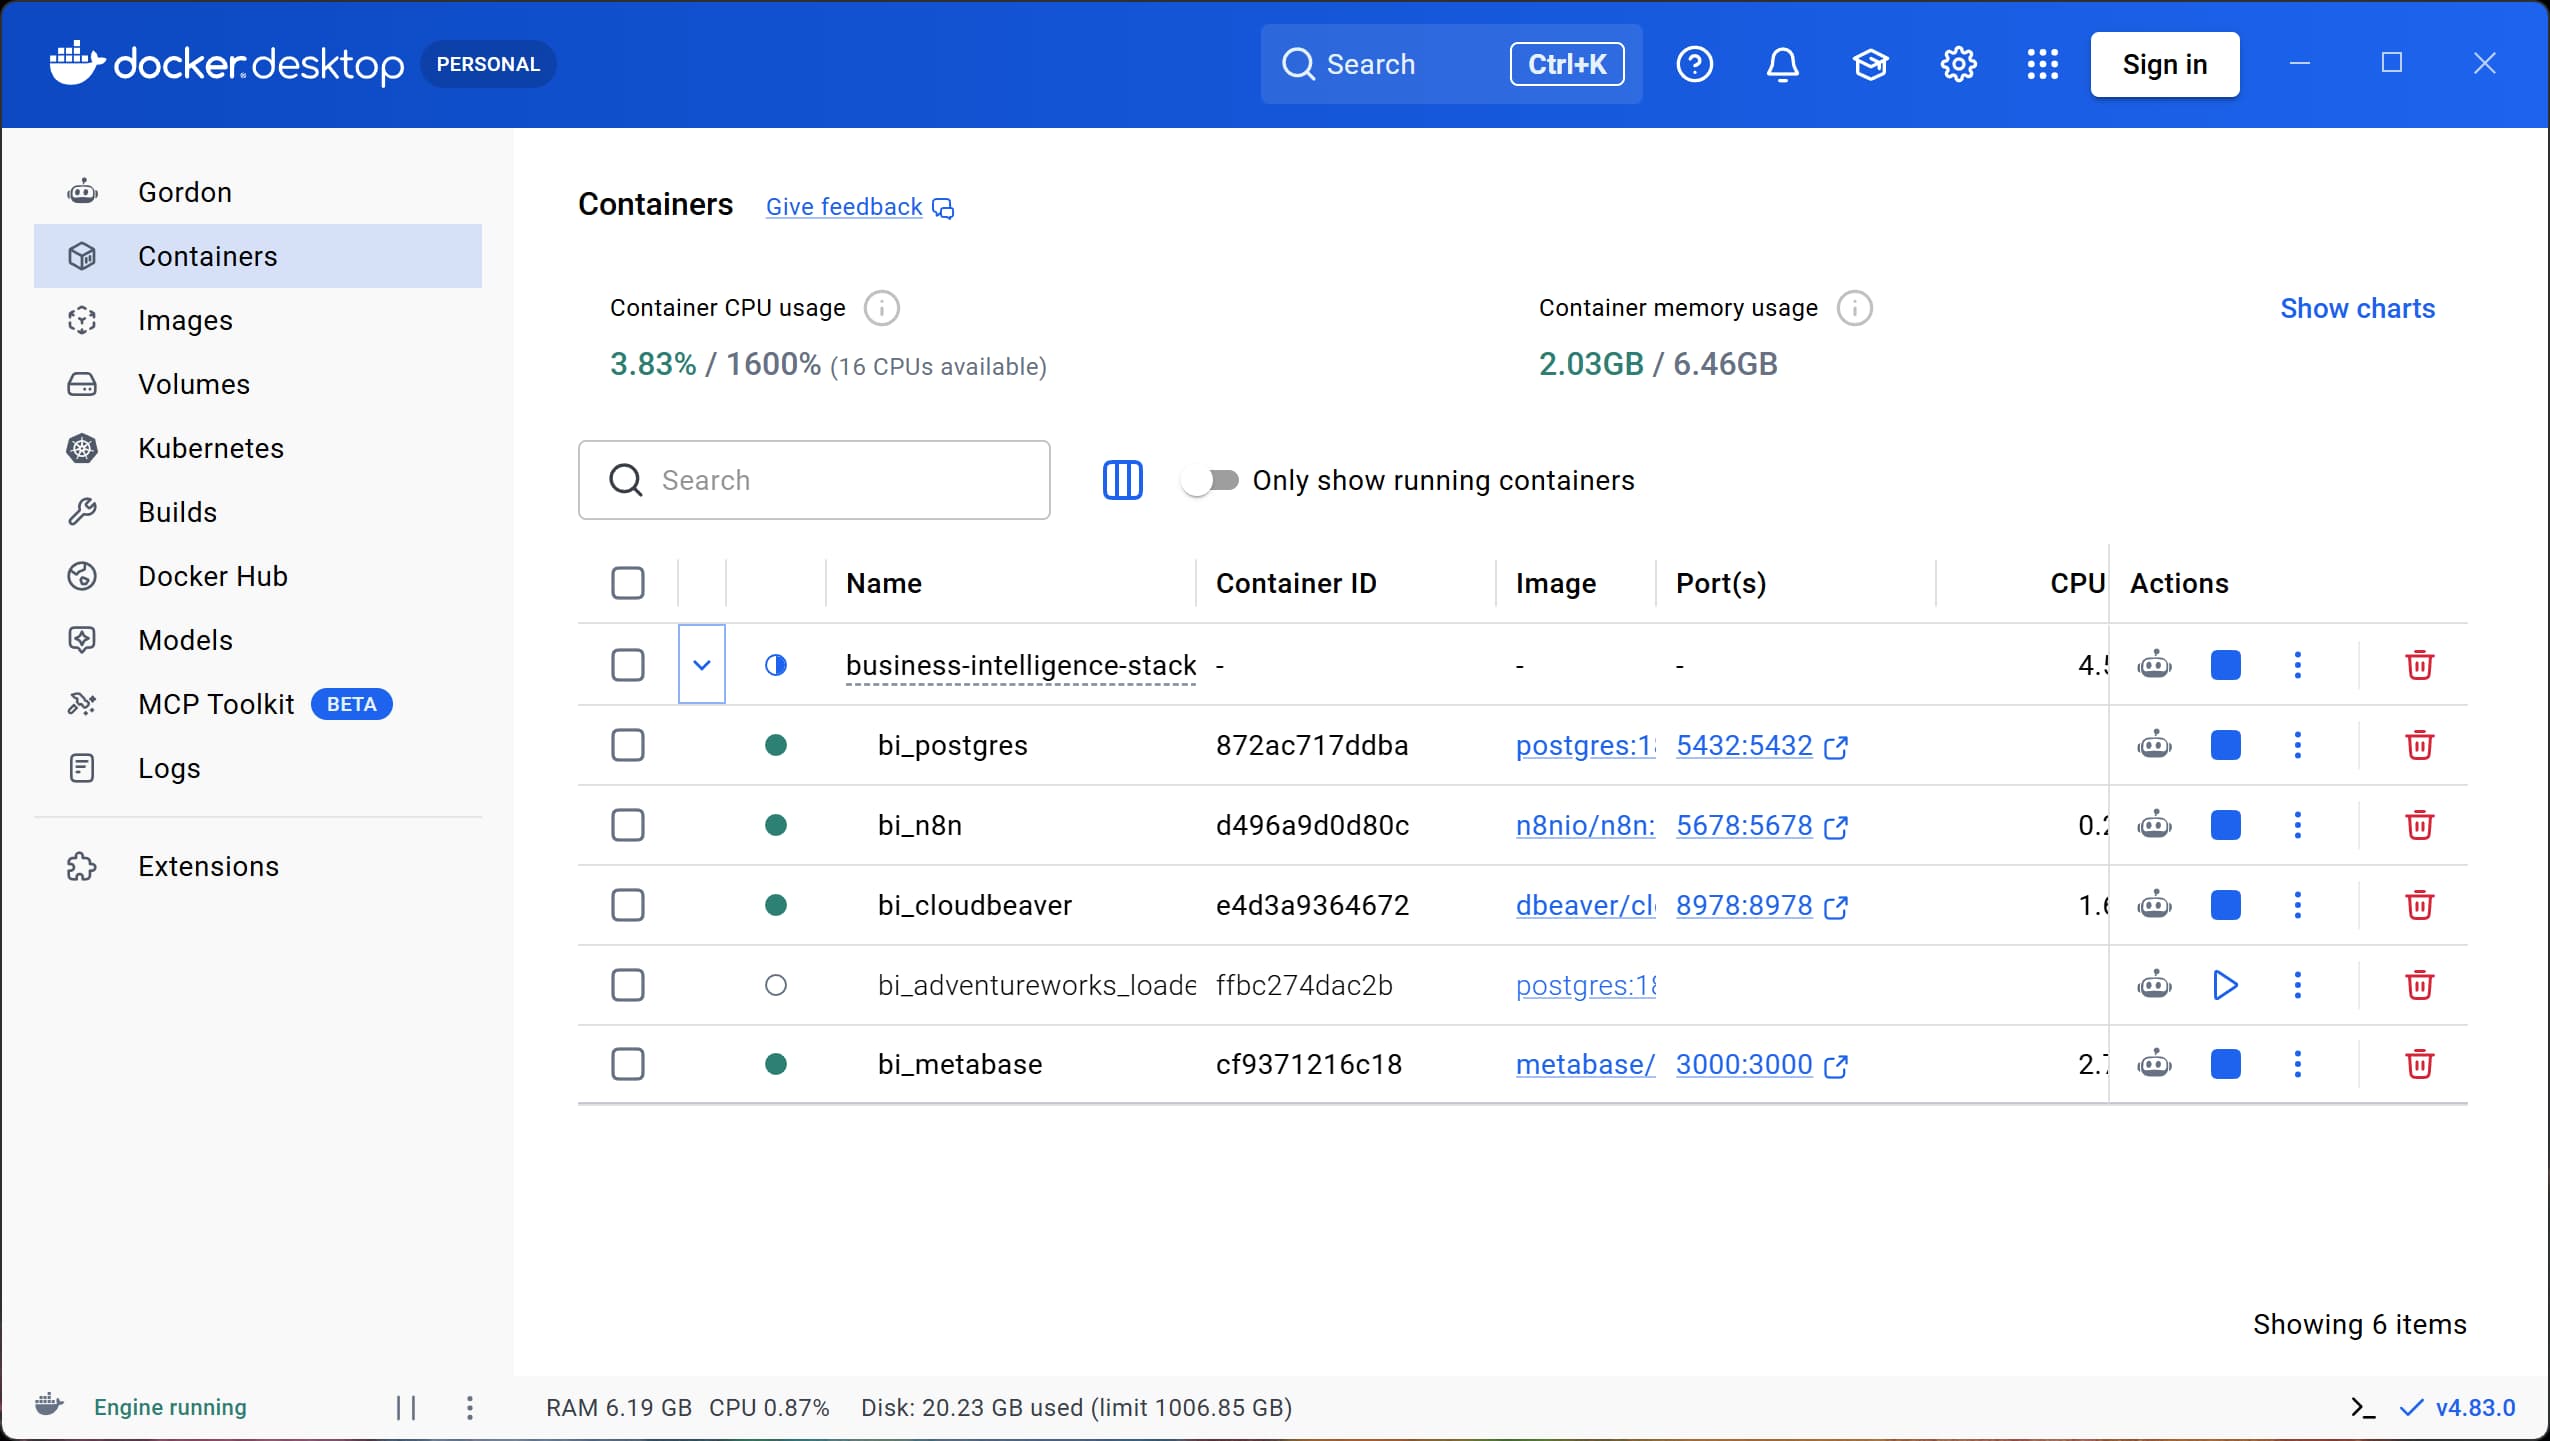
- Cloudbeaver: http://localhost:8978
- Metabase: http://localhost:3000
- n8n: http://localhost:5678
You might see a container called
bi_adventureworks_loaderlisted and not running. This is a one-time container that was used to load the AdventureWorks database into the Postgres container. You can ignore it for now.
3. Add and explore the database in Cloudbeaver (10:30)
- Open Cloudbeaver in your browser: http://localhost:8978
- In the upper right corner click the gear icon to login with the credentials in the
.envfile
You can see the postgres database server is already added. We still need to add the database credentials to connect to the database. You can find the credentials in the .env file.
- Click on the ‘Data Warehouse (dwh_db)` database
- A Database Authentication window will pop up
- From the
.envfile, fill in the values forPOSTGRES_USERandPOSTGRES_PASSWORDin the fieldsUsernameandPassword - Check the box
Don't ask again during the sessionand clickLogin
I recommend to set the Connection view to Simple
- Explore the database and its imported schemas and tables from the AdventureWorks database.
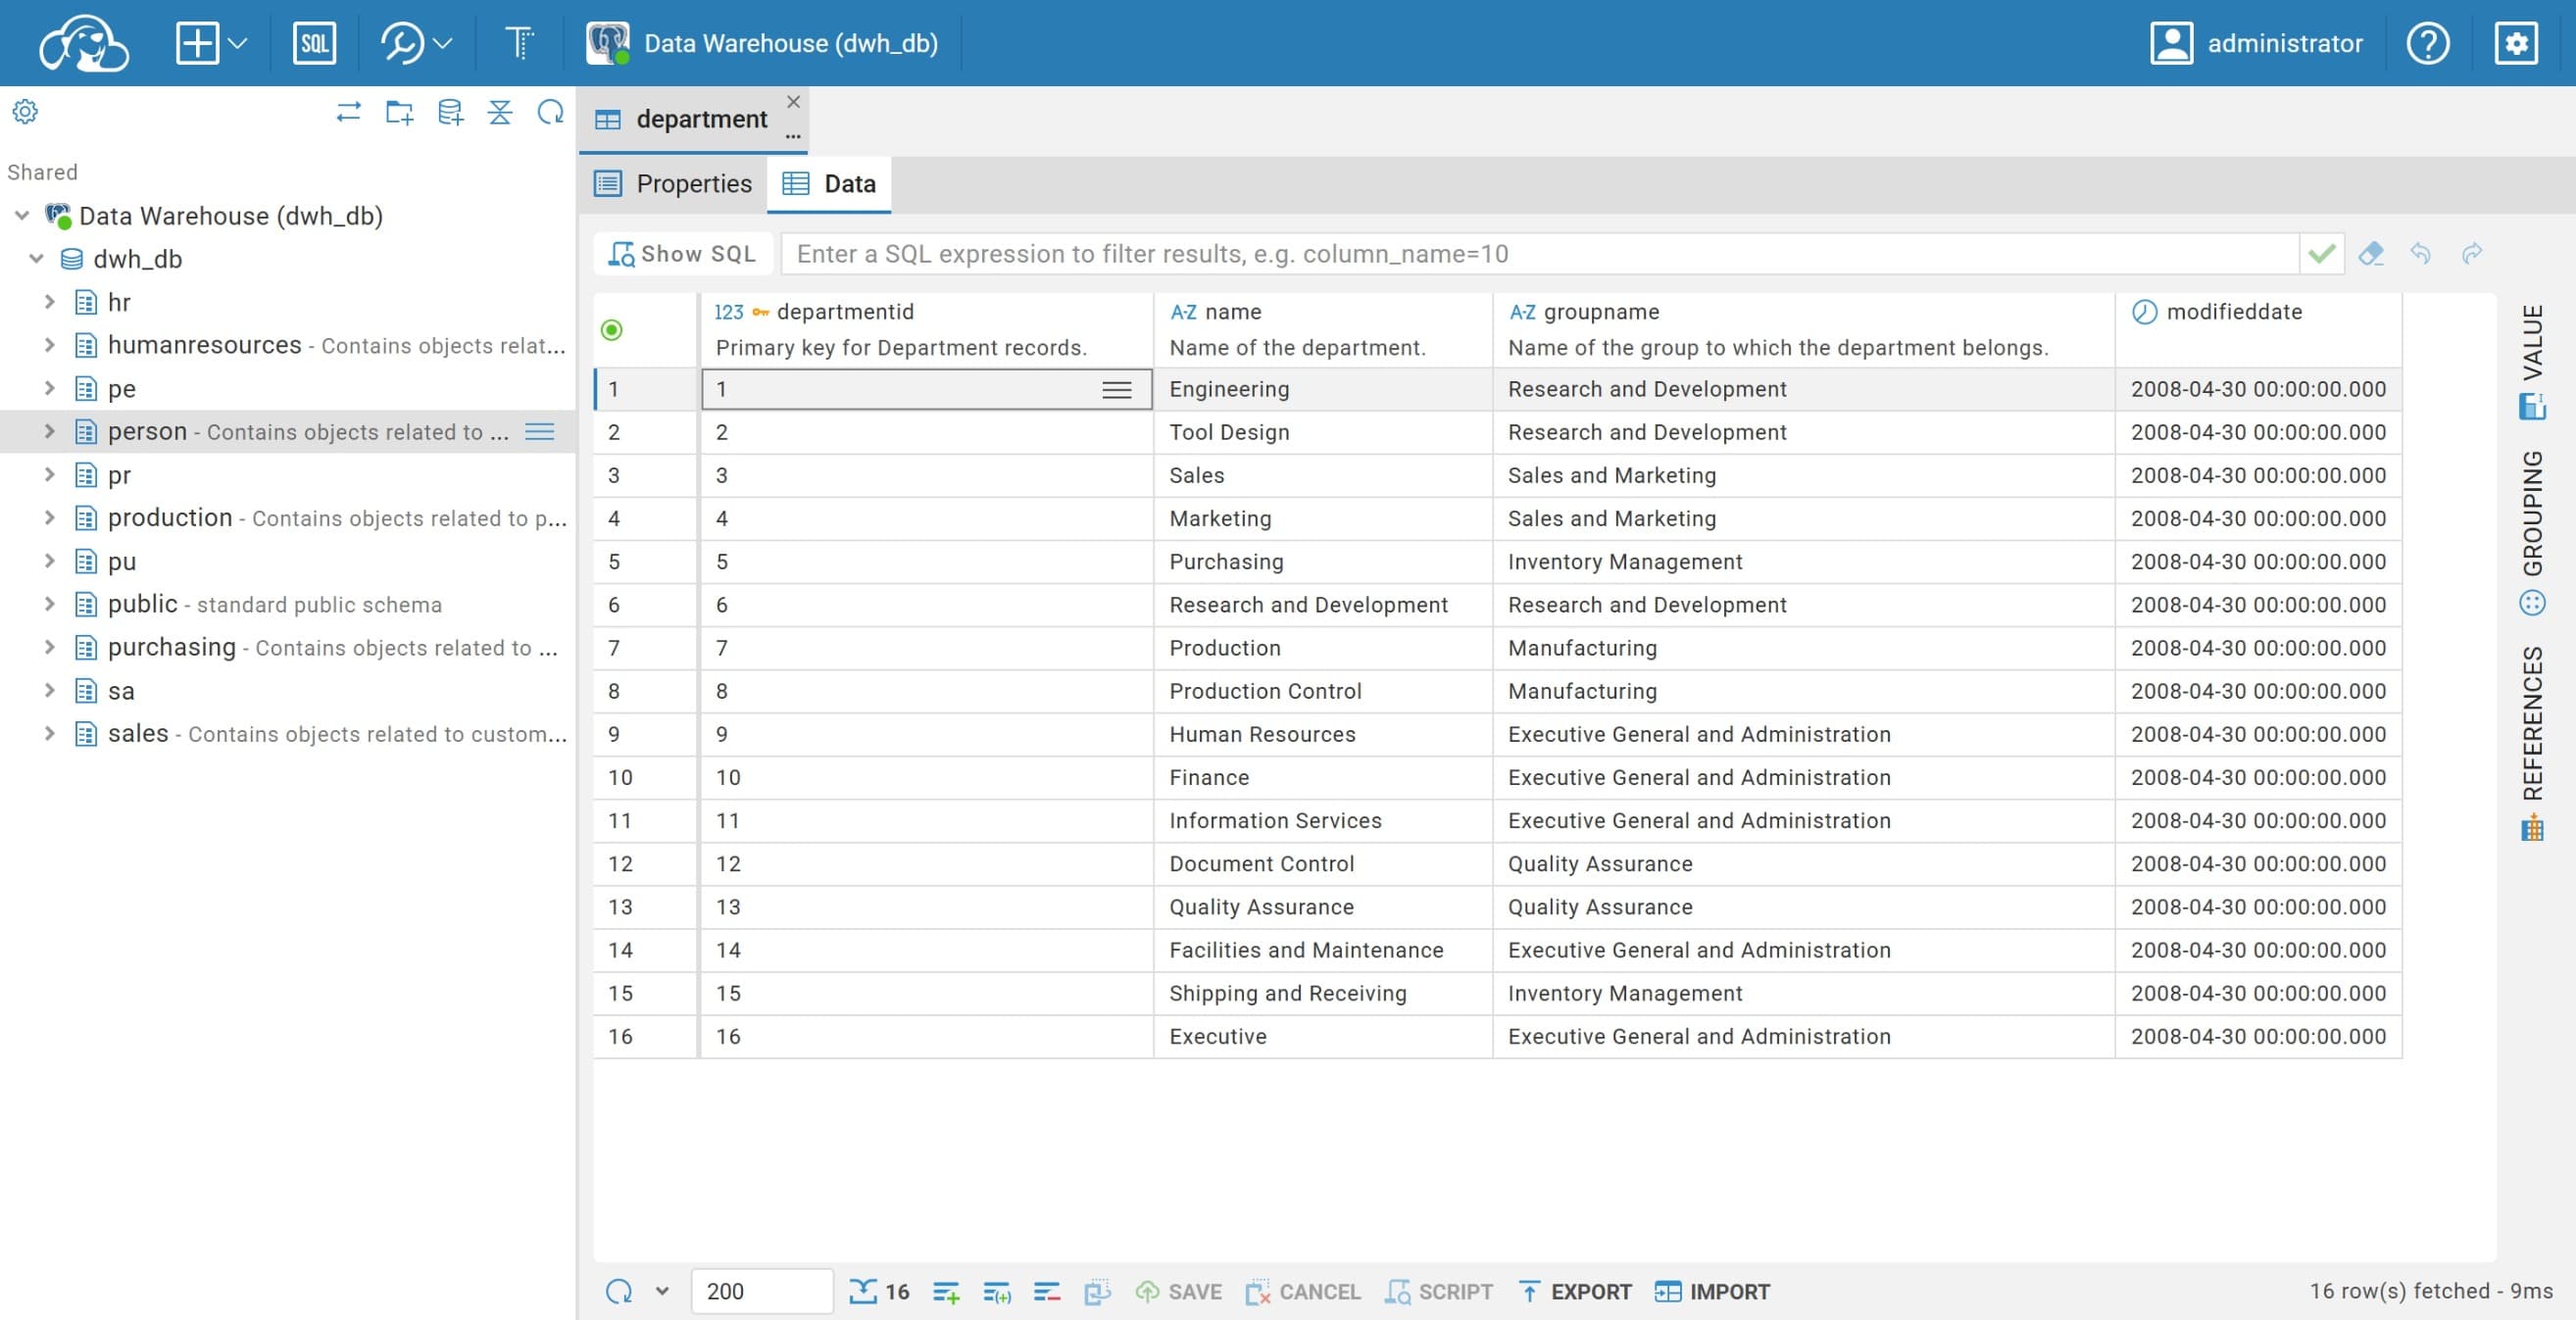
Don’t close the Cloudbeaver tab yet, we will use it later to explore the database and its tables. Next, we will add the database to Metabase so we can create queries and dashboards.
4. Add and explore the database in Metabase (10:40)
Click the Metabase container port in Docker desktop, or directly go to http://localhost:3000 in your browser to open Metabase. You will be prompted to create an account.
- Click Let’s get started
- Fill in your name, email and password and click
Next. For this demo I’ll go with- First name:
James - Last name:
Bond - Email:
james@bond.com - Company:
MI6 - Password:
Shakennotstirred007
- First name:
- Click
Next,NextandI'll add my own data later,FinishandTake me to Metabaseto complete the setup
Add the database
After we are in, let’s add the database to Metabase.
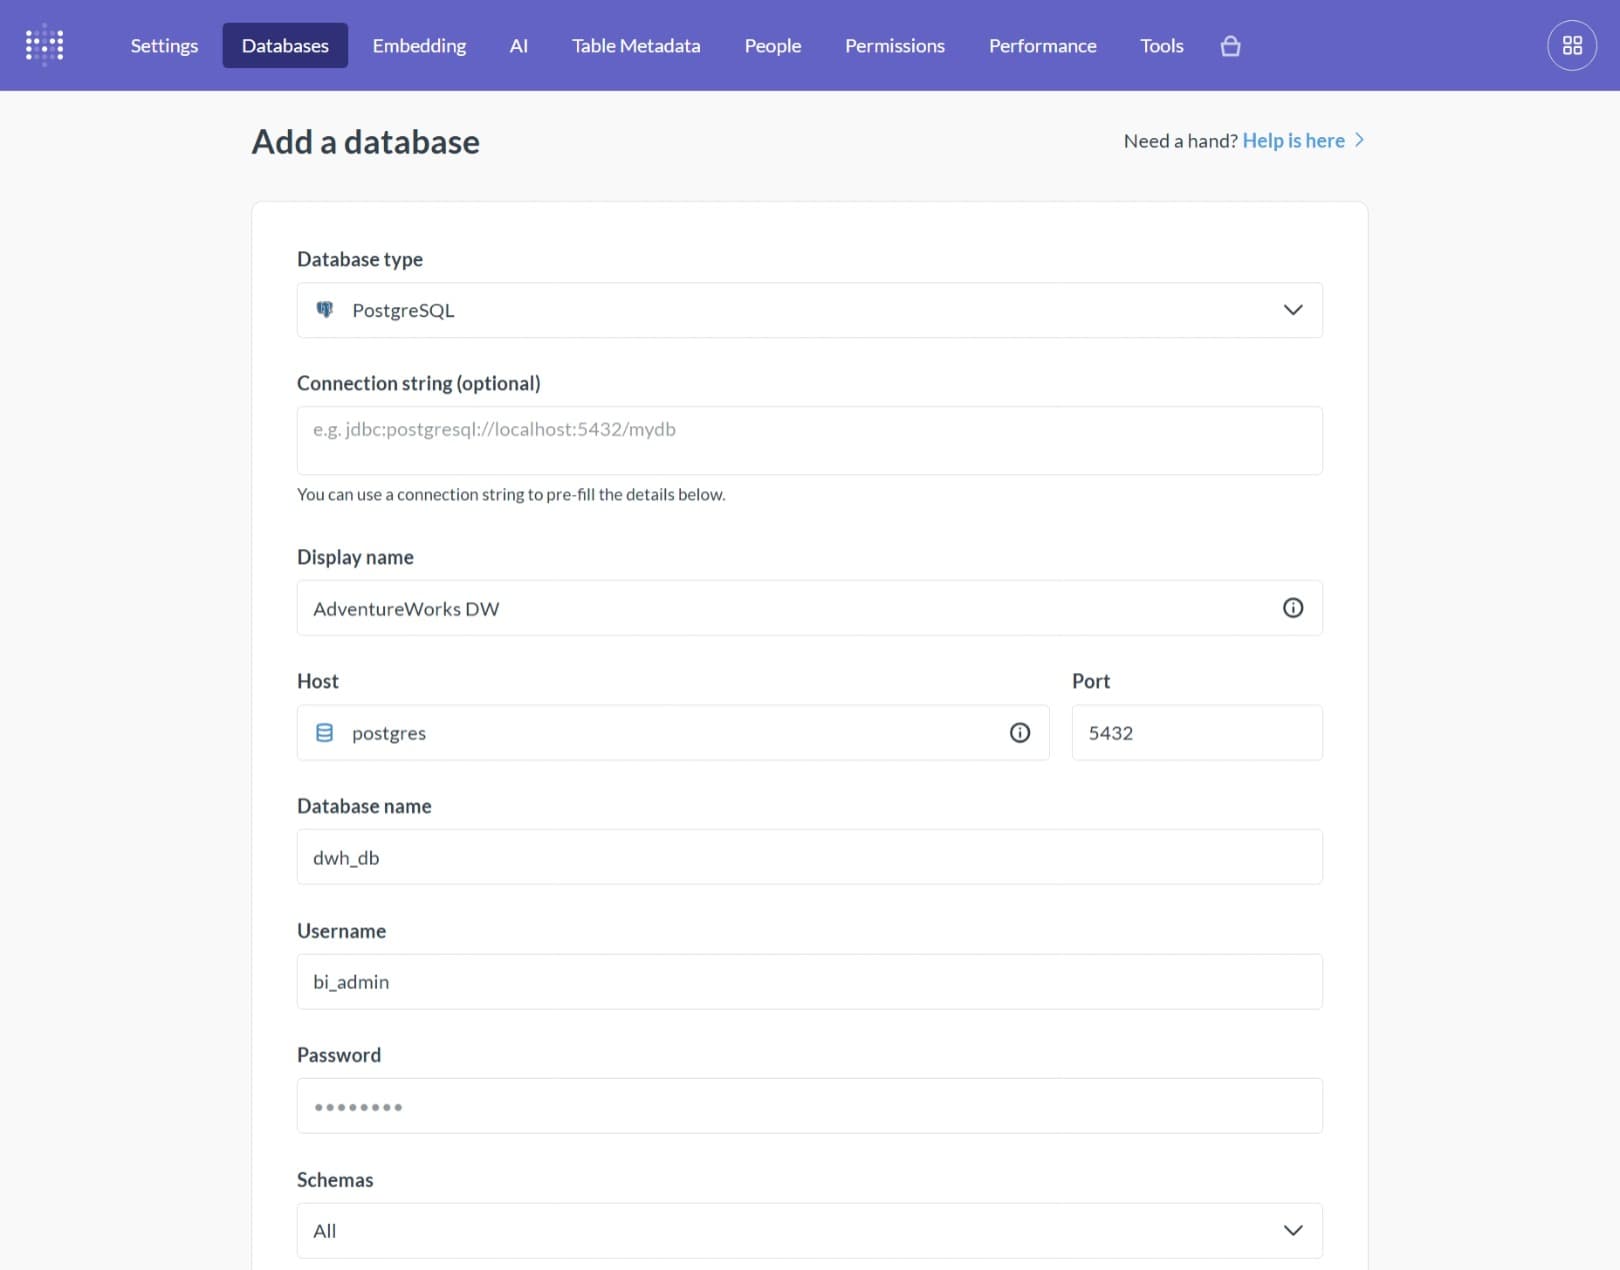
- In the upper right corner, click on the gear icon and select
Admin. - In the top menu, click on
Databases - Click on
Add database. Fill in the following values:- Database type:
PostgreSQL - Display name:
AdventureWorks DW - Host:
postgres - Port:
5432 - Database name:
dwh_db - Username:
POSTGRES_USER(from.envfile) - Password:
POSTGRES_PASSWORD(from.envfile)
- Database type:
- Click
Saveto add the database
Give Metabase some time to index the database and its tables. You can check the progress in the Databases tab. Once the database is indexed, you can start exploring the data.
Explore the database
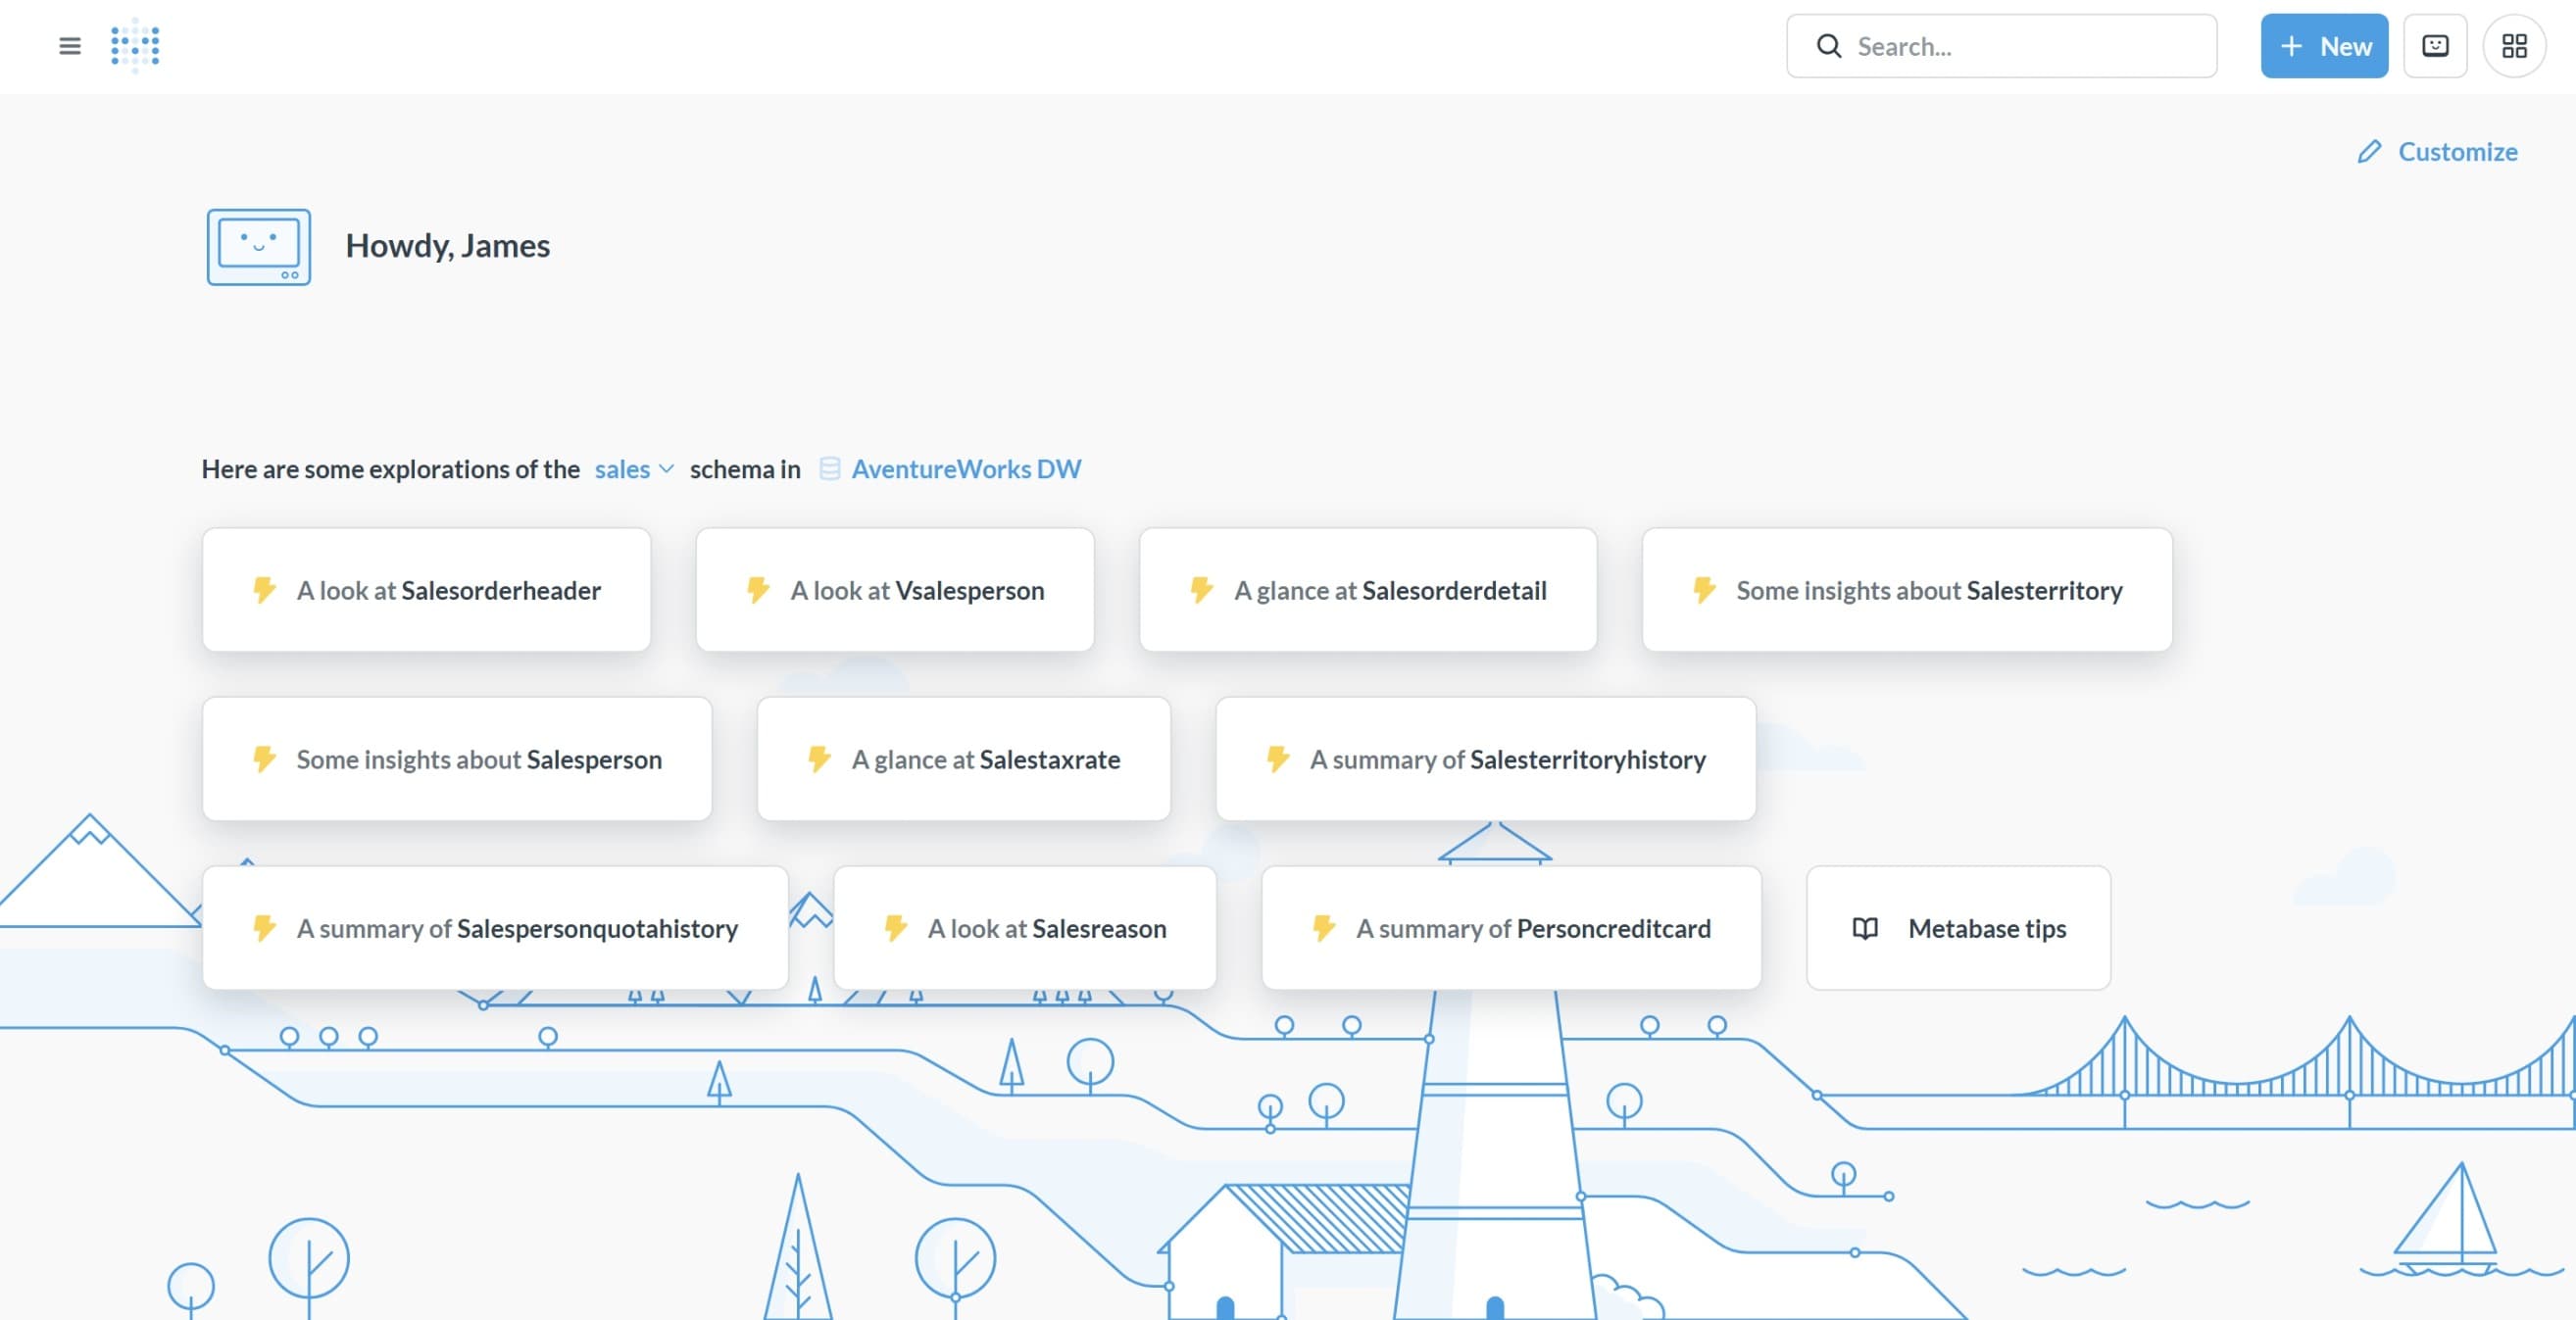
Go back to the Metabase home page by click the gear icon in the upper right corner and select Main app. You may now see some suggestions for data exploration. For example, you can find some quick insights about Vsalesperson
Create simple queries
Let’s make a simple query to explore the data. In the top menu bar click on + New and select Question. Select the AdventureWorks DW database and then select the Sales.SalesOrderDetail table. You can now see the data in the table.
Let’s make a simple join to see which products are sold the most (in volume)
- Click
Summarize - Summarize by
Sum of OrderQty - Group by
ProductID
Cool, but which products are this exactly? Let’s join the Production.Product table to get the product names.
Open the editor for the overview you just created, click Join data and select the Production.Product table. Select the ProductID column from both tables to join them. Select the Name column from the Production.Product table to add it to the overview.
To make sure that the name shows up in the summary, add name to the Group by section.
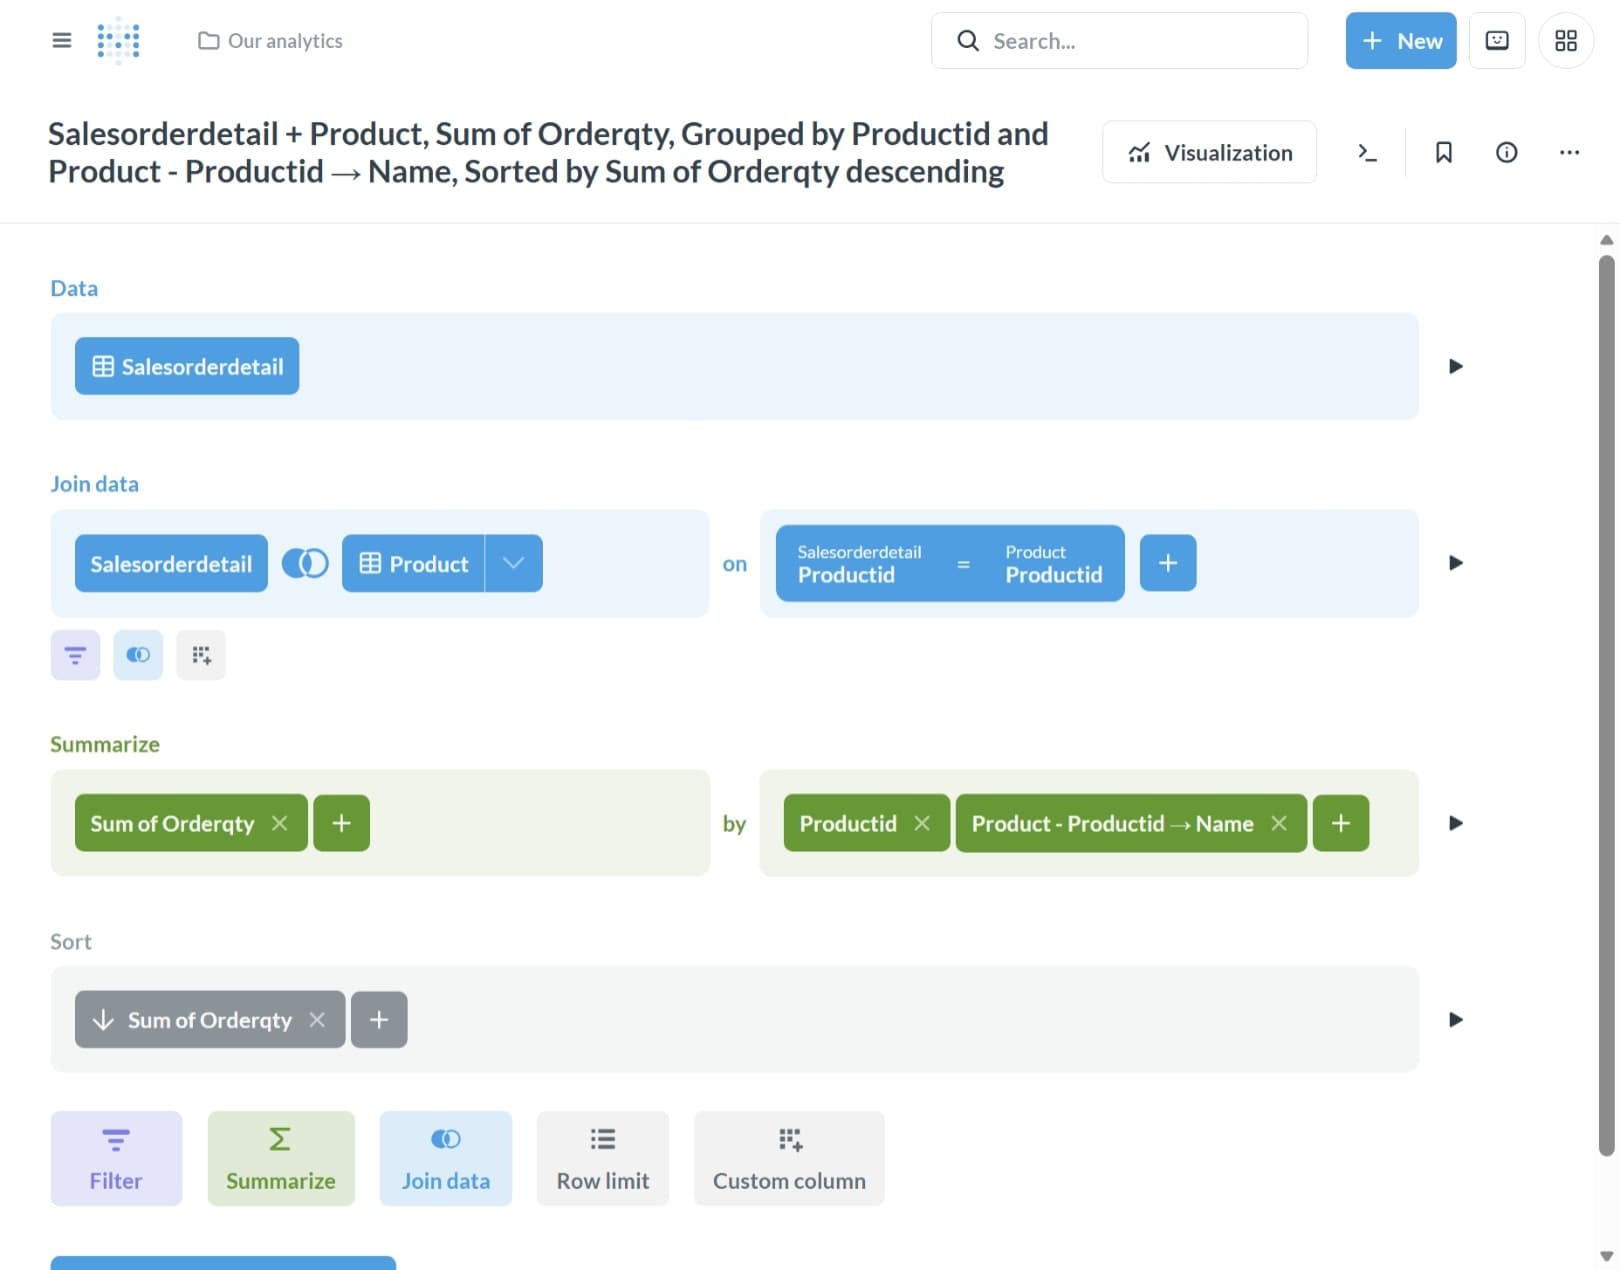
Click the Visualize button.You can now see the product names and the total quantity sold for each product.
Create a simple dashboard
Only if time allows
Add an API key to Metabase
Well we just 30 minutes without AI, so let’s add a little AI into the mix. Metabase has a built-in AI feature called Metabot that allows you to ask questions in natural language and get answers in the form of charts and tables. To use this feature, we need to add an API key to Metabase.
- Click on the gear icon in the upper right corner and select
Admin. - In the top menu, click on
AI - Under the
Connect to an AI providersection, select your provider - Fill in the API key and click
Save
If you are using your Azure for student credit, make sure you deployed a model on Azure Foundry and use the API key from that model. For this purpose, I recommend the gpt-5.6-terra model. You can find the information under the deployment details of the model in Azure Foundry. In my case, it looks like this:
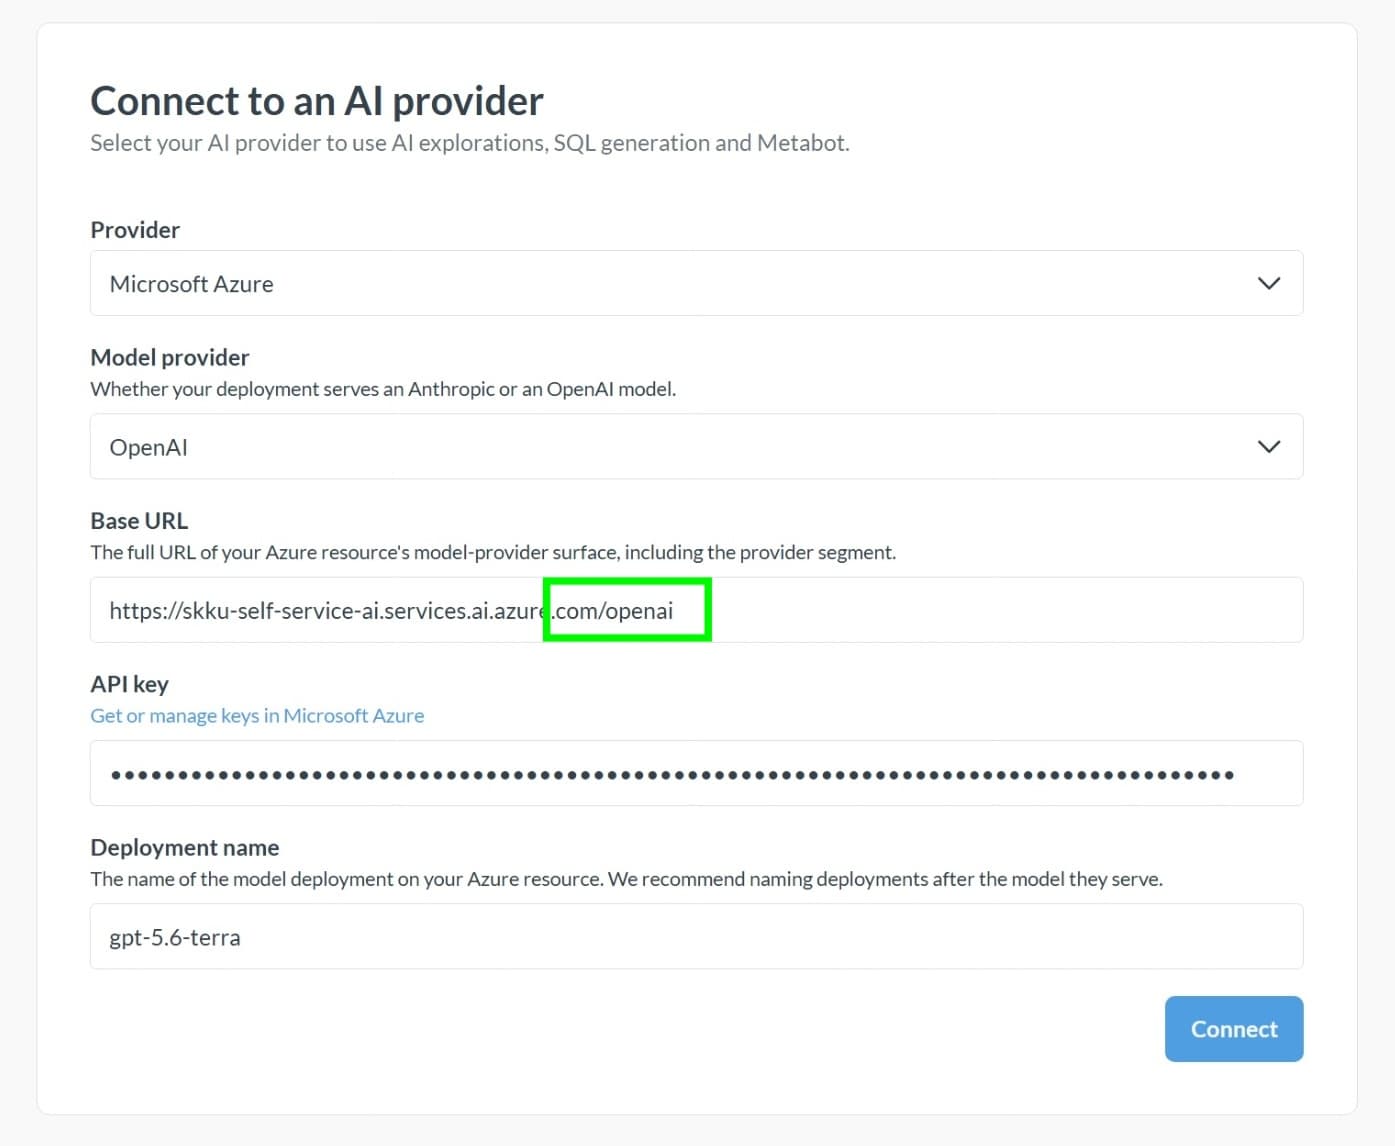
Make note of the Base Url, that seems to be your Azure Foundry model endpoint hostname followed by
/openai
After you added the API key, you can go back to the Metabase home page and by clicking the gear icon in the upper right corner and select Main app.
Explore data with Metabot
Since we are not very familiar with the data, let’s ask Metabot to give us some insights.
In the top right, click + New and select AI Exploration. On the question What are you lookin to learn, ask:
1

I want to learn more about the data in the AdventureWorks DW database. Can you describe the data and give me some insights?
Let’s read the answer and see what Metabot has to say about the data. Click on one of the linked tables, and ask follow-up questions to get more insights.
Example questions you can ask Metabot:
- “What are the top 10 products by sales quantity?”
- “Show me the total sales by year”
- “Which product has the highest profit margin?”
- “Show me the sales trend for the last 12 months”
- “Which product category has the highest sales?”
- “Show me the top 5 customers by sales”
- “Which region has the highest sales?”
- “Show me the sales by product category and region”
- “Which product has the highest return rate?”
Finish with the question
Which orders were placed on a holiday?
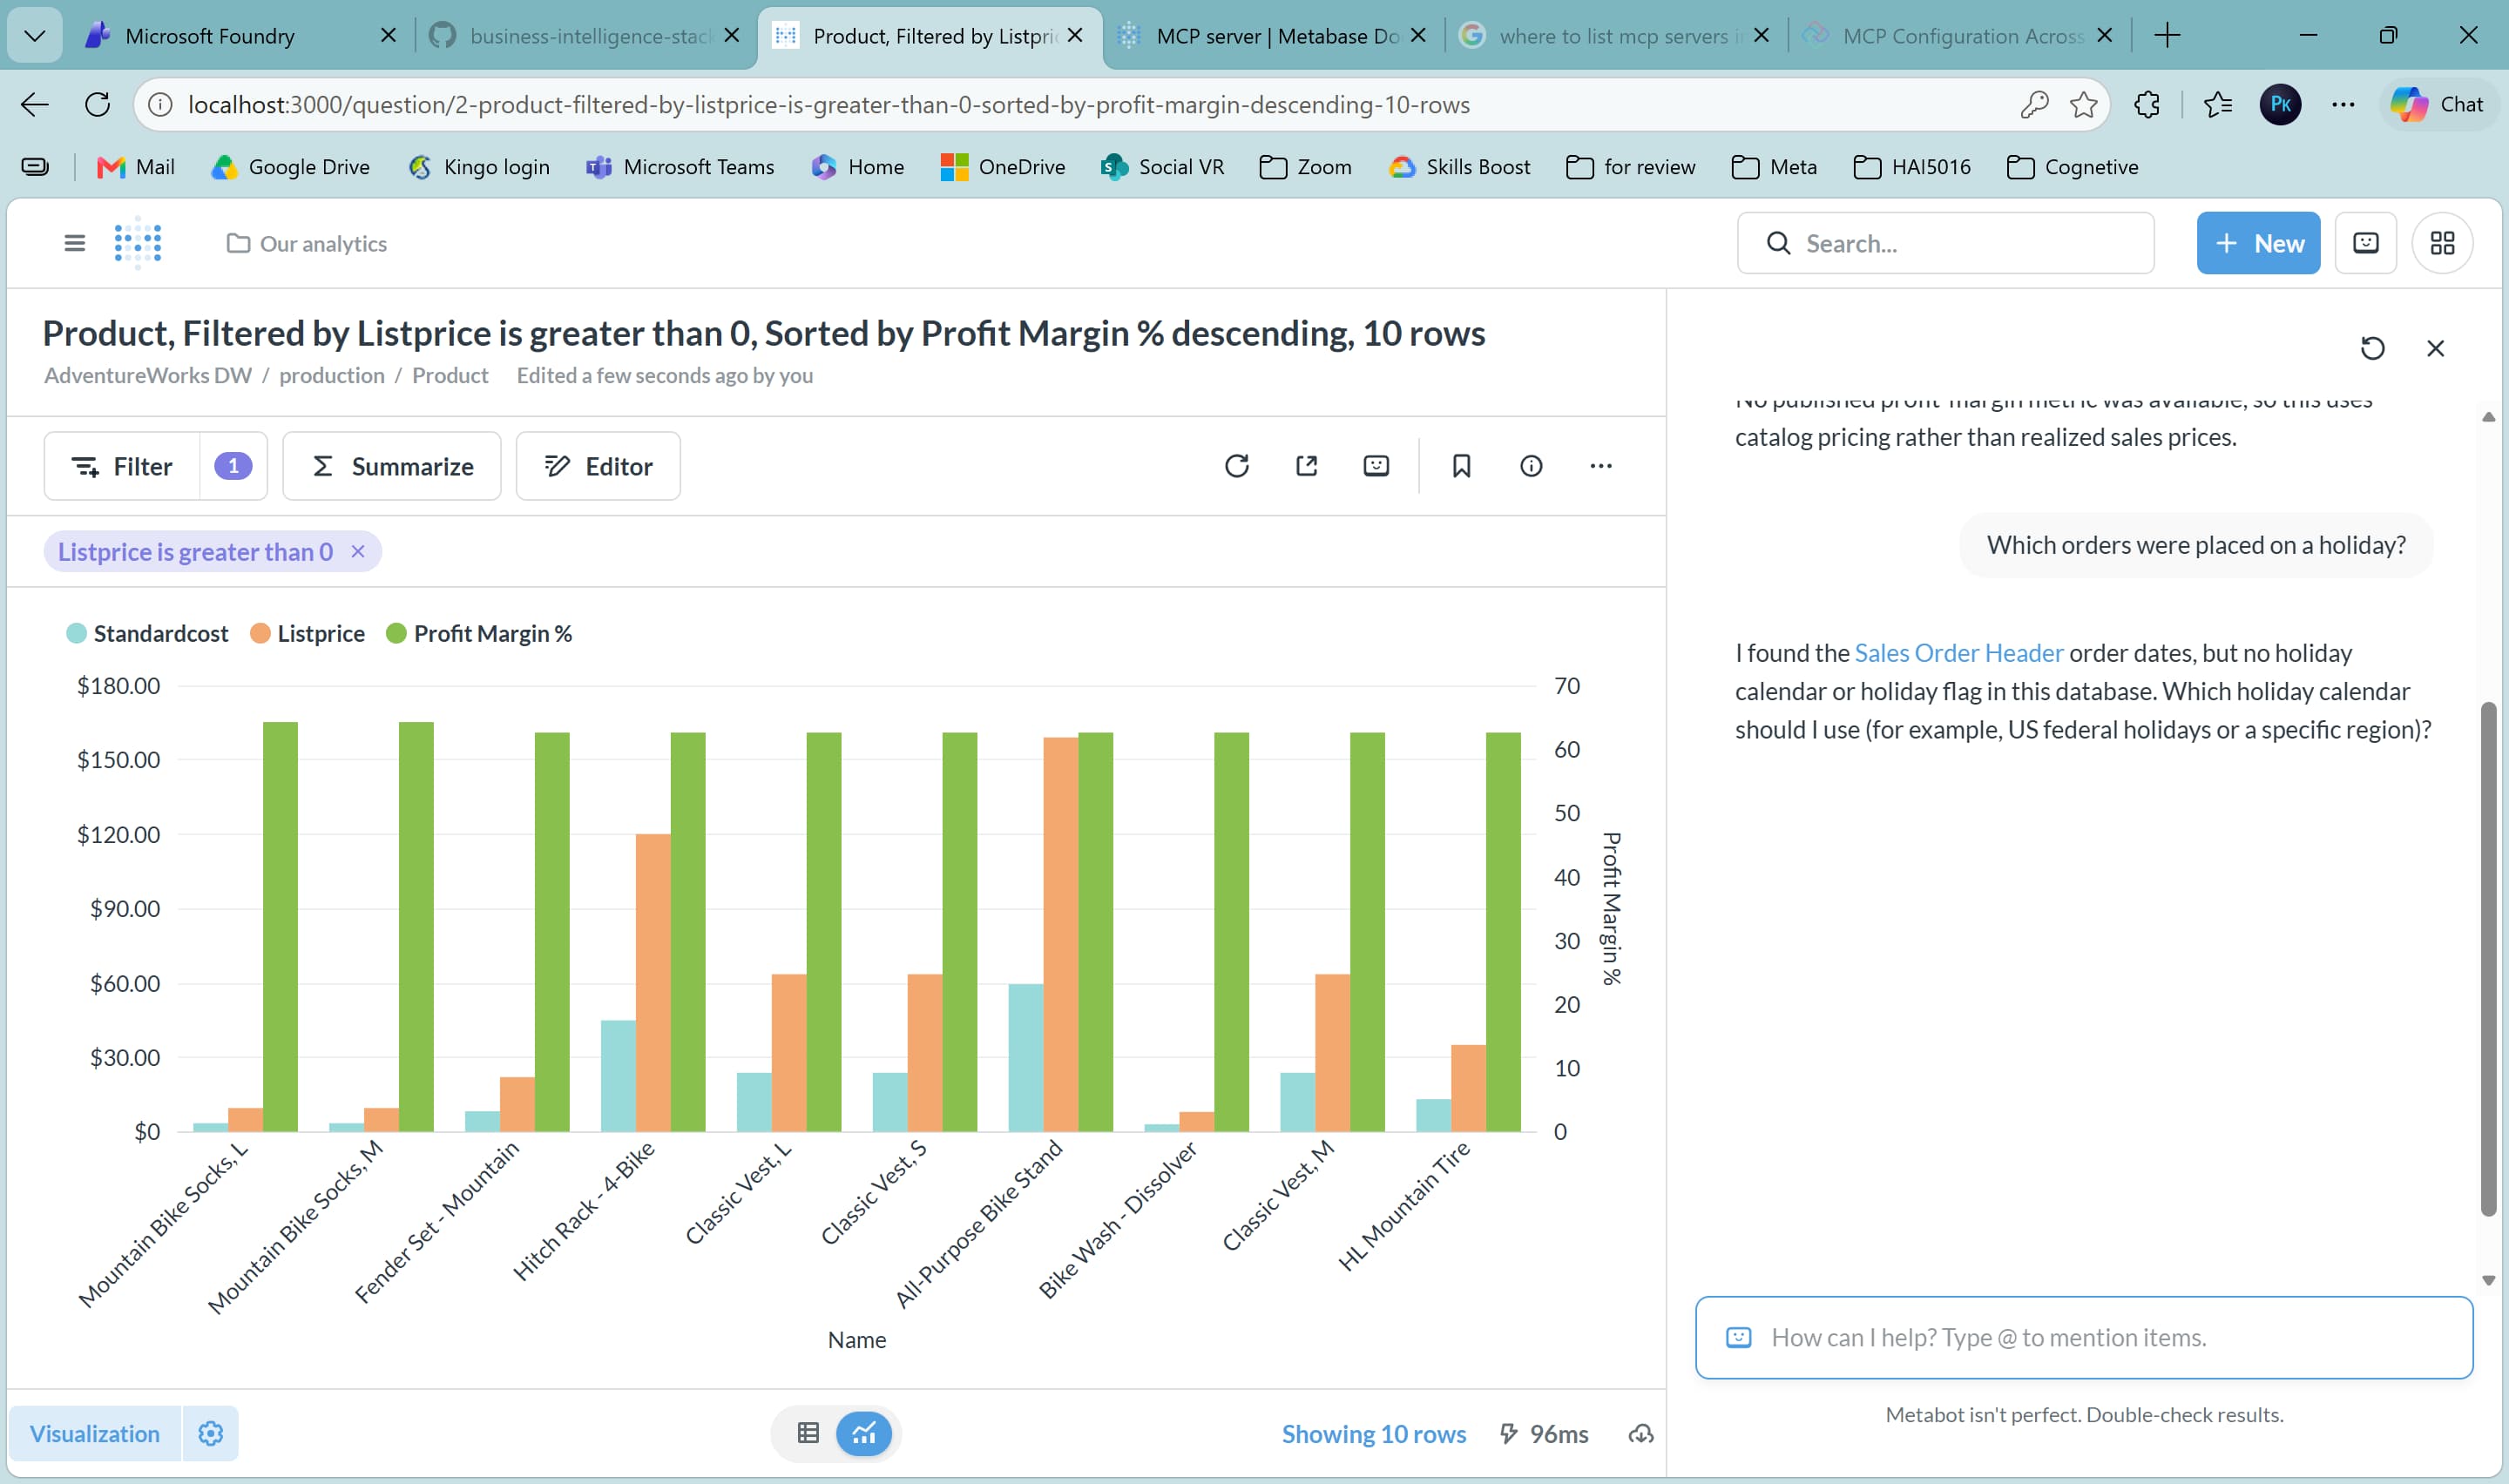 seems like Metabot does not know about holidays yet. Let’s fix that by supplementing the data in n8n.
5. Supplement the data in n8n (11:00)
Setup n8n
From your Docker Desktop dashboard, click on the n8n container port to open n8n in your browser, or go directly to http://localhost:5678. You will be prompted to create an account. For the example, I’ll go with the good old James Bond again:
- Email:
james@bond.com - First name:
James - Last name:
Bond - Password:
Shakennotstirred007
Click Next, Get Started and finally Skip to complete the setup. You can now start creating workflows in n8n.
Let’s have AI write a workflow for us (or, import the workflow from the repository)
Like with the IaC, we can also have our AI coding agent write a workflow for us. With our project folder open, we could prompt our agent with something like this:
1
2
3
4
5
6
7
8
9
10
11

Create an n8n workflow that pulls public holidays from Nager.at API into a PostgreSQL `sales_holidays` table for each country/year combination found in AdventureWorks sales data.

## Steps
1. Create `sales_holidays` table in Postgres
2. Query AdventureWorks for distinct (sales_year, country_code) pairs
3. Fetch holidays from Nager.at API for each pair
4. Upsert holidays into Postgres with conflict handling

## Connections
- PostgreSQL: `postgres:5432`, db `dwh_db`, user `bi_admin`
- Nager.at API: `https://date.nager.at/api/v3/PublicHolidays/{year}/{countryCode}`
But to save time, I have already prepared a workflow that supplements the sales data with national holiday information. You can find the workflow in the n8n folder of the repository.
- Click
Build a workfloworNew Workflowfrom the menu - In the upper right click the three dots and select
Import from file - Import the workflow from the repository. You can find the workflow in the
n8nfolder of the repository. - Select the
n8n-sales-holidays-workflow.jsonfile and clickOpen
The workflow will be imported and you can see it in the editor.
Add the database credentials to the workflow
You might have noticed that the workflow is not working yet. This is because we need to add the database credentials to the workflow.
- Click on the first
Postgresnode in the workflow - In the
Credentialssection, click onSet up credential - Fill in the following values:
- Host:
postgres - Port:
5432 - Database:
dwh_db - User:
POSTGRES_USER(from.envfile) - Password:
POSTGRES_PASSWORD(from.envfile)
- Host:
- Click
Saveto save the credentials - Click
Execute Stepto test the connection. If the connection is successful, you should see a green checkmark. - Close the node window
Run the workflow

If success, we can now run the workflow to see if it works. Click on the Execute Workflow button in the upper right corner.
If you have issues with connecting credentials to a node, go to the n8n homepage, open the flow and try again. This seems to be a bug with the latest version of n8n. If you still have issues, please let me know and I will help you out.
Explore the new data in Cloudbeaver and Metabase
Go back to your Cloudbeaver tab and refresh the dwh_db database. In the public schema, there should be a new table called sales_holidays. You can explore the data in this table to see the national holidays for each country that was found in the sales orders.
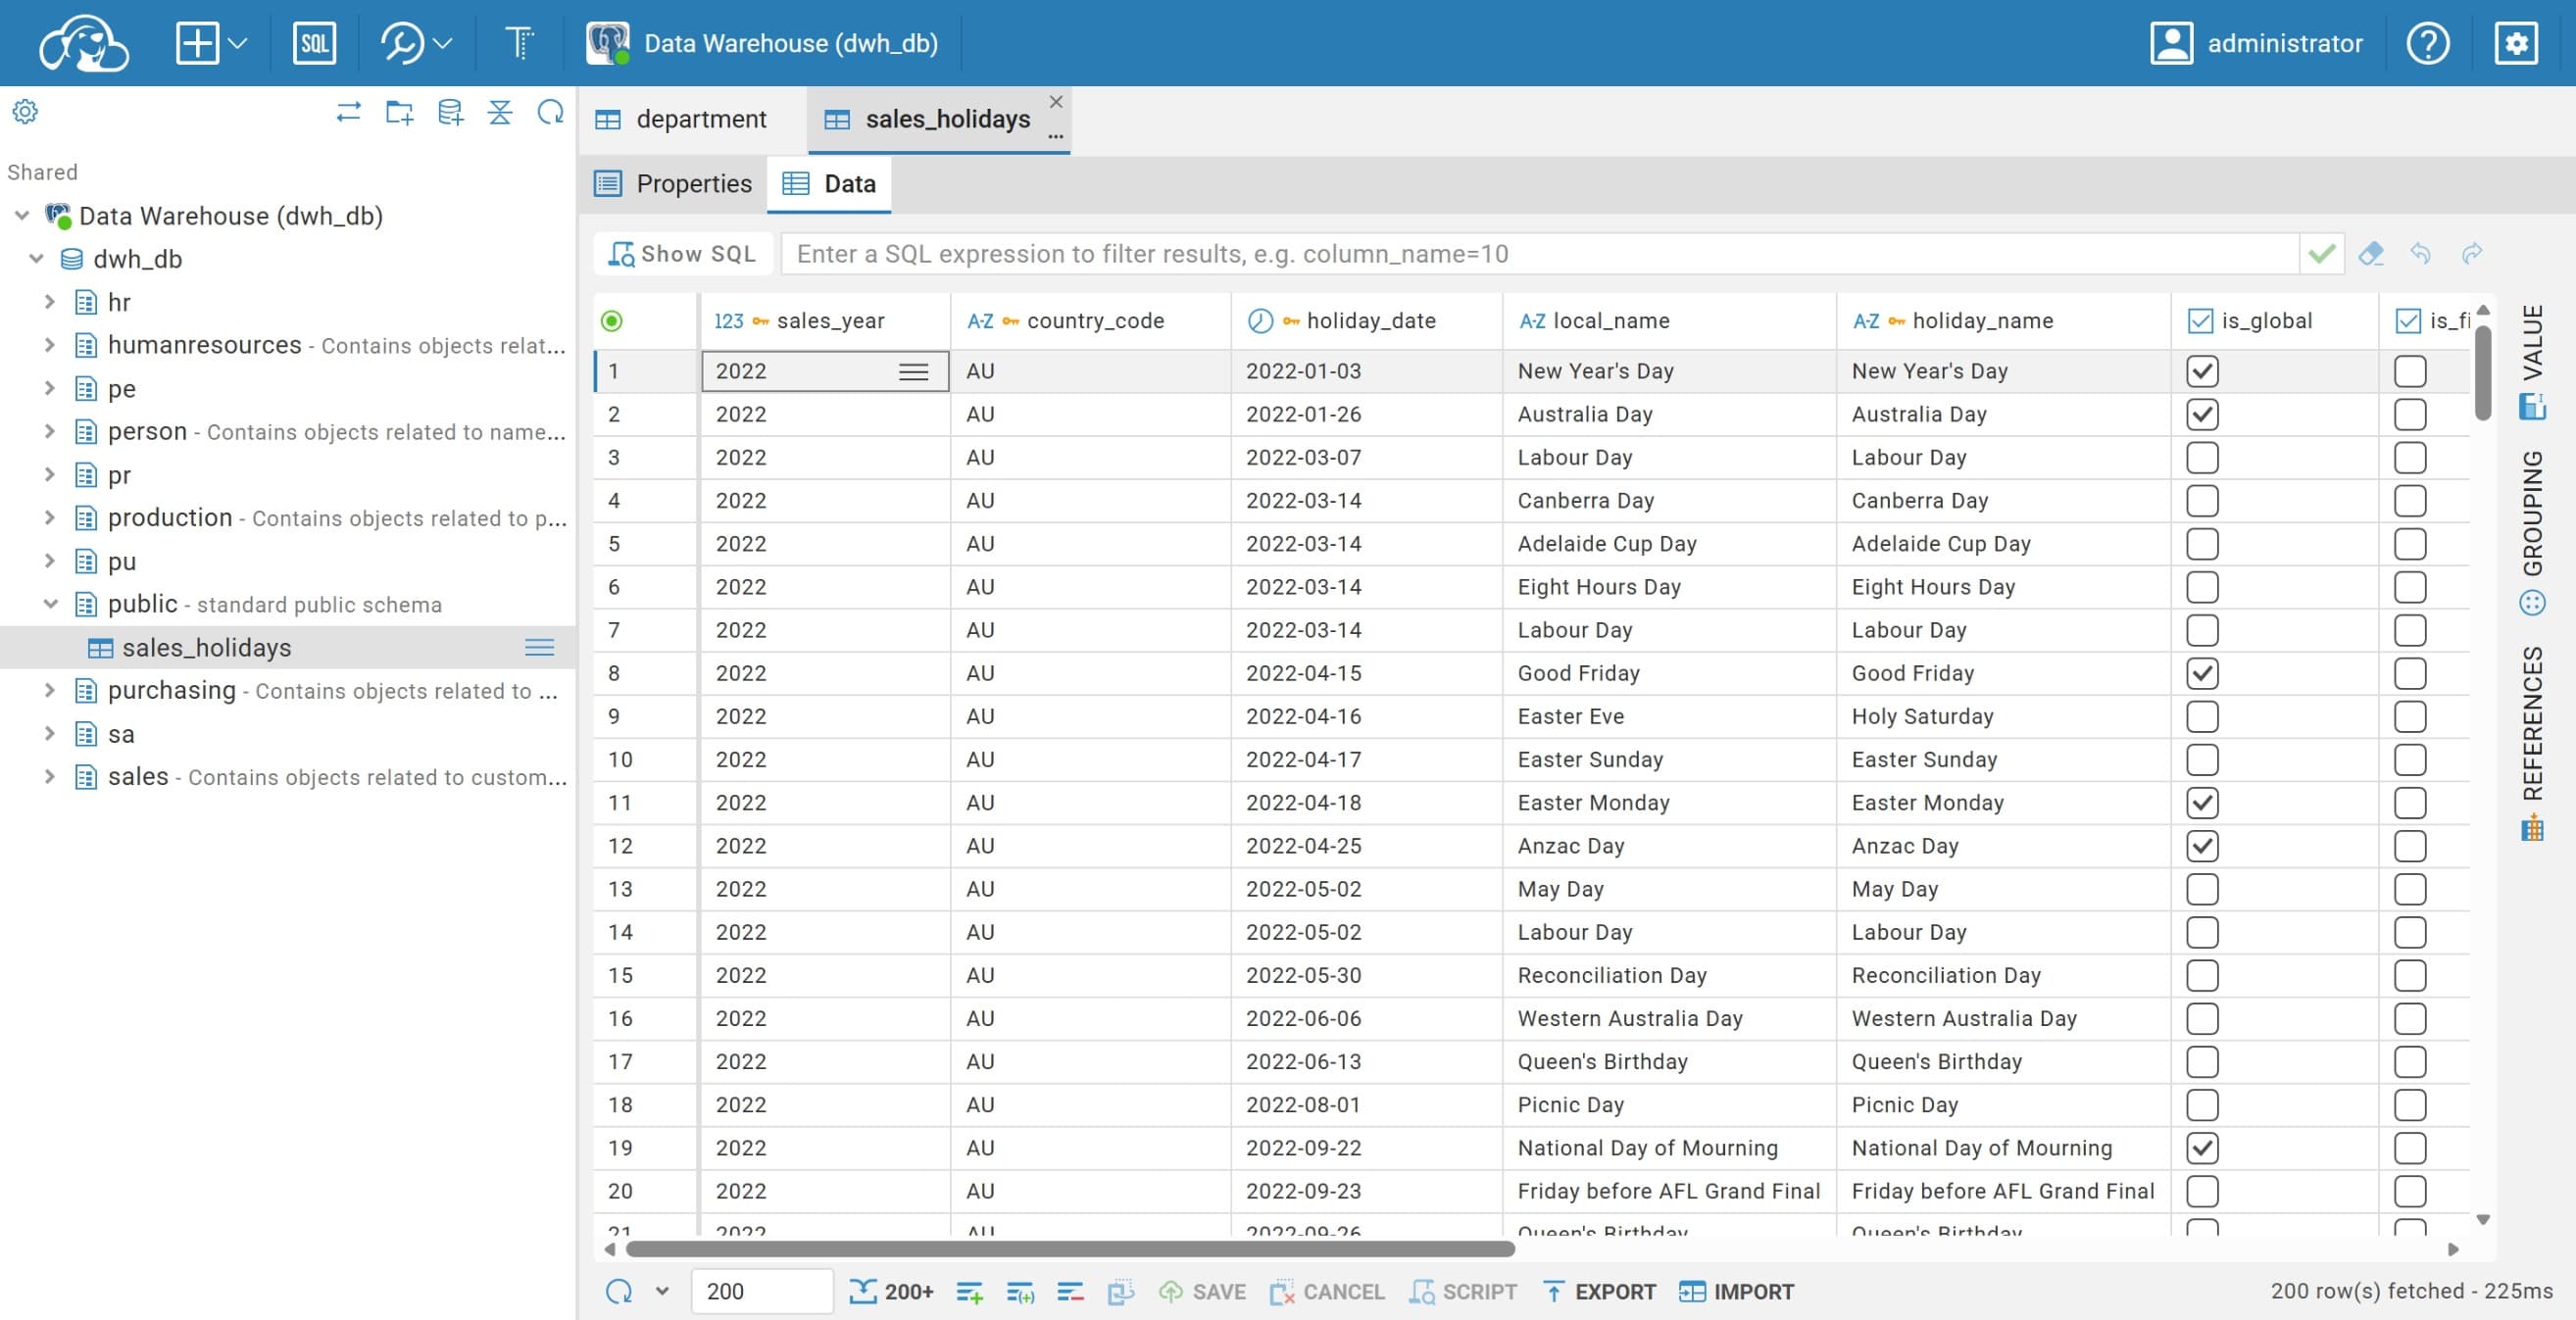
Refresh the Metabase database
In Metabase, go to the Admin panel by clicking the gear icon in the upper right corner and selecting Admin. In the top menu, click on Databases, select the AdventureWorks DW database and click Sync database schema now. This will refresh the database schema and include the new sales_holidays table.
Ask Metabot again
1
2

I have added national holiday information to the table public.sales_holidays.
Can you show me how much sales were made on a holiday?
Ask it maybe to make a new chart.
6. Next level: Metabase MCP (11:30)
You can make your AI agent interact with your Metabase instance by using the Metabase MCP (Metabase Command Protocol). This is a feature that allows you to send commands to Metabase and get responses in natural language. You can use this feature to automate tasks, create dashboards, and get insights from your data.
On https://www.metabase.com/docs/latest/ai/mcp you can read more about the Metabase MCP and how to use it. In our demonstration, I am going to add the Metabase MCP server to ChatGPT/Codex:
Add the Metabase MCP server to ChatGPT/Codex
Open Codex in your ChatGPT desktop app and go to
- Settings
- Plugins
- MCPs
- Click on
Add serverand fill in the following values:- Name:
Metabase MCP - Type: select
Streamable HTTP - URL:
http://localhost:3000/api/metabase-mcp
- Name:
- Click Save
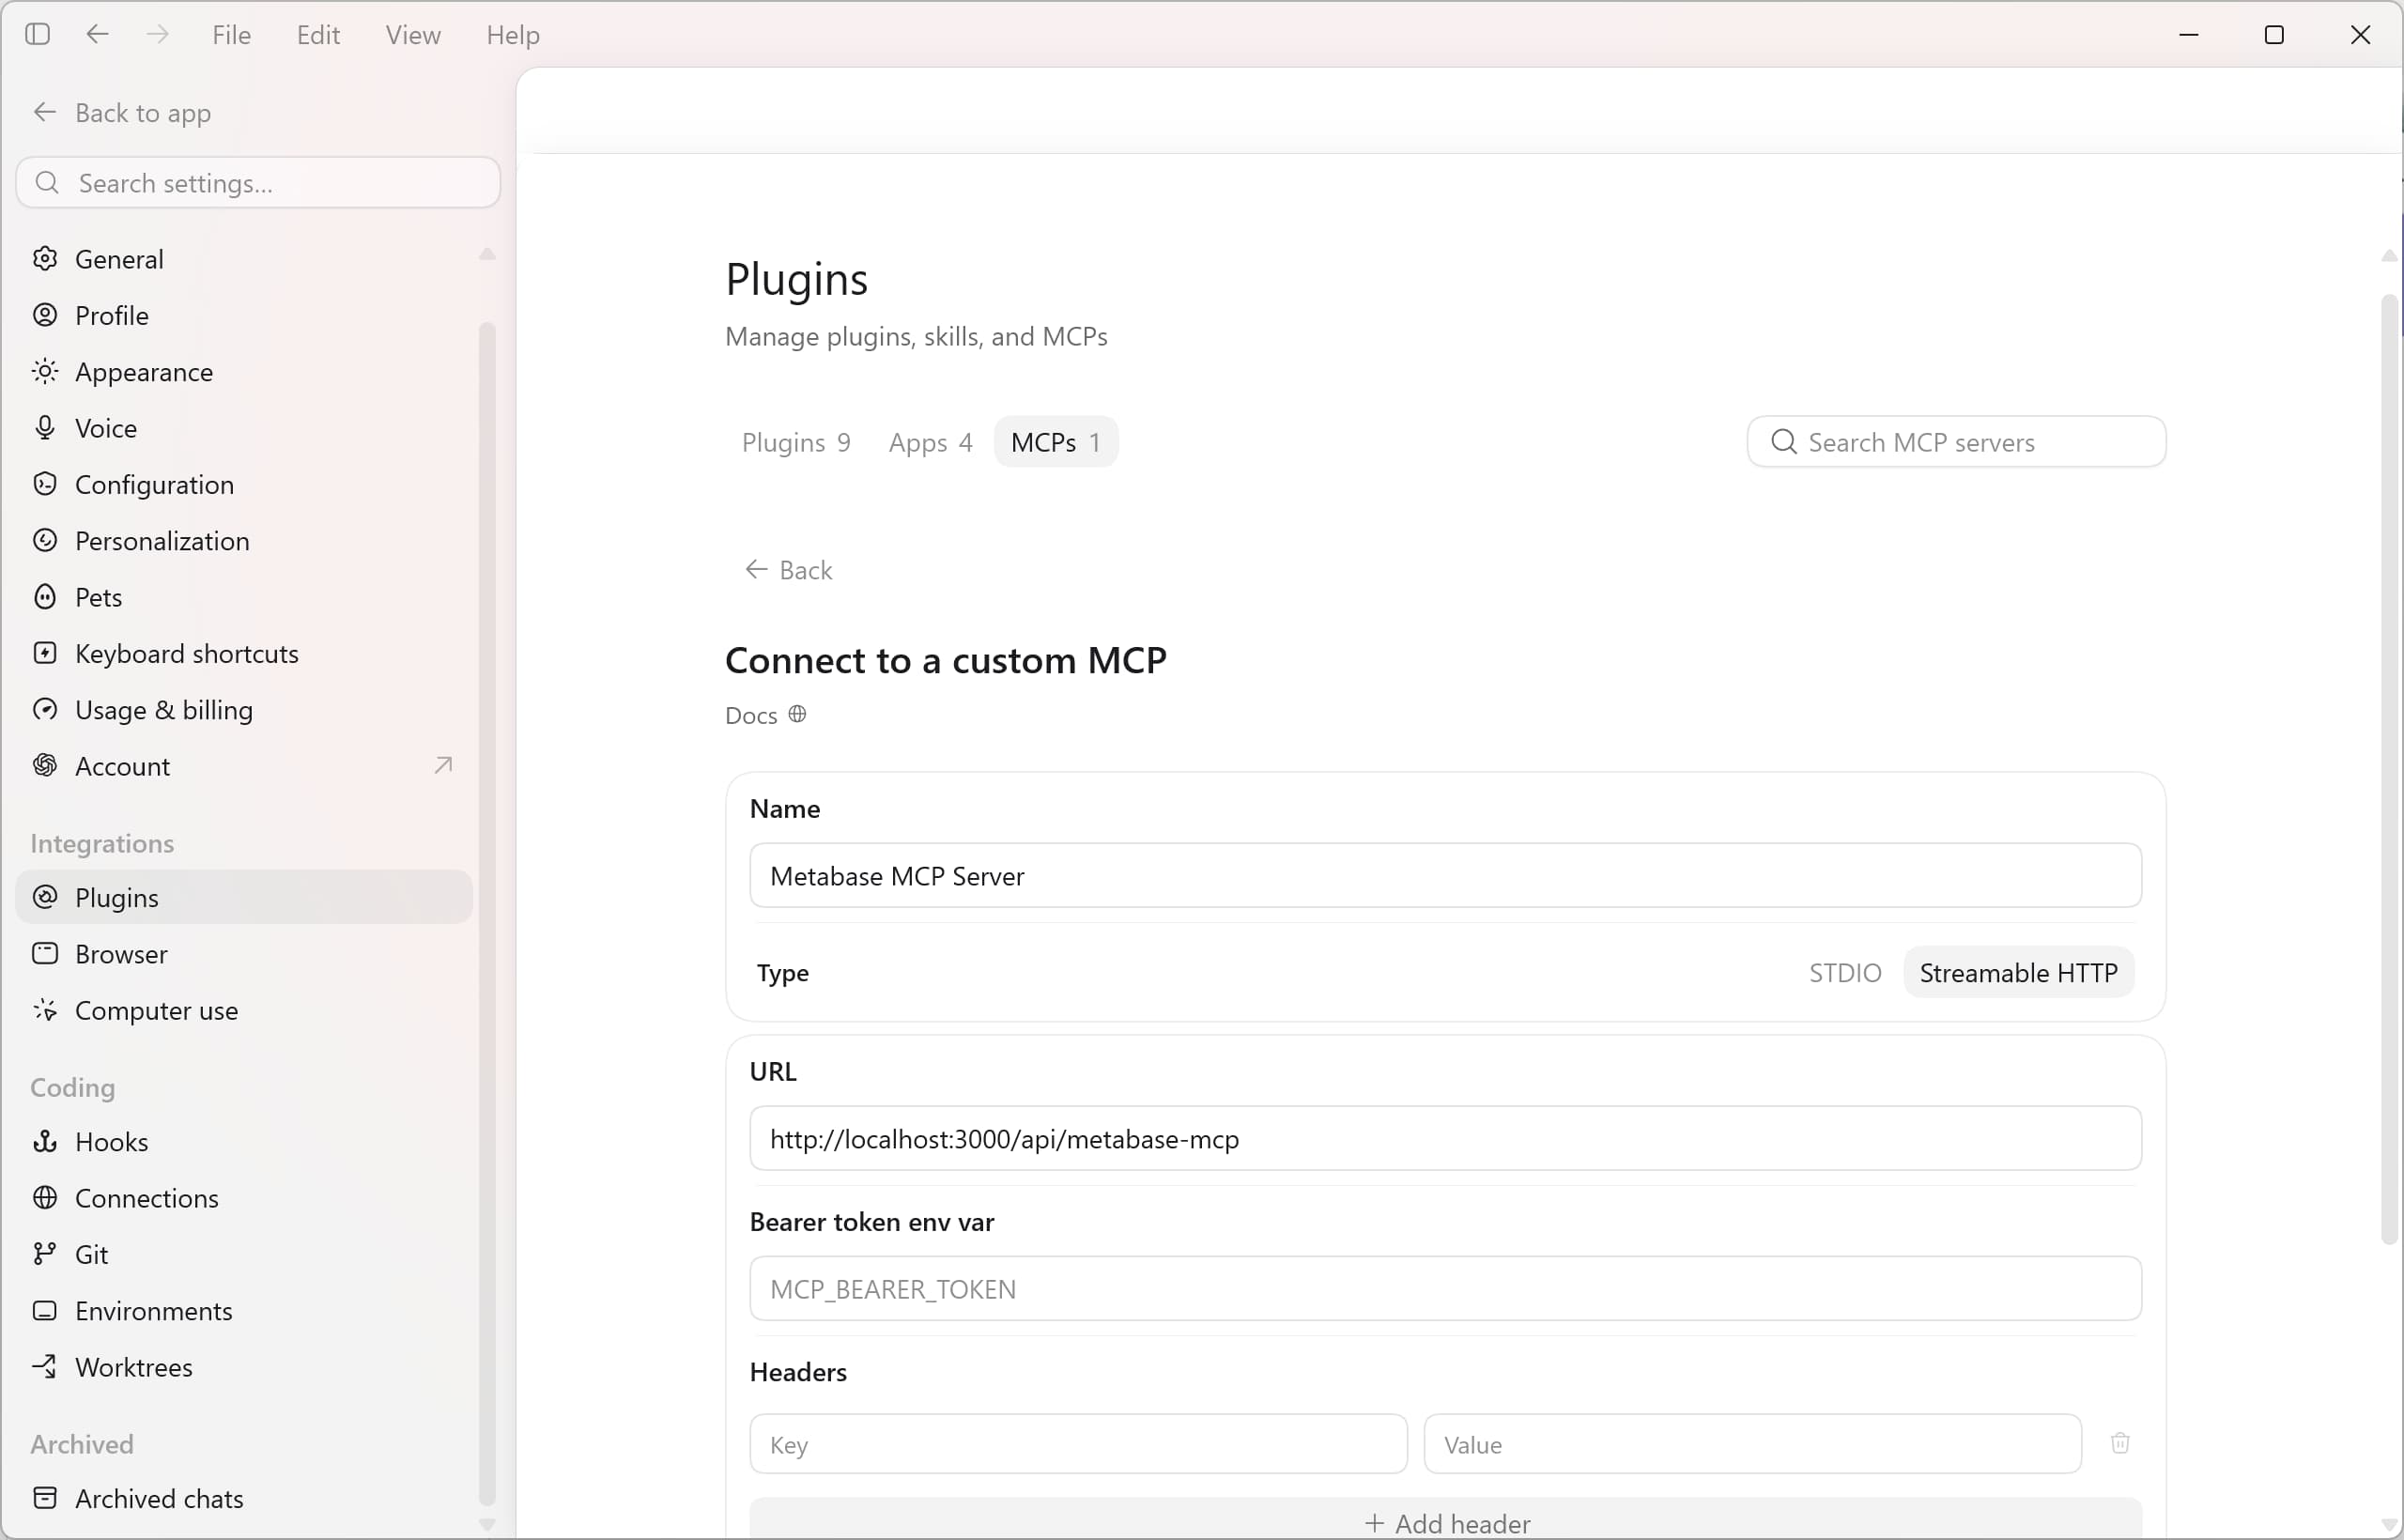
The server will show in the list and an Authenticate button will appear. Click on it to authenticate the server.
Prompt your AI coding agent to create a dashboard in Metabase
Now that we got our Metabase MCP server connected to our AI coding agent, we can ask it to create a dashboard for us:
1
2
3
4
5
6
7
8
9
10
11
12
13
14
15
16
17
18
19
20
21
22
23
24
25
26
27
28
29
30
31
32
33
34
35
36
37
38
39
40
41
42
43
44
45
46
47
48
49
50
51
52
53
54
55
56
57
58
59
60
61
62
63
64
65
66
67
68
69
70
71
72
73
74
75
76
77
78
79
80

Using the Metabase MCP server, create a dashboard named “Adventure Works Holiday Sales” in the “our analytics” collection.

Before building anything, inspect the available database schema and sample field metadata to identify the correct:

- Sales-order date
- Sales country
- Sales-volume field
- Holiday date
- Holiday name
- Holiday country code

Use the `sales_holidays` table as the holiday source. Connect each holiday to sales from the same country.

Define the holiday window as:

- “7 days before”: the seven calendar days preceding the holiday, offsets −7 through −1
- “Holiday”: the holiday date, offset 0
- “7 days after”: the seven calendar days following the holiday, offsets +1 through +7
- “15-day total”: all three periods combined

Prevent double counting when holiday windows overlap. Each sales order must be attributed to no more than one holiday. Assign it to the eligible holiday with the smallest absolute date difference. Use holiday date and holiday name as deterministic tie-breakers.

Use order-level sales volume so joining product-level sales rows cannot multiply revenue. Unless schema inspection identifies a more appropriate sales-volume field, use the order subtotal rather than line-item quantities or cumulative sales fields.

Create these saved questions and add them to the dashboard:

1. “Holiday Sales — Daily Volume (−7 to +7 Days)”
   - Line chart
   - Show daily sales volume for offsets −7 through +7
   - Include zero-value dates so every holiday displays all 15 days
   - Clearly label the offset axis and sales-volume axis

2. “National Holidays Ranked by 15-Day Sales Volume”
   - Bar chart
   - One result per country, holiday name, holiday date
   - Rank descending by complete 15-day sales volume

3. “Holiday Sales Volume — Before vs Holiday vs After”
   - Stacked or grouped bar chart
   - Compare “7 days before”, “Holiday”, and “7 days after”
   - Use clear period and sales-volume labels

4. “Top National Holidays by Country”
   - Horizontal bar chart or another clear country-comparison visualization
   - Rank holidays within each country by 15-day sales volume
   - Include an explicit within-country rank in the underlying result

5. “Holiday Sales — Before, Holiday Day, and After”
   - Full-width table card
   - One row per country, holiday name, and holiday date
   - Include these columns in this order:
     - Country
     - Holiday
     - Holiday Date
     - 7 Days Before
     - Holiday Day
     - 7 Days After
     - 15-Day Total
   - Sort primarily by 15-Day Total descending
   - Include holidays with no sales and display zero instead of null

After the dashboard is built succesful, share instructions with me to create shared dashboard filters for:

- Country
- Holiday Name
- Year

And how to connect all three dashboard filters to every compatible card. Filtering must happen after the overlap-safe holiday attribution so selecting one holiday does not reassign sales that normally belong to another overlapping holiday.

Use clear chart titles, axis labels, column names, descriptions, and currency/number formatting. Arrange the dashboard logically and make the table full-width.

Finally, verify through the Metabase MCP server that:

- The dashboard exists in the requested collection
- All five cards are present
- Each saved question is in the requested collection
- The queries execute successfully
- The overlap-prevention logic is present

Return the dashboard URL, dashboard ID, card names and IDs. Only use the Metabase MCP server, not another tool like browser.
Did your AI coding agent create the dashboard successfully?
Bonus: Cloudflare Tunnel
To make the dashboards available to your boss or team members, you can use Cloudflare Tunnel to expose the Metabase container to the internet. This way, your colleagues can access the dashboard from anywhere without having to set up a VPN or port forwarding.
- Create a token in your Cloudflare account for the tunnel. You can do this by going to the Cloudflare dashboard and selecting
Zero Trust>Networks>Tunnels & Mesh>+ Create a tunnel>Cloudflared. Follow the instructions to create a token. - Run the following command in your terminal to start the tunnel:
-
On macOS and Linux:
1
2
3

docker run -d \
--network cf_tunnel \
cloudflare/cloudflared:latest tunnel --no-autoupdate run --token <YOUR_TOKEN>
-
On Windows:
1
2
3

docker run -d `
--network cf_tunnel `
cloudflare/cloudflared:latest tunnel --no-autoupdate run --token <YOUR_TOKEN>
-
After the tunnel is running you should be able to see it in your Cloudflare dashboard. Add application route to the tunnel for Metabase. You can do this by going to the Tunnels section in your Cloudflare dashboard, selecting the tunnel you just created, and clicking on Add a published application route. Fill in the following values:
- Application name:
Metabase - Application domain:
metabase.<YOUR_DOMAIN>.com Service:
http://metabase:3000- In Metabase, change your site URL to the new domain. You can do this by going to the
Adminpanel, selectingSettings>Generaland changing theSite URLtohttps://metabase.<YOUR_DOMAIN>.com. ClickSaveto save the changes.
If you cannot change the site URL in the admin panel, you can also change it in the .env file by adding the following line:
1

MB_SITE_URL=https://metabase.<YOUR_DOMAIN>.com
And then restart the Metabase container by running the following command in your terminal:
1

docker-compose restart metabase
Now you can access the Metabase dashboard from anywhere by going to https://metabase.<YOUR_DOMAIN>.com. You can also share this link with your boss or team members.
In my case, the link is
https://metabase.camphouse.me. You can also use a subdomain of your choice, as long as it is connected to your Cloudflare account.
Create a Metabase account for your boss or team members
In Metabase click the menu in the upper right corner and select Admin. In the top menu, click on People and then click on Invite someone. Fill in the details for your boss or team member and click Create. Because no mailserver is configured, Metabase will show the password for the new user.
Can you login into Metabase with the new user credentials?
7. Shut down your stack
When you are done with the workshop, you can shut down the stack by going to the project’s folder and running the following command in your terminal:
1

docker-compose down
Remove the data
If you’re not planning on using the stack for again, you can also remove the data by running the following command:
1

docker-compose down -v
References
- AdventureWorks sample data: https://github.com/lorint/AdventureWorks-for-Postgres
- Cloudflare tunnels: https://developers.cloudflare.com/cloudflare-one/networks/connectors/cloudflare-tunnel/
- cloudbeaver: https://github.com/dbeaver/cloudbeaver/
- n8n: https://n8n.io/
- Metabase: https://www.metabase.com/
- PostgreSQL: https://www.postgresql.org/