[GPT5137] The AI assisted BI Kit

Let’s take a little break from Power BI. In today’s hands-on session, we’ll use PostgreSQL, CloudBeaver, and Metabase to explore sales data, ask AI business questions, and investigate how shared metrics and definitions affect the answers.
I used my favorite AI buddy, Codex, to prepare the Infrastructure as Code (IaC) files for us. These files describe the services Docker will run on your laptop, so we can start with the same environment.
Disclaimer: This blog provides instructions and resources for the workshop part of my lectures. It is not a replacement for attending class; it may not include some critical steps and the foundational background of the techniques and methodologies used. The information may become outdated over time as I do not update the instructions after class.
Before you begin
You will need Docker Desktop installed, a browser, and access to the materials on iCampus. We will share the usernames and passwords during class. For the AI exercises, have an OpenRouter API key ready; we will cover access and model selection in class. The optional MCP exercise also requires Claude Code or the Codex CLI installed and signed in on your laptop.
| Tool | Role in this session |
|---|---|
| PostgreSQL | Acts like today’s data warehouse and stores our sample sales data |
| CloudBeaver | Lets us inspect database tables and their contents. |
| Metabase | Lets us build questions, metrics, and dashboards, and explore data with AI. |
1. Start Docker Desktop
Before we can spin up our IaC stack, we need to make sure that Docker Desktop is running on your laptop. Open Docker Desktop and wait for it to start. This may take a few minutes, depending on your system.
Check if Docker Desktop is running by looking for the Docker icon in your system tray (Windows) or menu bar (Mac).
2. Download the IaC files
On our iCampus course materials under Session 5 you will find a bi-stack.zip file containing the IaC files. Download this file to your local machine and extract its contents to a convenient location.
3. Spin up the IaC stack
Open the folder where you extracted the IaC files in your terminal. One way to do this is
Open the extracted folder in a terminal
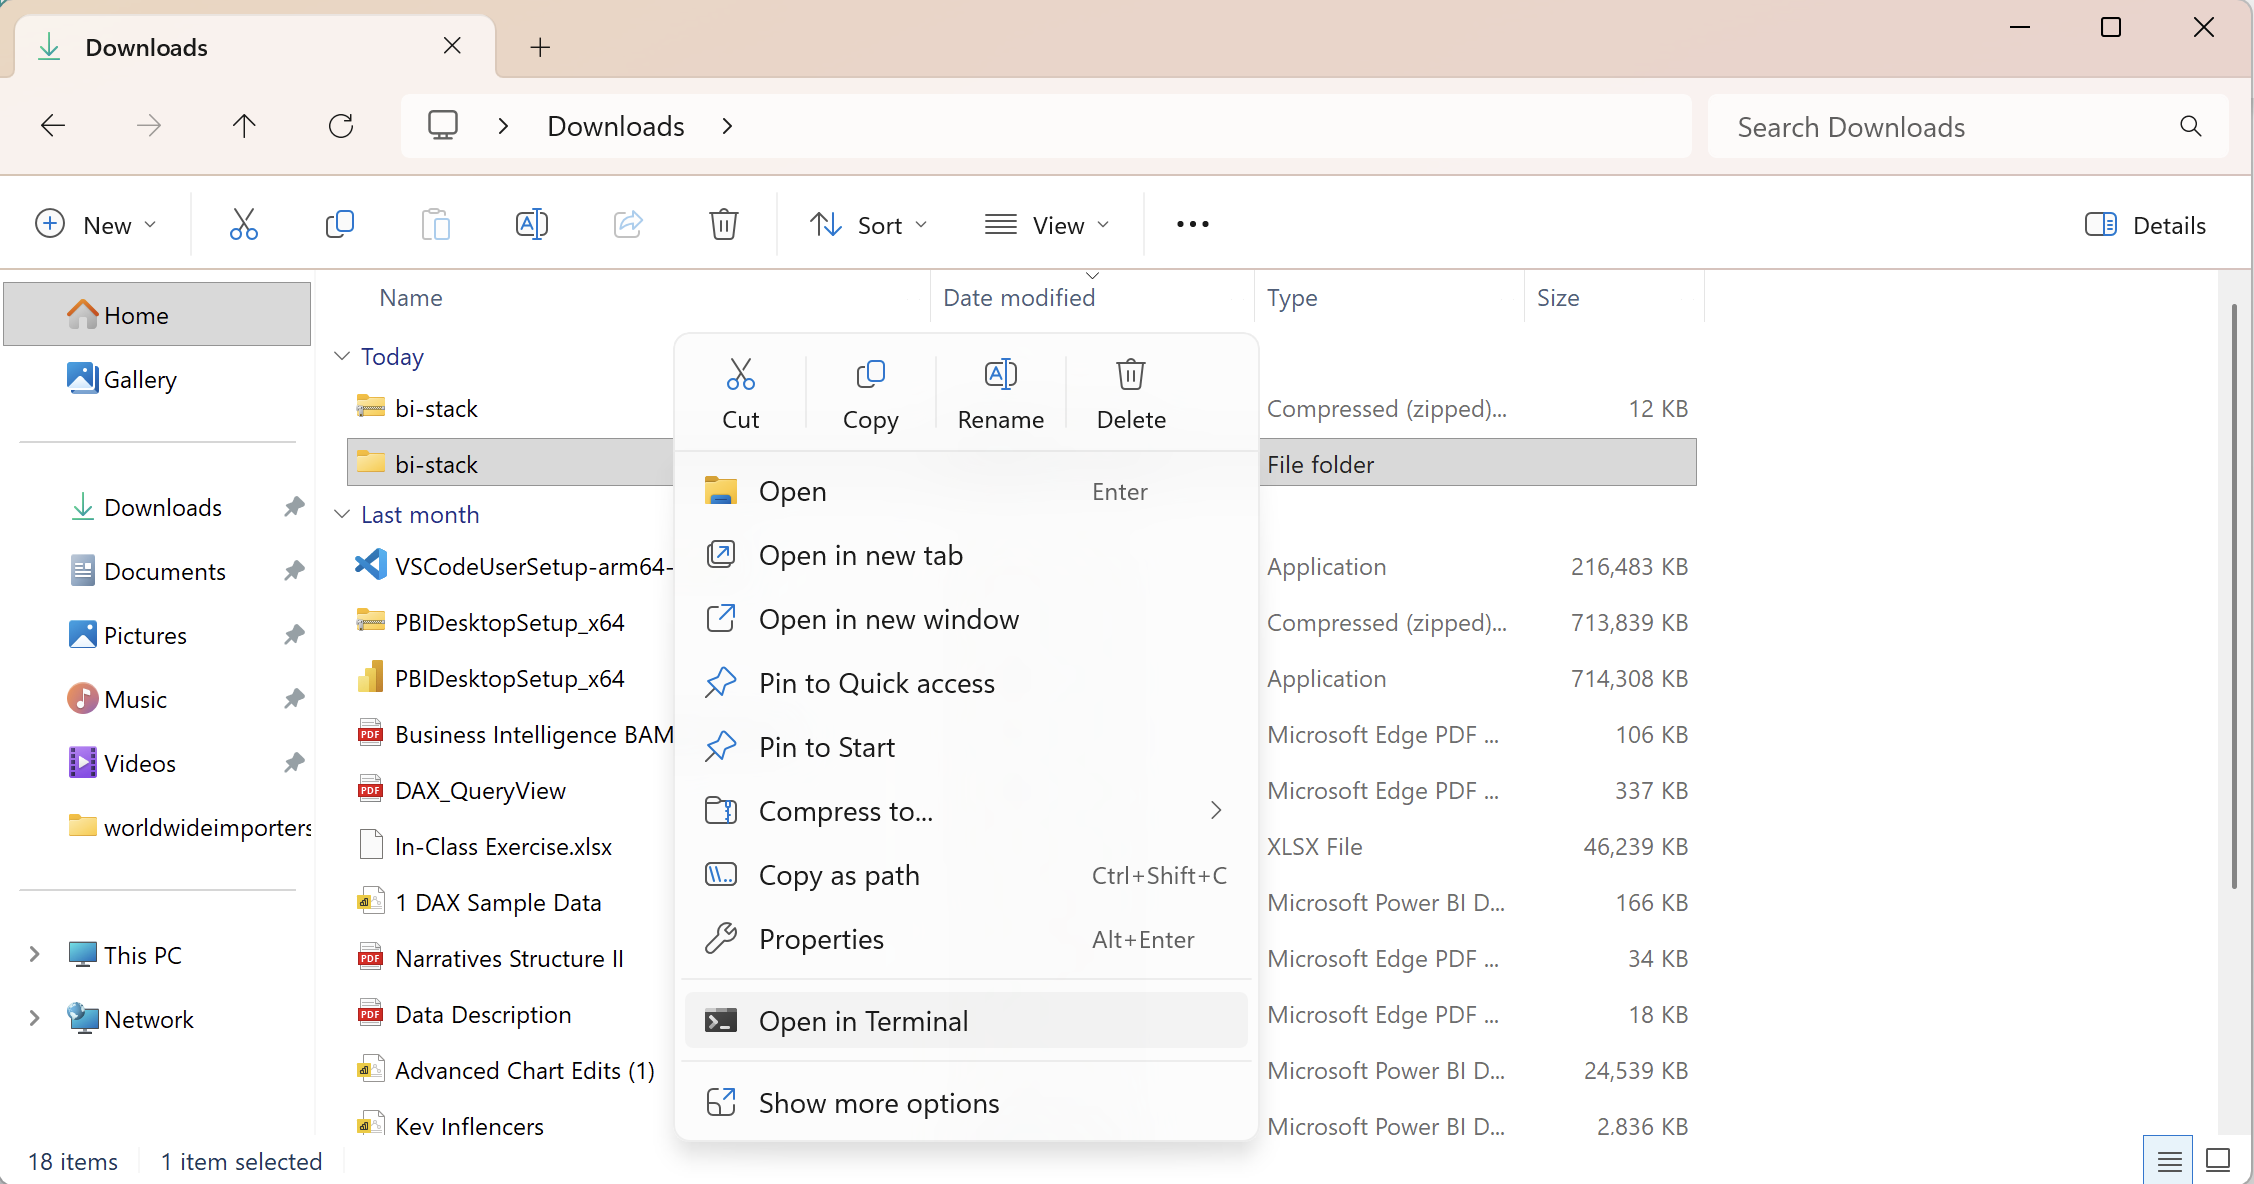
On Windows:
- Open File Explorer and navigate to the folder where you extracted the IaC files.
- Right click on the folder where you extracted the IaC files and select “Open in Terminal”
- Alternatively, click on the address bar, type
cmd, and press Enter. This will open a terminal in the current folder.
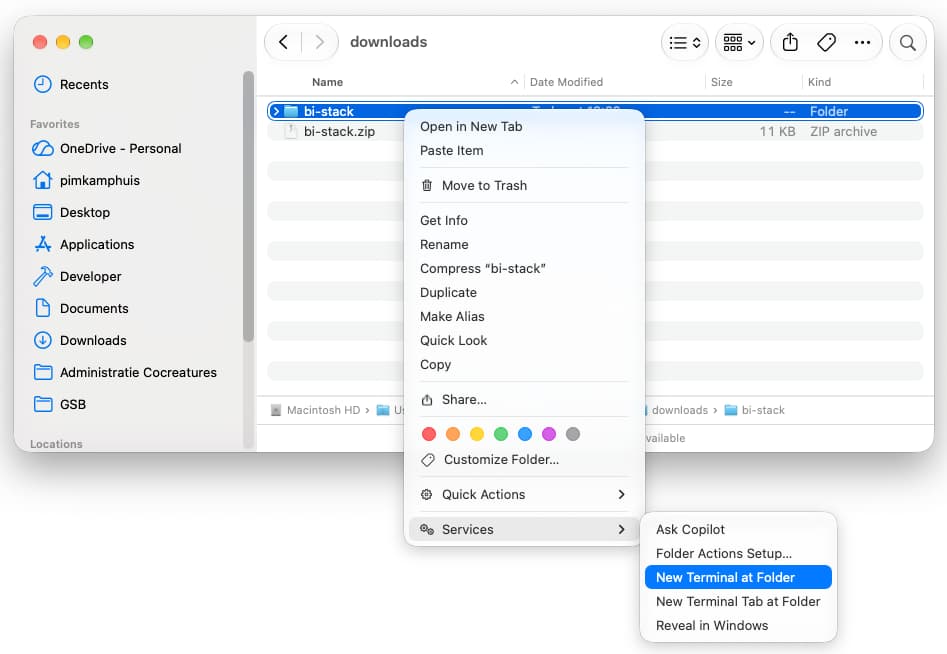
On macOS or Linux:
- Open Finder and navigate to the folder where you extracted the IaC files.
-
Right click on the folder and select “Services” -> “New Terminal at Folder” (or similar option depending on your macOS version).
Alternatively, open a terminal and use the
cdcommand to navigate to the folder where you extracted the IaC files
-
Launch the IaC stack with Docker Compose
Once you have the correct folder open in your terminal, run the following command to spin up the IaC stack:
1

docker compose up -d
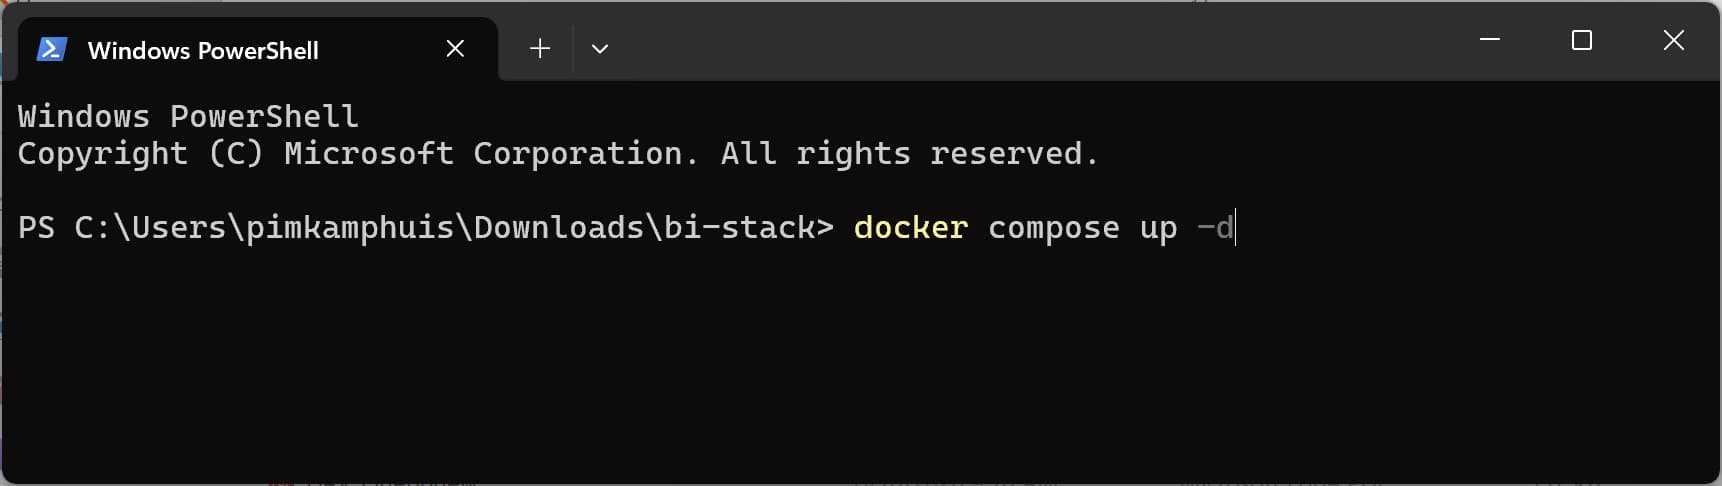
This will download the necessary Docker images and start the containers for Postgres, Metabase and n8n. This may take a few minutes, depending on your internet connection and system performance.
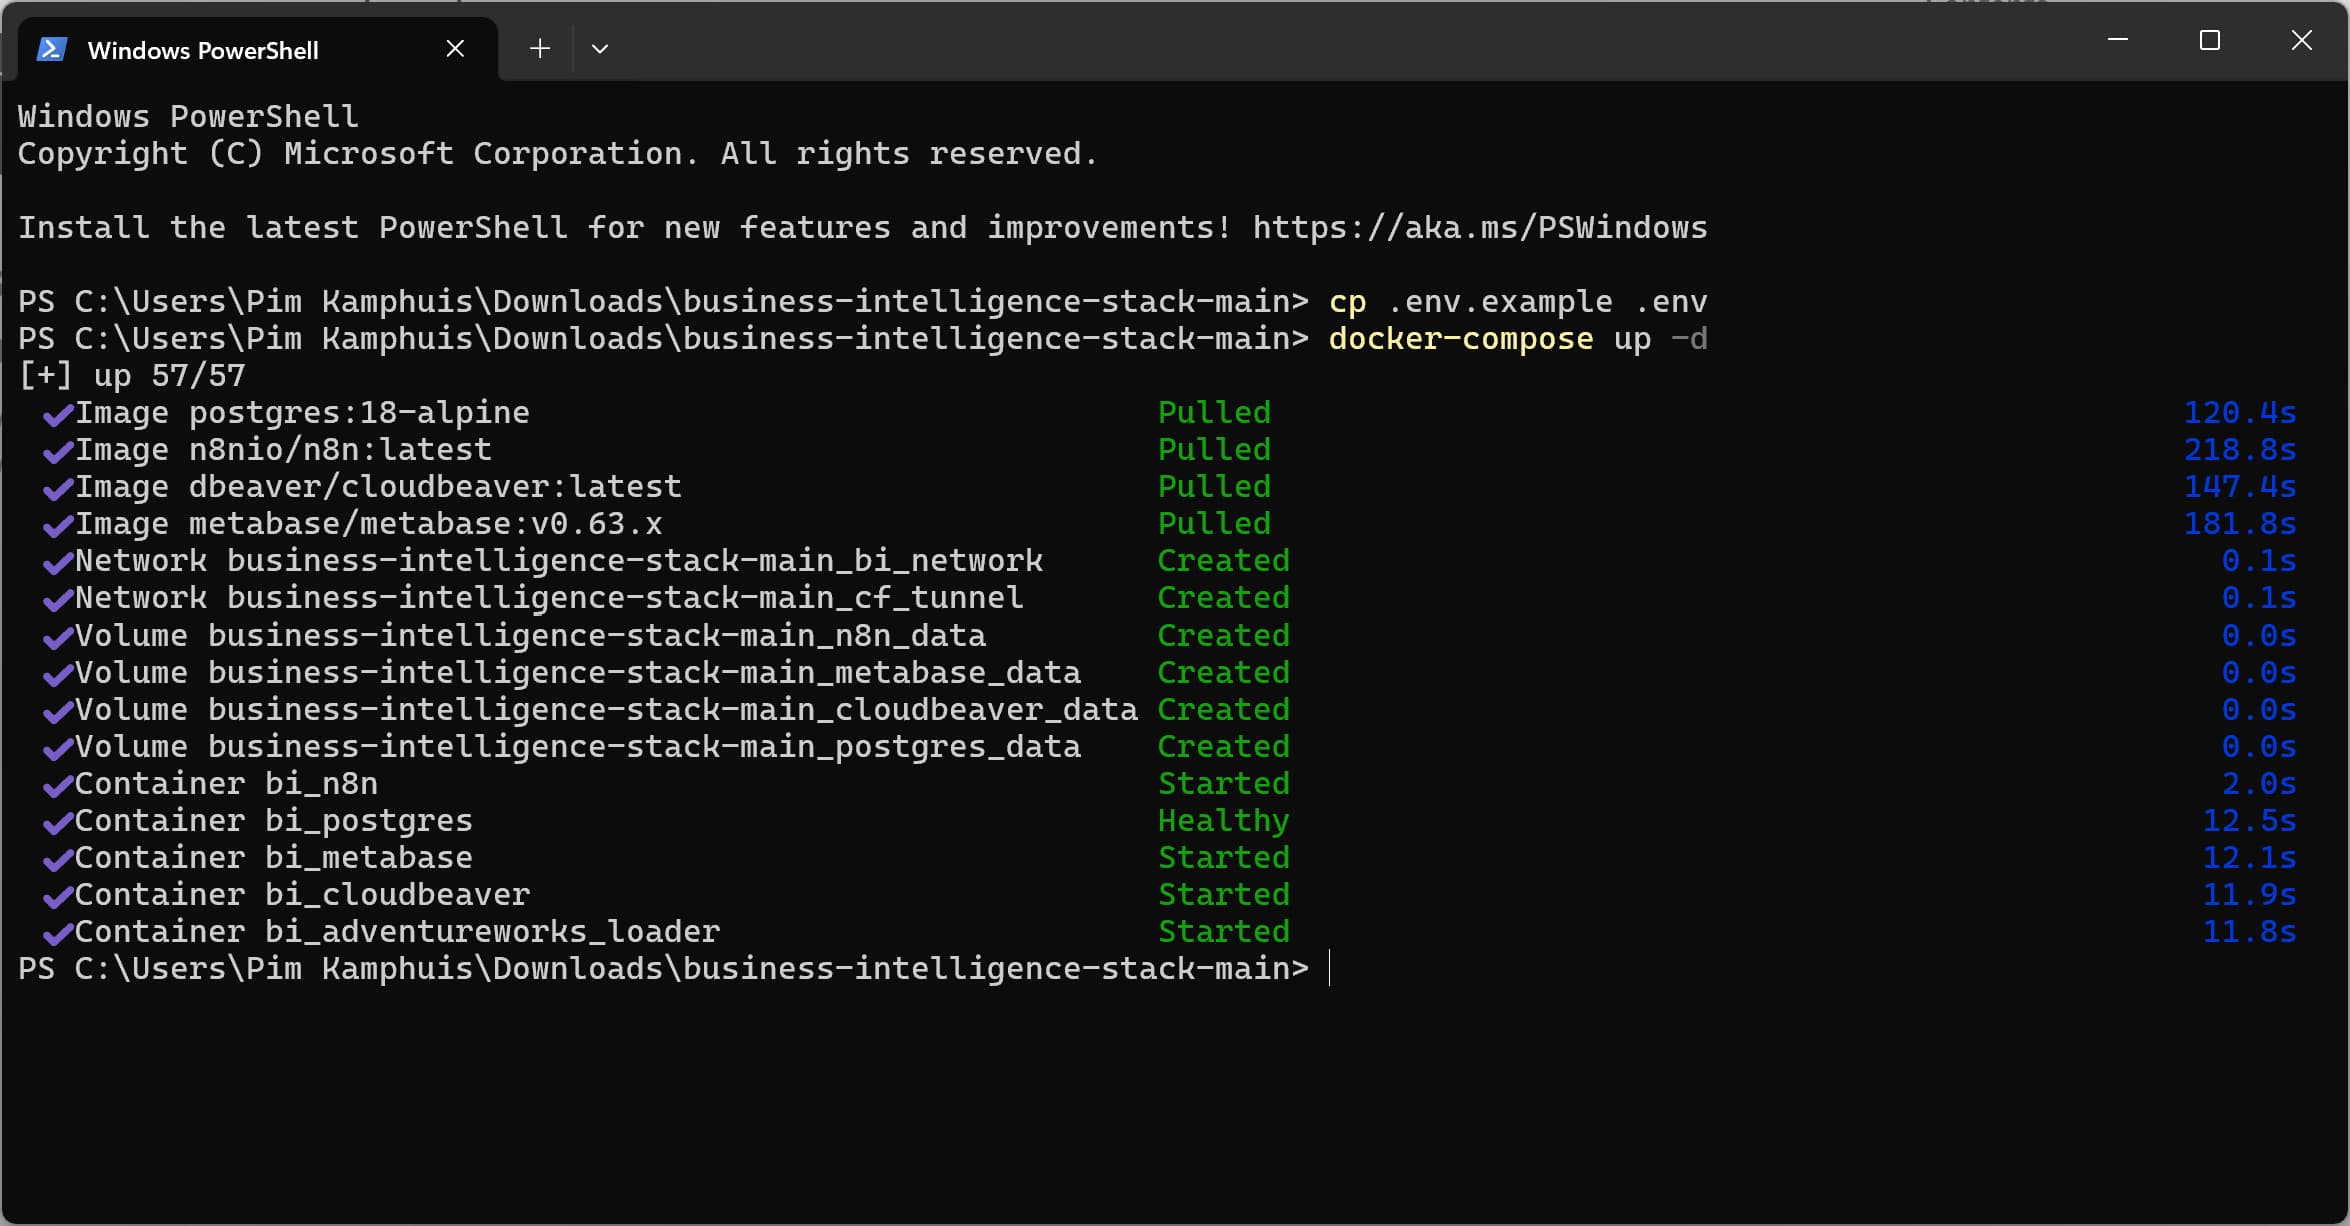
Do not forget to shut down your stack after class is finished. See instructions in section 10 for details.
4. Explore the stack
You can now explore the stack by open the Docker Desktop dashboard and checking the containers that are running. You should see the following containers:
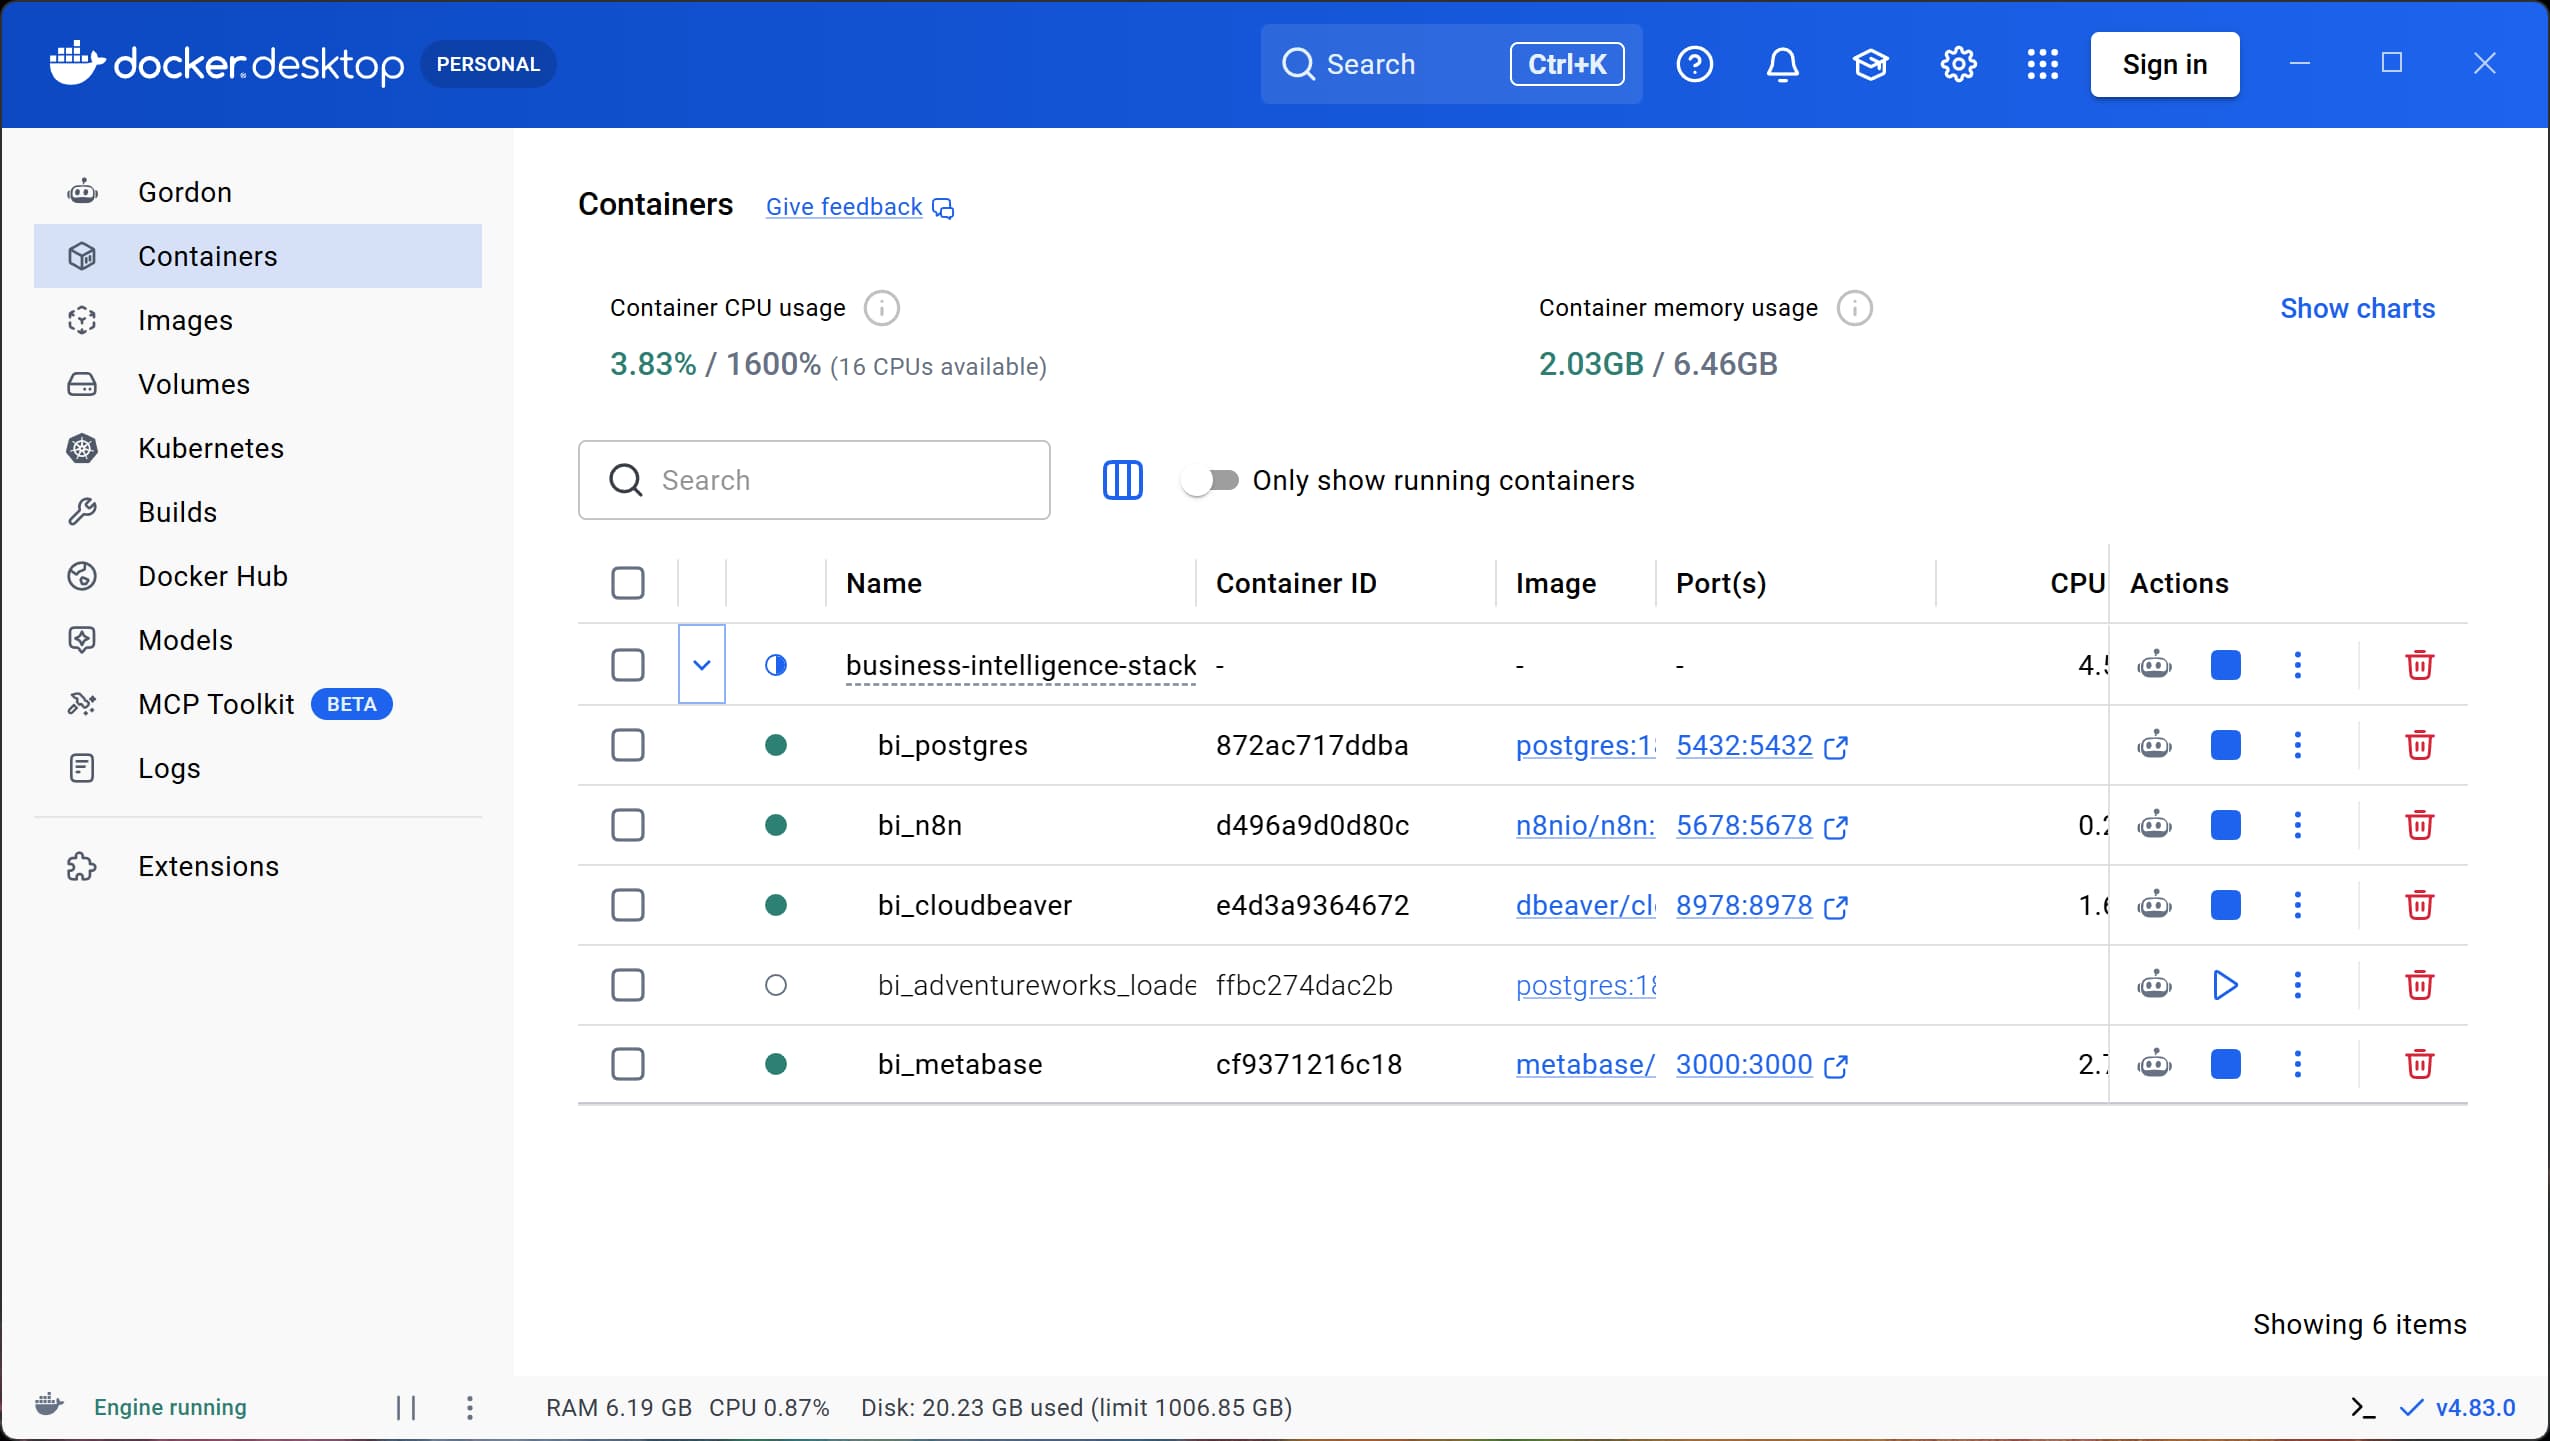
The applications in the stack can be accessed through the following URLs:
- Cloudbeaver: http://localhost:8978
- Metabase: http://localhost:3000
n8n: http://localhost:5678
You may see containers called
bi_metabase_setup,bi_saas_loaderandbi_adventureworks_loaderlisted and not running. These are one-time containers that were used to load the AdventureWorks database into the Postgres container and set-up Metabase for your use. You can ignore it for now.
5. Add and explore the database in Cloudbeaver
- Open Cloudbeaver in your browser: http://localhost:8978
- In the upper right corner click the gear icon to login with the username and password from the lecture slides
You can see the postgres database server is already added. We still need to add the database credentials to connect to the database. We can use the same username and password from the lecture slides.
- Click on the ‘Data Warehouse (dwh_db)` database
- A Database Authentication window will pop up
- Fill in the same credentials as shared before class
-
Check the box
Don't ask again during the sessionand clickLoginI recommend to set the
Connection viewtoSimple. You can do this by right-clicking on the Data Warehouse (dwh_db) server and selectingConnection view->Simple. - Explore the database and its imported schemas and tables from the AdventureWorks database.
- Find the
SalesOrderHeaderandSalesOrderDetailtable - Explore the columns and data within these tables, compare the granularity and relationships between them
- Find the
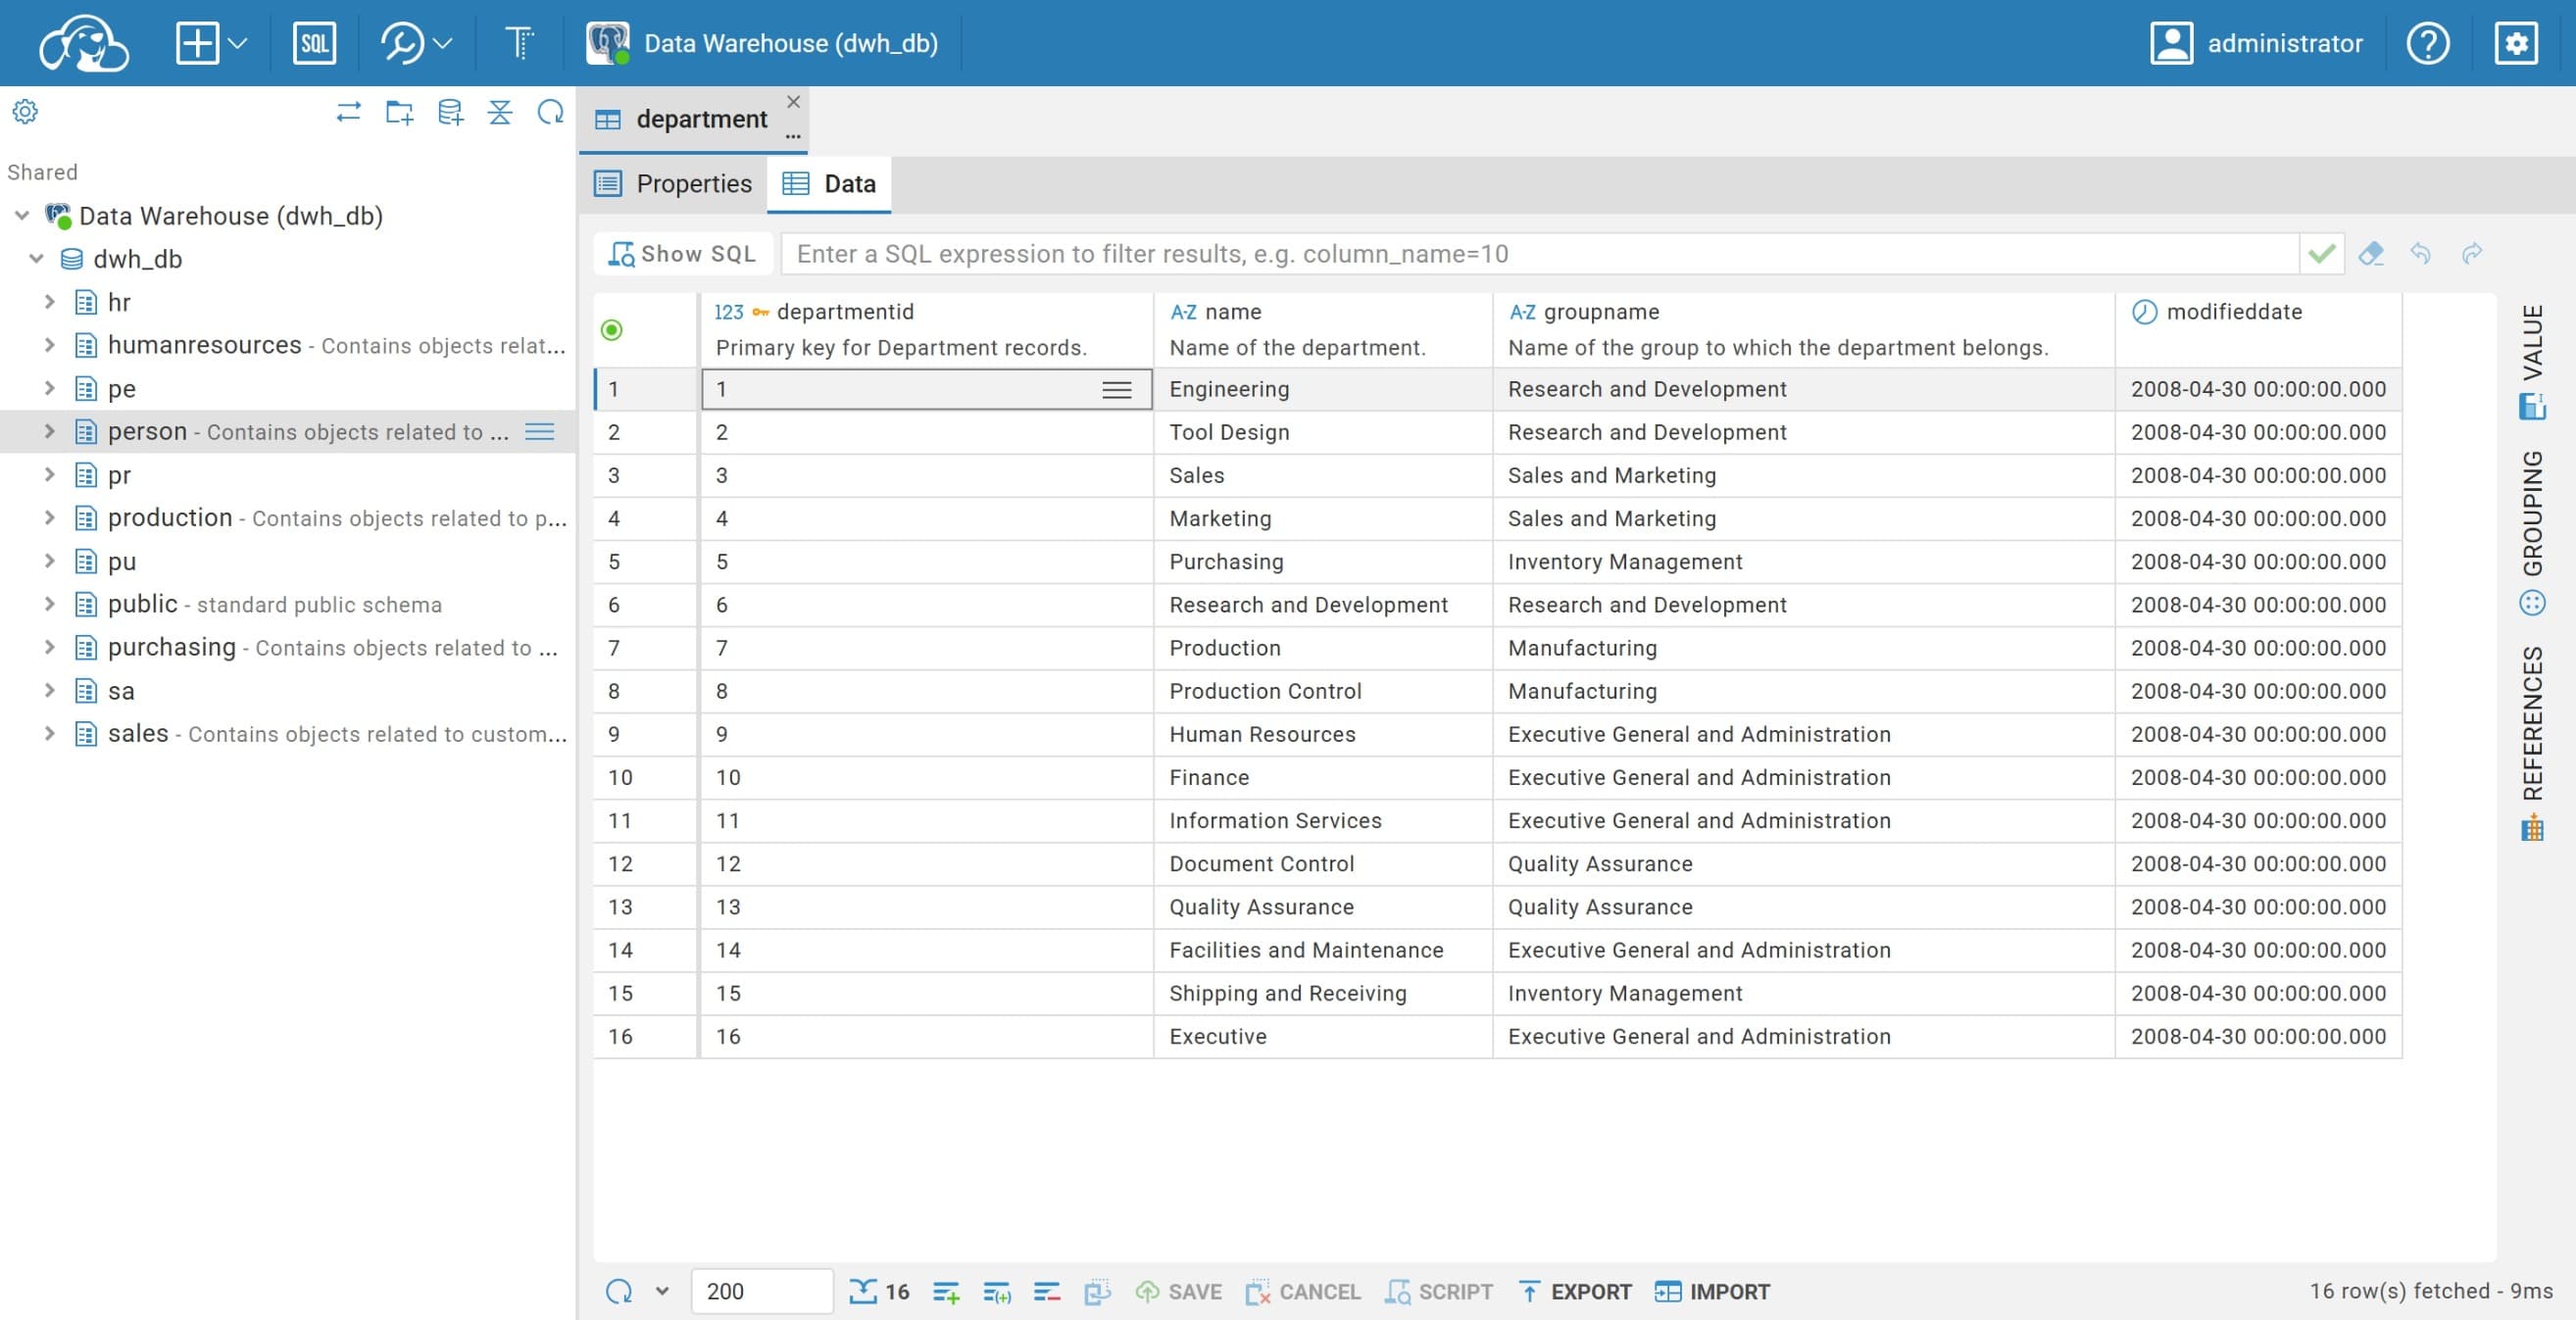
Don’t close the Cloudbeaver tab yet, we will use it later to explore the database and its tables. Next, we will add the database to Metabase so we can create queries and dashboards.
6. Explore the database in Metabase
Let’s have a look at how to explore the database from another perspective using Metabase.
- Click the Metabase container port in Docker desktop, or
- go to http://localhost:3000
- Login with the email and password from the lecture slides
You may be greeted with some suggestions for data exploration. For example, you can find some quick insights about Vsalesperson
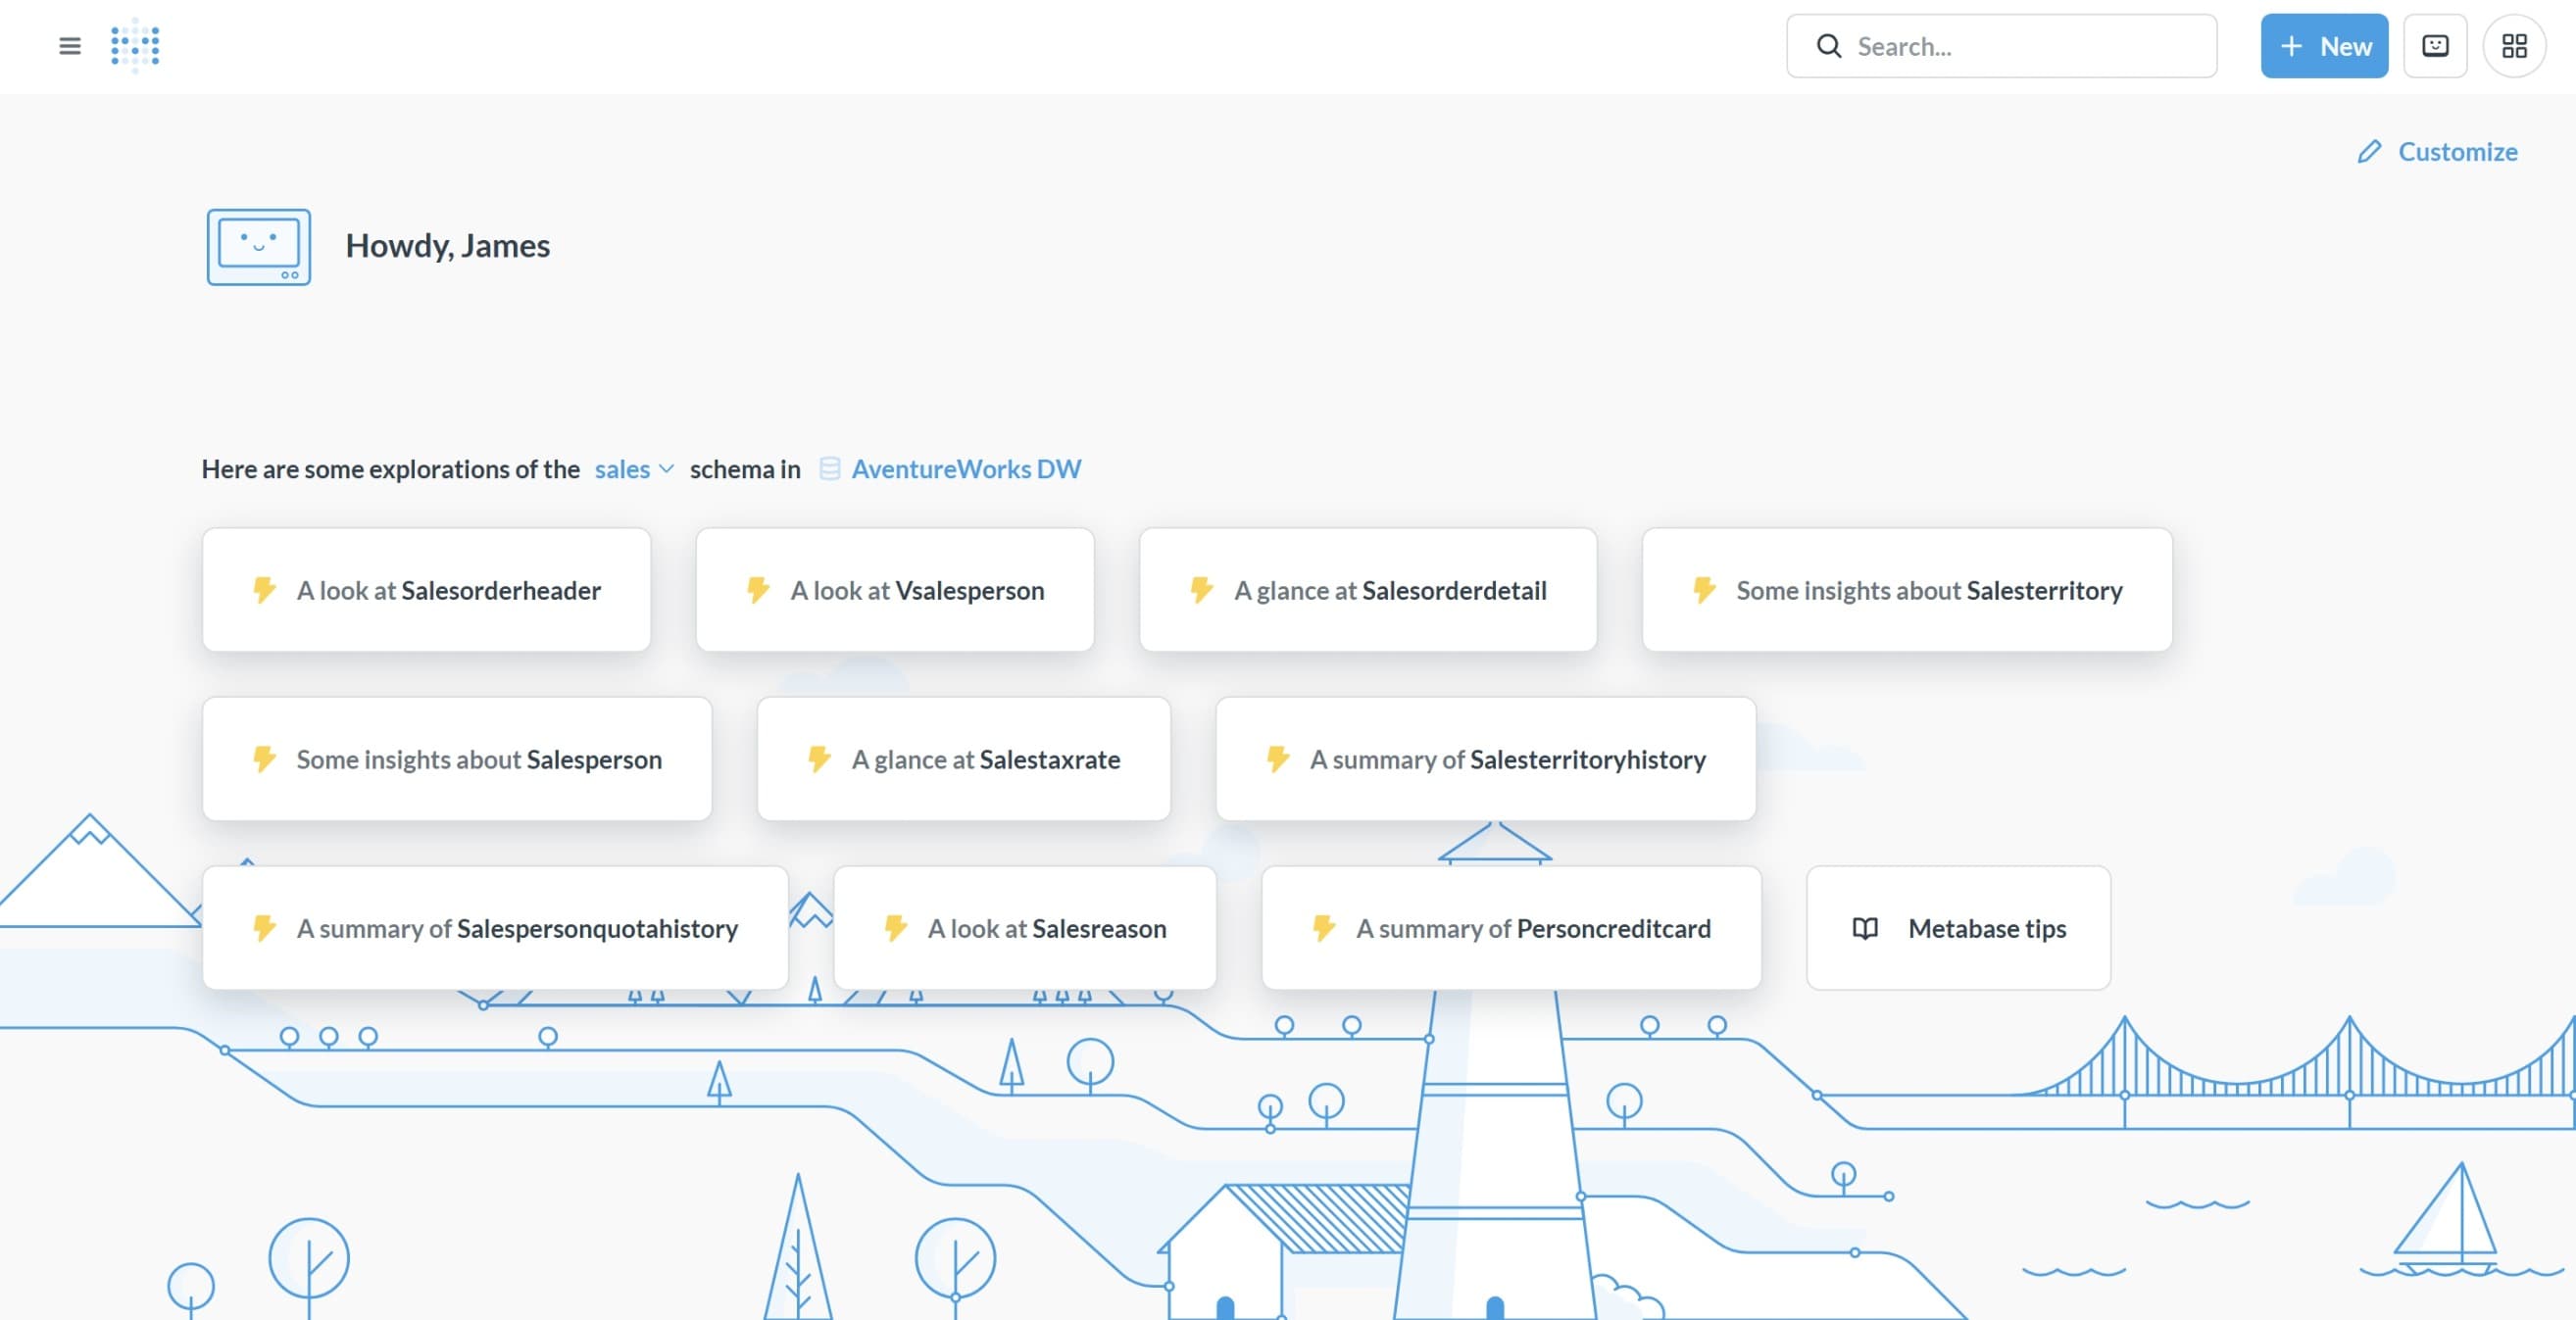
You can also explore the database structure in the Data Studio:
- In the four-square menu in the upper right corner, select
Data studio - Click
Tablesto explore the database structure in Metabase
Create simple ‘questions’ in Metabase
Let’s make a simple query to answer the business question: Which products did we sell the most?
- In the top menu bar click on
+ New - Select
Question. - Select the
Data Warehouse (dwh_db)database and then select theSales.SalesOrderDetailtable. - Click
Visualize - You can now see the data in the table.
Summarize sales by product
Let’s make a simple join to see which products are sold the most (in volume)
- Go back to the question editor by clicking
Editorin the top right corner. - Click the green
Summarizebutton - Under
Pick function or metricselectSum of ... - Select
Orderqtyas the column to sum. - Under
Pick a column to group byselectProductid - Click
Visualizeto see the summarized data.
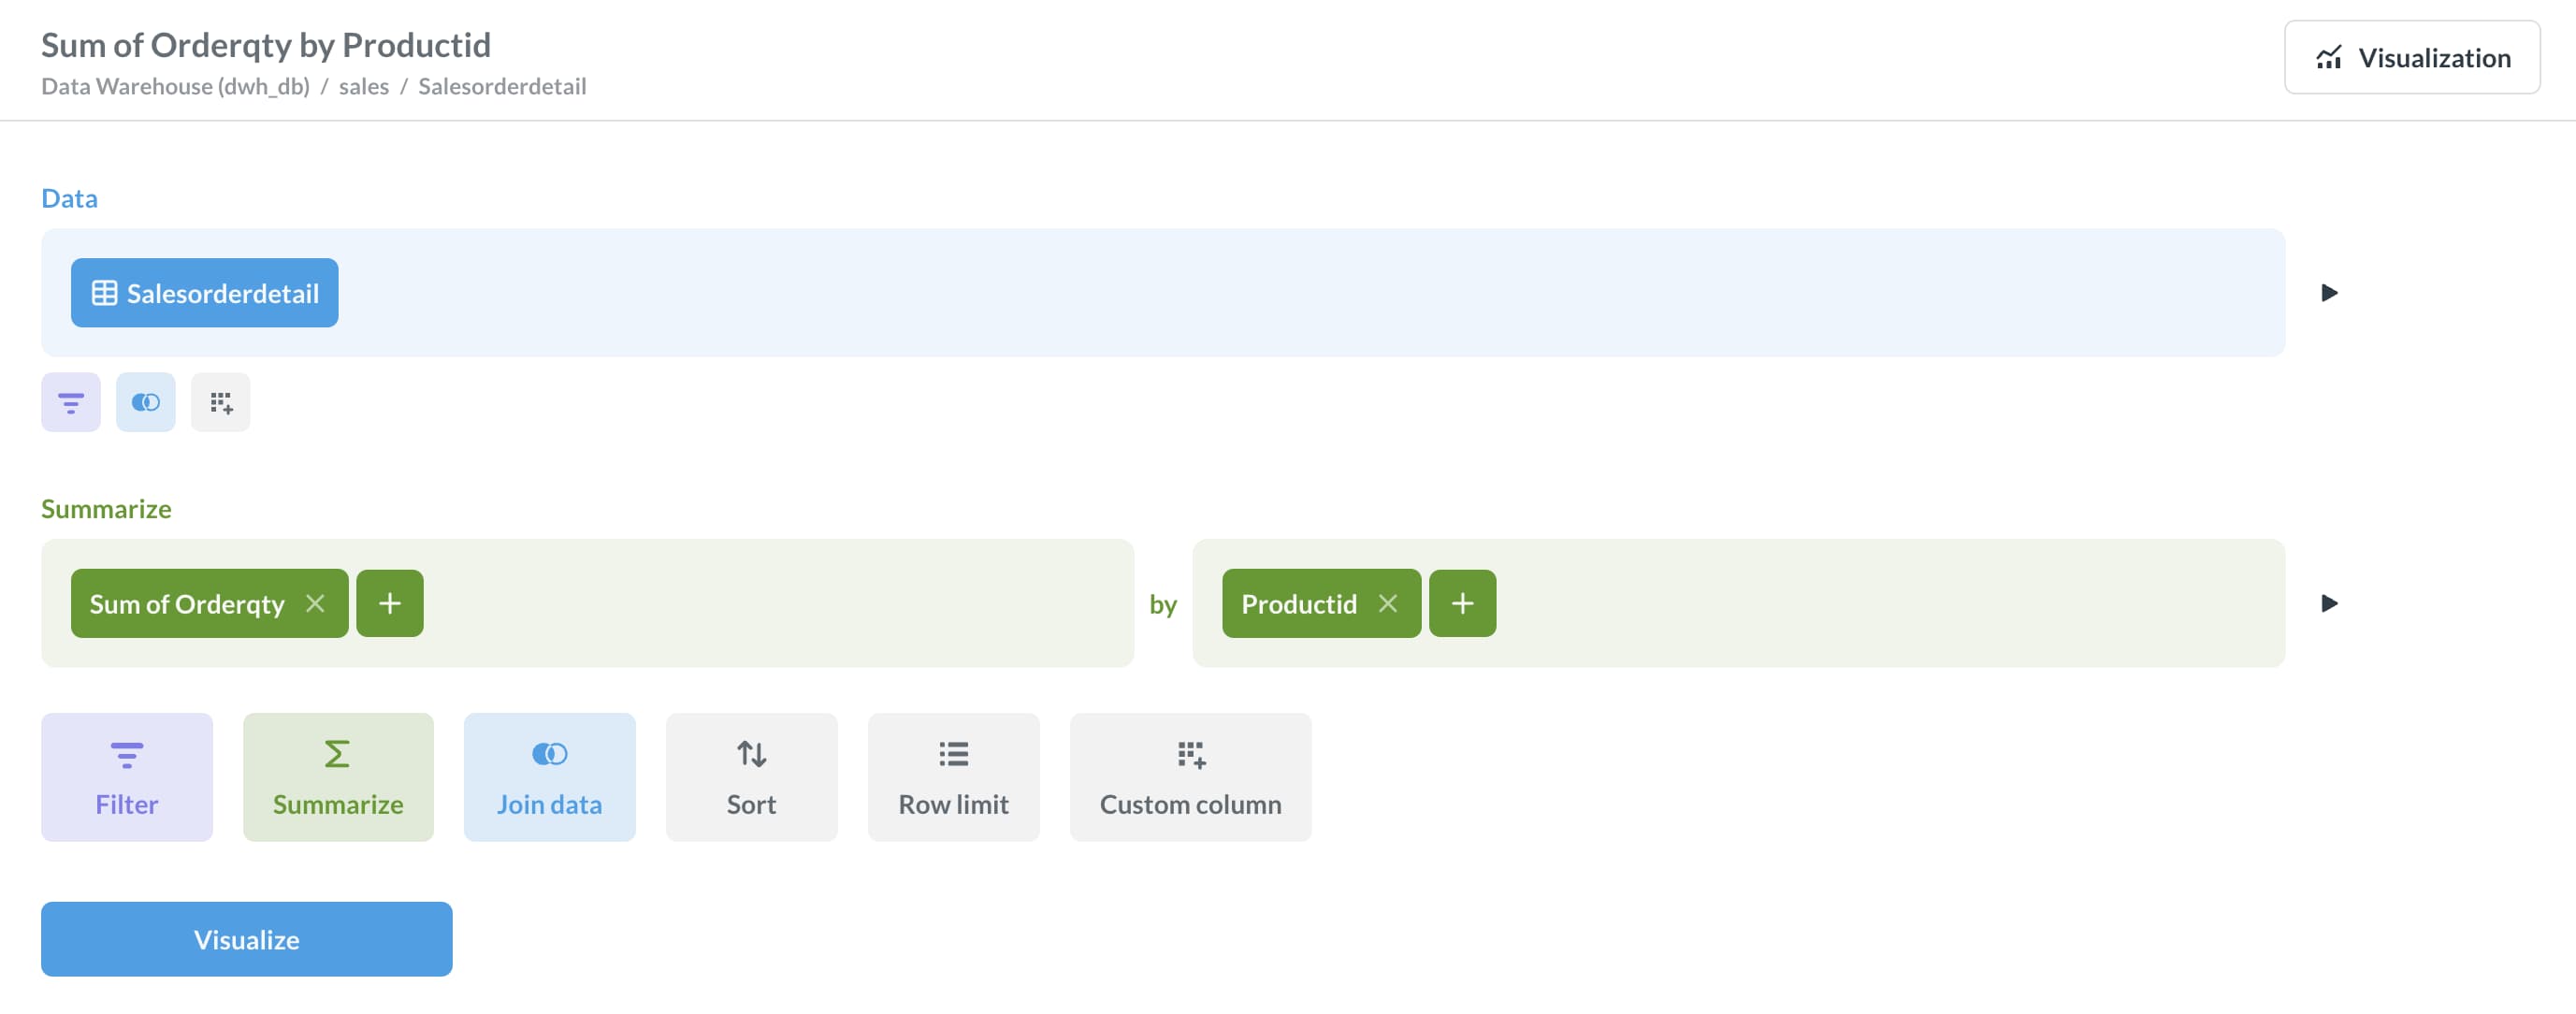
Cool, but which products are this exactly? We only see the ProductID at the moment. Let’s join the Production.Product table to get the product names.
Join with the product table
- Go back to the question editor by clicking
Editorin the top right corner. -
Click the blue
Join databutton in the top menu of the question editor.
- Select the
Production.Producttable to join with. - Select the
Productidcolumn from both tables to join them. - In the
Summarize bysection, addProduct.Name
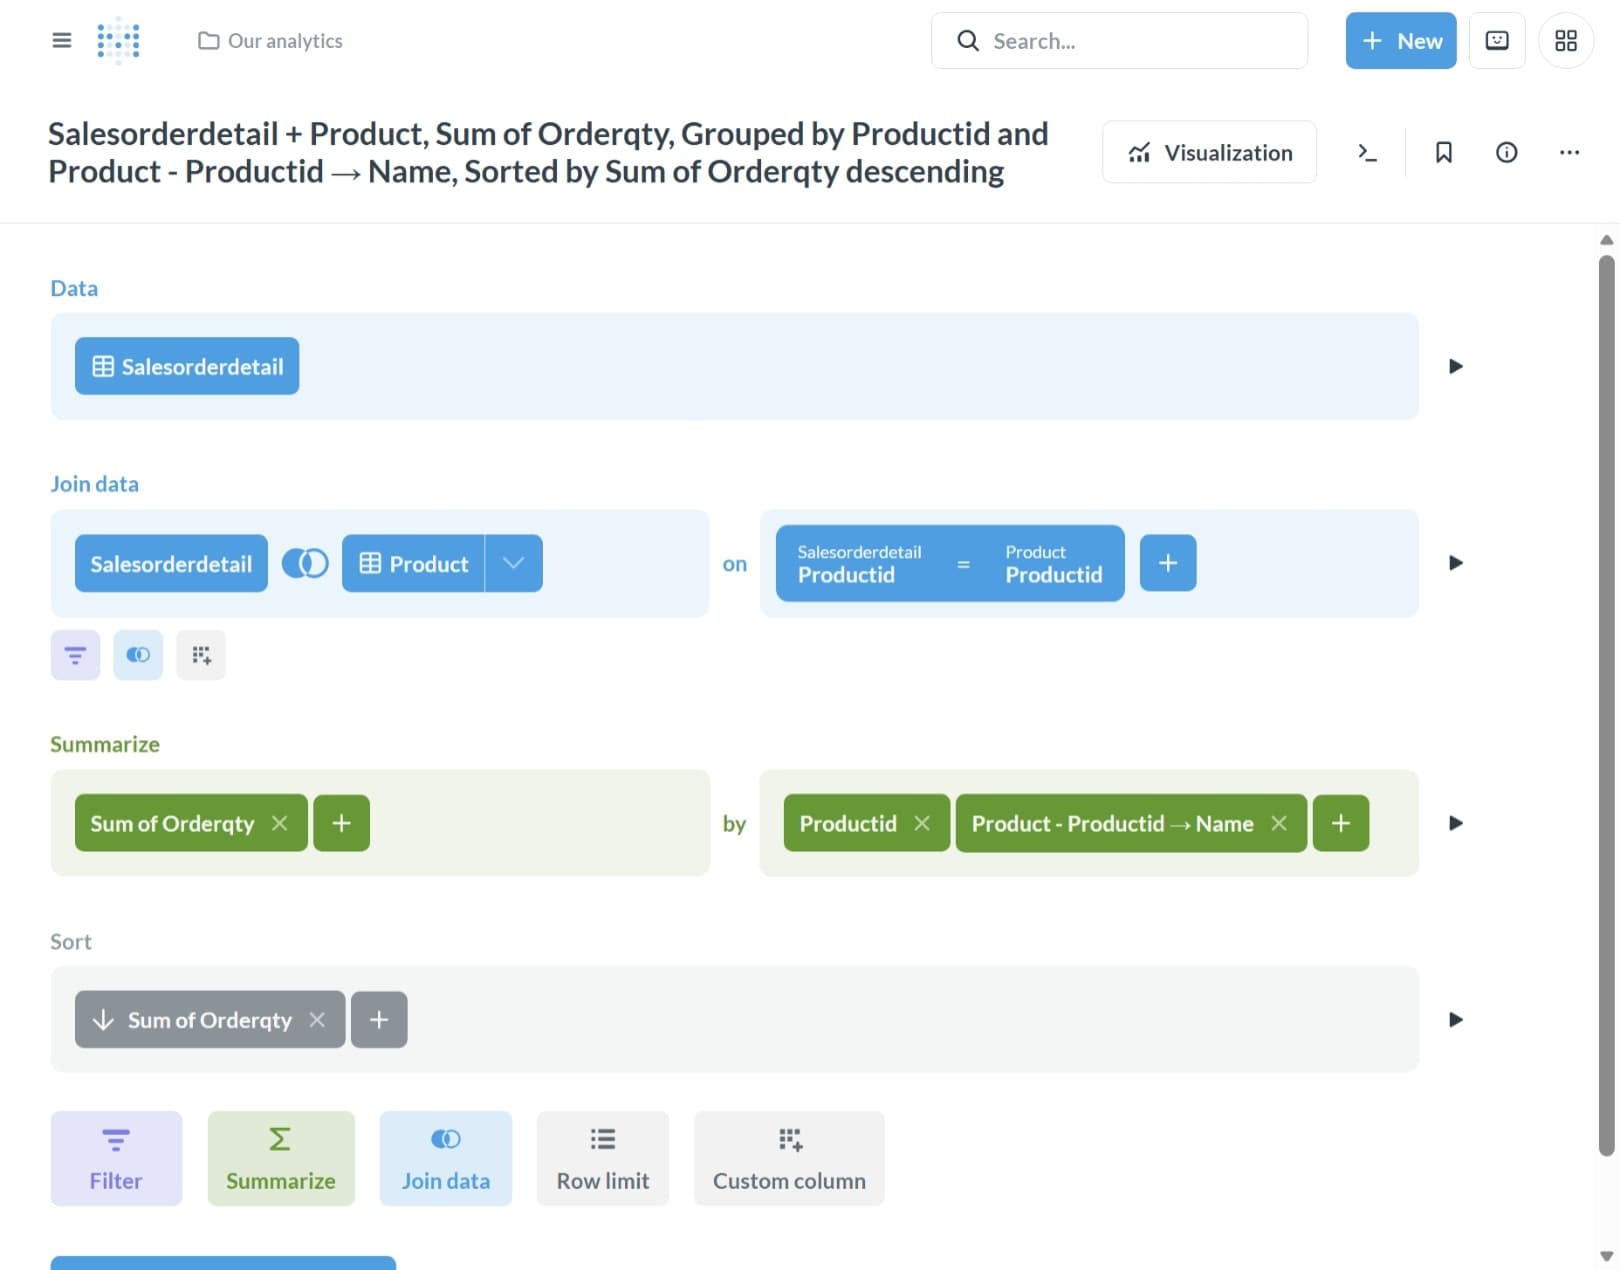
Click the Visualize button.You can now see the product names and the total quantity sold for each product.
Create a simple dashboard
Only if time allows
Let’s prepare this question to be added to a dashboard.
- Go back to the question editor by clicking
Editorin the top right corner. - Click the
Sortbutton and sort the results bySum of Orderqtyin descending order (arrow down) - Click the
Row limitbutton and set the limit to 10 rows - Check the results and click
Visualizeto see the top 10 products sold. - Click the
Savebutton to save the question for future reference -
Name:
Top 10 products sold -
Description:
Top 10 products sold by quantity - Click
Save
To add this question to a dashboard, click the Add to dashboard button in the top right corner of the question editor. You can create a new dashboard or add it to an existing one.
7. In-app AI to Metabase: the Metabot
We just spent 30 minutes without AI. Now let’s add a little AI into the mix.
Metabase has a built-in AI feature called Metabot that allows you to ask questions in natural language and get answers in the form of charts and tables. To use this feature, we need to add an API key to Metabase.
Before class, you should have received an API key for OpenRouter. If you haven’t received it yet, please let me know.
Add an API key to Metabase to enable the Metabot
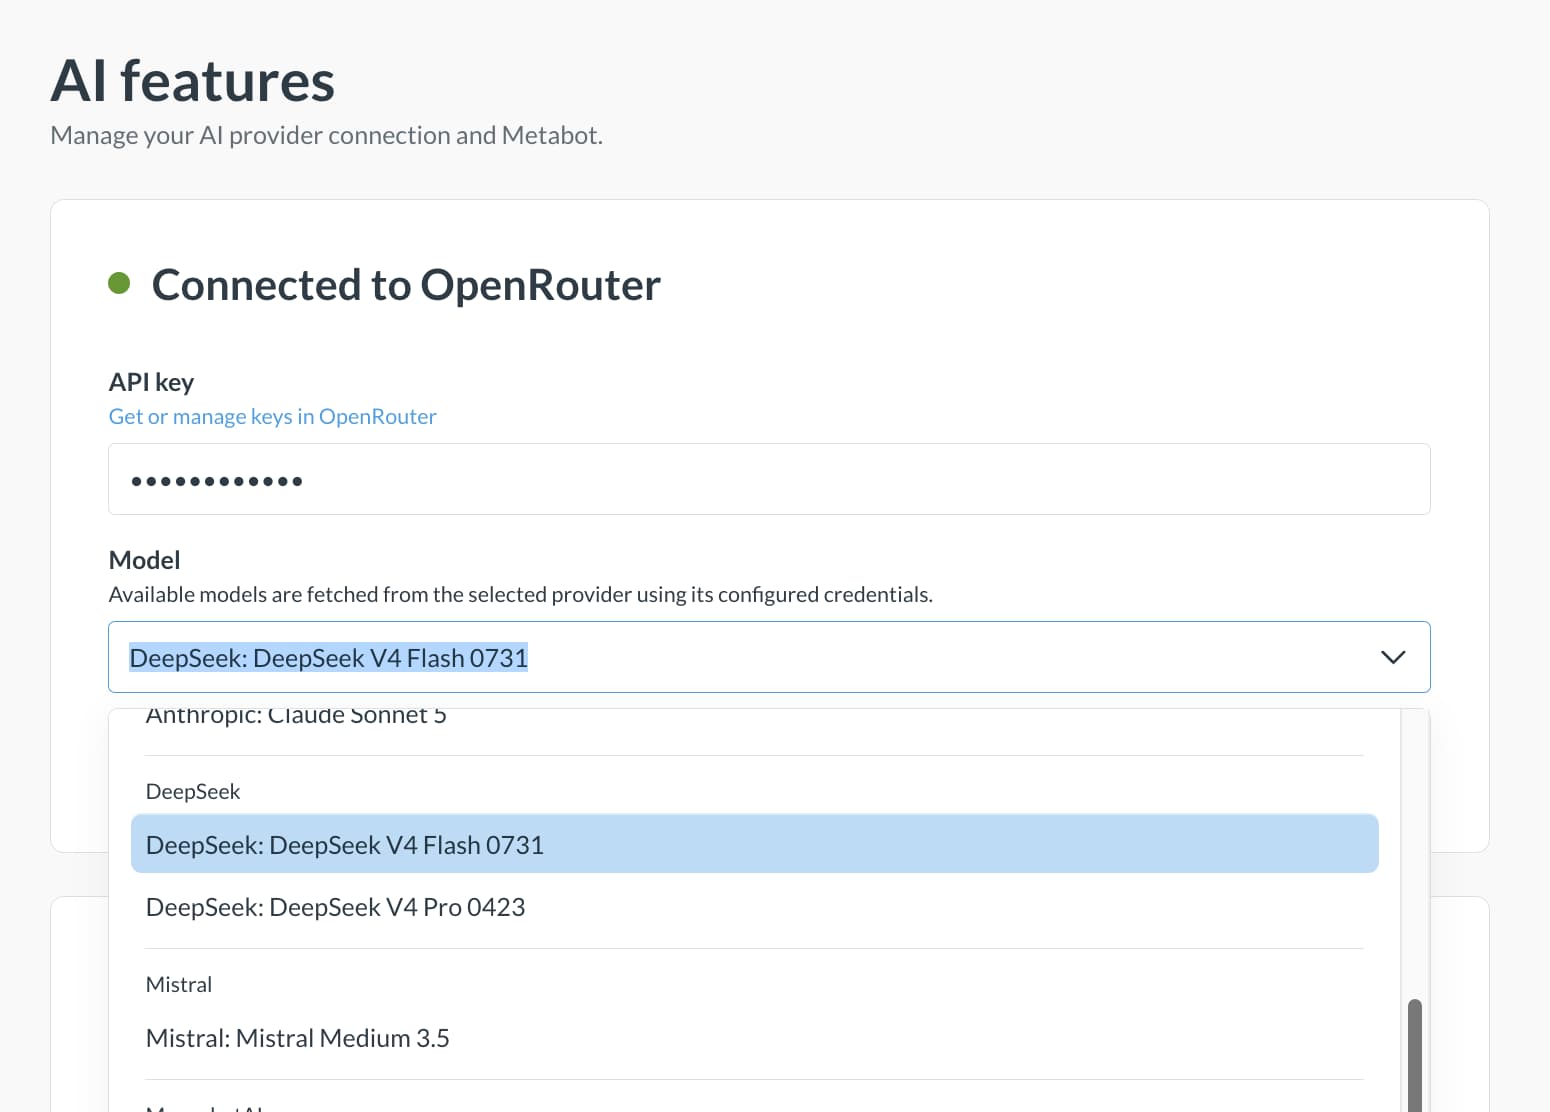
- Click on the four-square icon in the upper right corner and select
Admin. - In the top menu, click on
AI(Shortcut) - Under the
Connect to an AI providersection, selectOpenRouter - Fill in your API key and click
Connect
If your key is valid, Metabase will show a green indicator and Connected to OpenRouter message. In the same section, make sure to change the Model
- In the Model drop-down, select the model you want to use.
-
For today’s session let’s go with
DeepSeek: DeepSeek V4 Flash 0731.At the moment of writing, Deepseek v4 Pro is even cheaper on OpenRouter than V4 Flash. You may check here and decide which model to use based on your needs.
After you added the API key, you can go back to the Metabase home page:
- Click the four-square icon in the upper right corner and
- Select
Main app
Explore data with Metabot
Since we are not very familiar with the data, let’s ask Metabot to give us some insights.
In the top right, click + New and select AI Exploration. On the question What are you looking to learn, write:
1

I want to learn more about the data in our Database Warehouse. Can you describe the data and give me some insights?
Let’s read the answer and see what Metabot has to say about the data. Click on the title of one of the linked tables, and ask follow-up questions to get more insights.
Example questions you can ask Metabot:
- “What are the top 10 products by sales quantity?”
- “Show me the total sales by year”
- “Which product has the highest profit margin?”
- “Show me the sales trend for the last 12 months”
- “Which product category has the highest sales?”
- “Show me the top 5 customers by sales”
- “Which region has the highest sales?”
- “Show me the sales by product category and region”
- “Which product has the highest return rate?”
8. Ground the Metabot with Metrics and Glossary Definitions
Return to the home page in Metabase by clicking on the Metabase logo in the upper left corner.
- Click the Metabot icon in the upper right corner to start a new conversation.
- Type your question, for example:
What is our total revenue?
Discuss the answer provided by Metabot. Did you all get the same result?
Let’s define the metric Revenue first.
The Revenue Metric
To add the Revenue metric in Metabase:
- Go to the home page and click on
Metricsunder data in the navigation bar. - Select
Create metric. - As a data source, select the
Sales.Salesorderheadertable (you can type to search for salesorderheader) - Under
FormulaselectCustom Expression - Enter
Sum([Subtotal]) - Click
Update
Press the play button to see the result. If this works correctly, let’s save the metric to our Metabase metrics.
- Click
Saveto save the metric - Under name, enter
Revenue - Under description, enter
Total revenue: order subtotal excluding tax and freight Explore the Metrics session
- Open a new chat
- Type a new question:
What is our revenue?and maybe a follow-up likeWhat was our revenue per month?
Assume that the managers in our board would like to be presented with official revenue figures, which account for an expected 3% returns allowance. This is also known as the Board Revenue.
- Ask Metabot:
What is our board revenue?
Discuss the answer provided by Metabot. Did you all get the same result?
The Board Revenue Metric
To add the Board Revenue metric in Metabase:
- Go to the home page and click on
Metricsunder data in the navigation bar. - Select
Create metric. - As a data source, select the
Sales.Salesorderheadertable (you can type to search for salesorderheader) - Under
FormulaselectCustom Expression - Enter
Sum([Subtotal]) * 0.97 - Click
Update
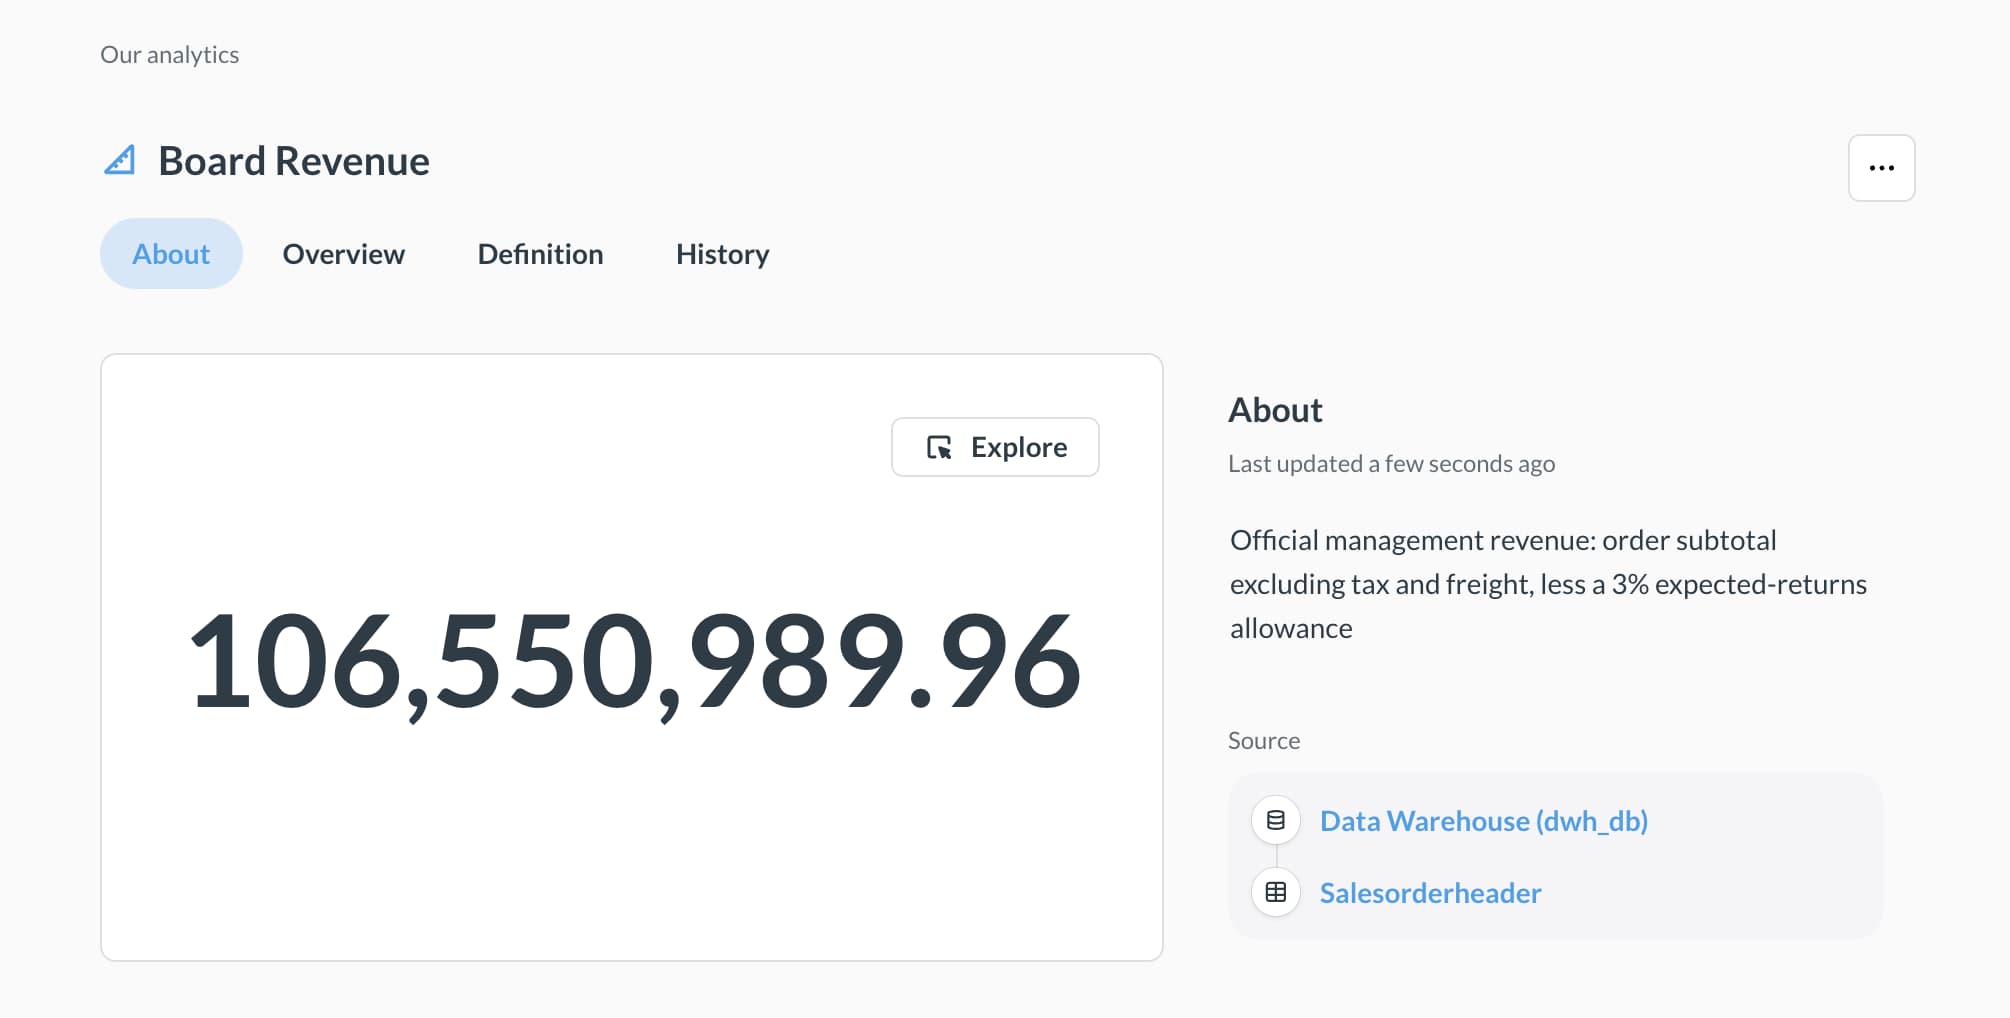
Press the play button to see the result. If this works correctly, let’s save the metric to our Metabase metrics.
- Click
Saveto save the metric - Under name, enter
Board Revenue - Under description, enter
Official management revenue: order subtotal excluding tax and freight, less a 3% expected-returns allowance - Explore the Metrics session
Now you can ask Metabot questions using the Board Revenue metric. Go back to the homepage, and start a new conversation with Metabot to test your new metric. Open a new chat and ask:
What is our board revenue?What was our board revenue over the years?
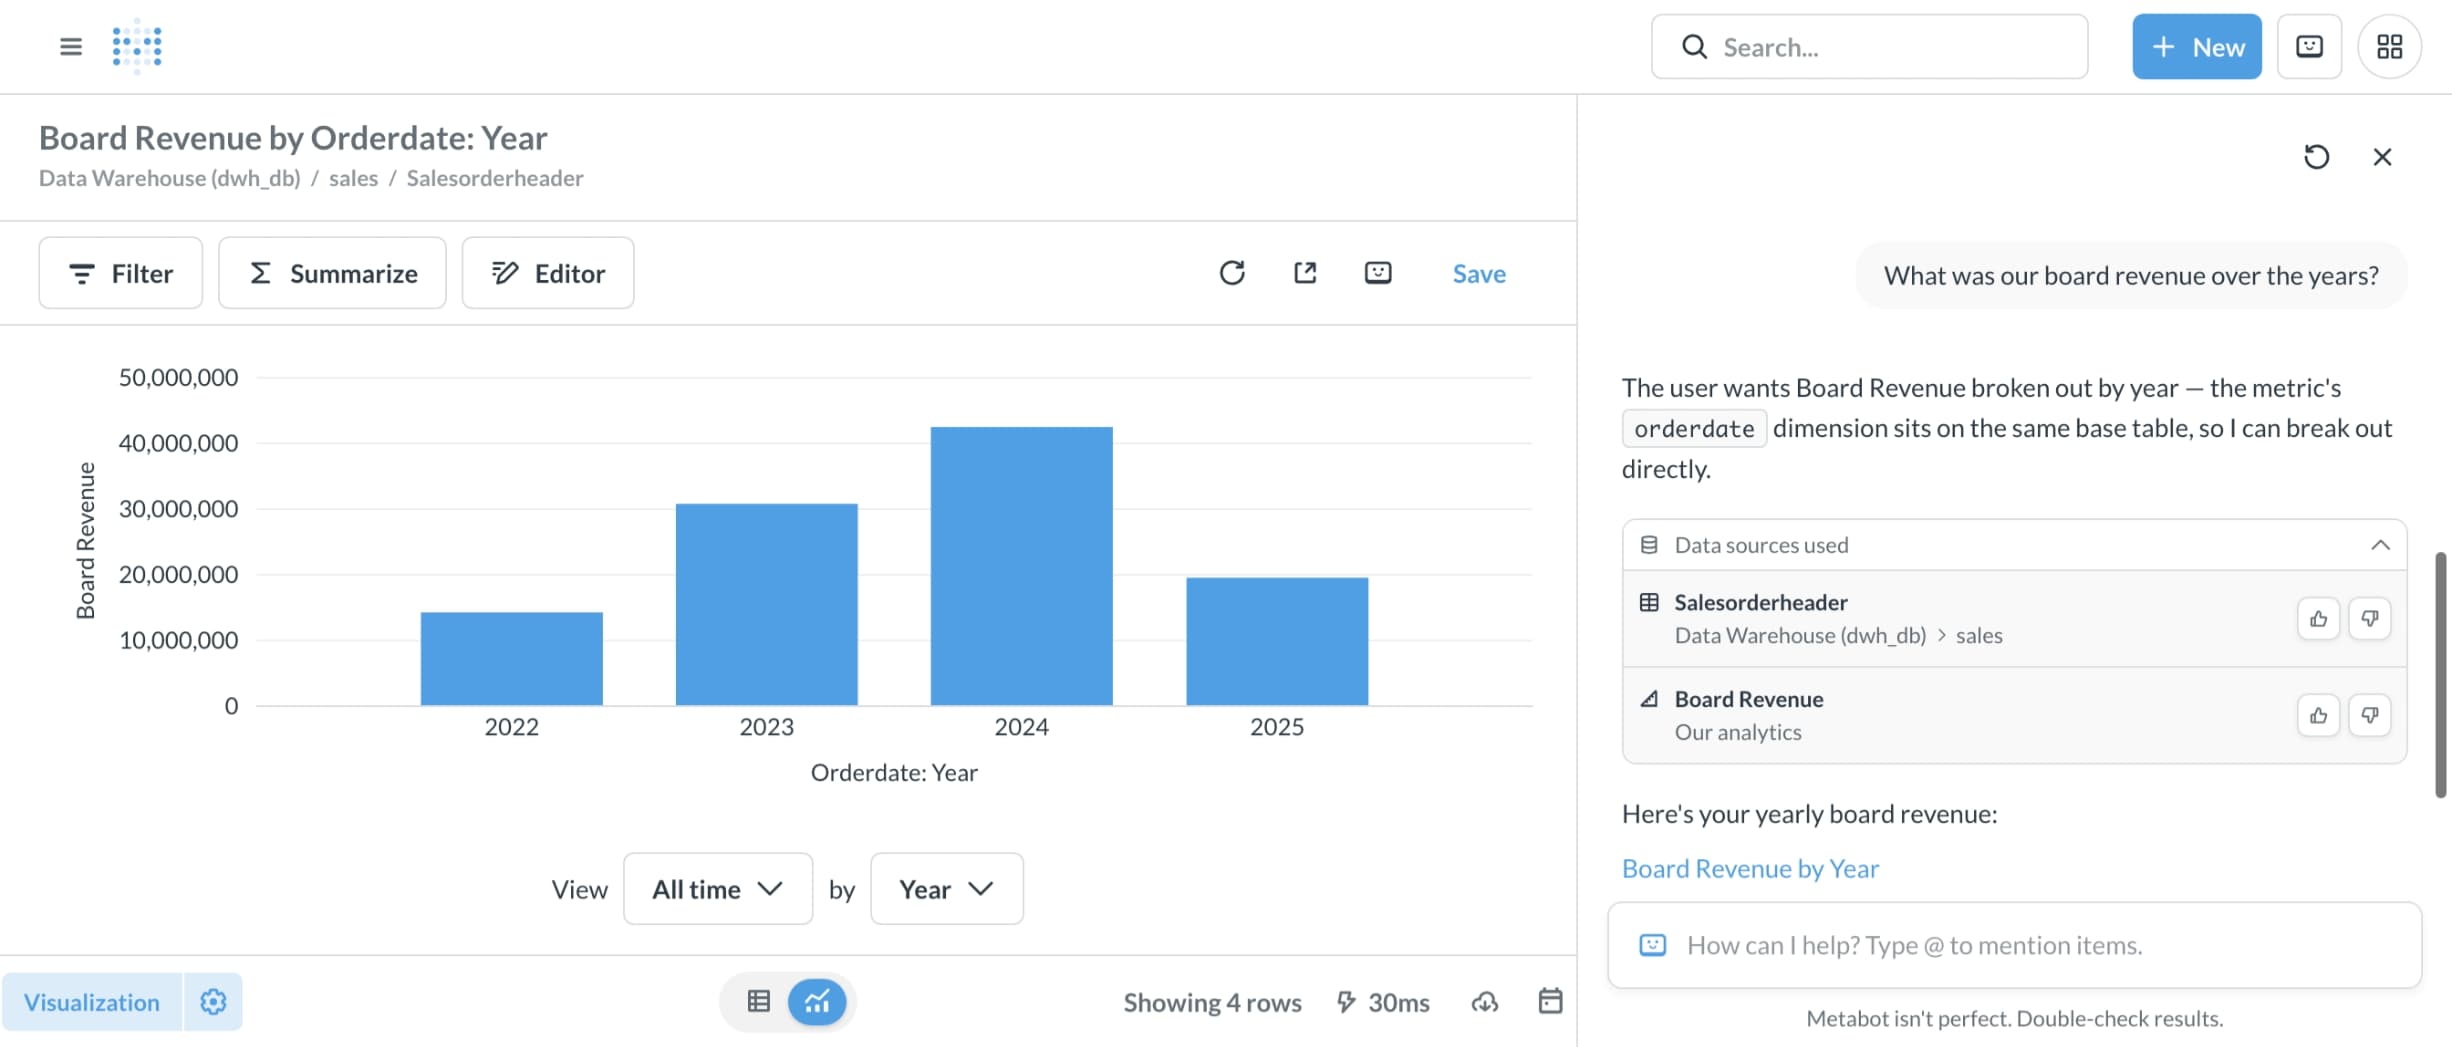 Did you all get the same result?
How many active customers do we have?
- Ask the following question to Metabot:
How many active customers do we have? - Compare the answer with your expectations and with your classmates’ answers
Let’s define what we mean by an active customer.
- Open the four-square menu in the top right corner of Metabase
- Click
Data Studio - In the left navigation pane, click on
Glossary
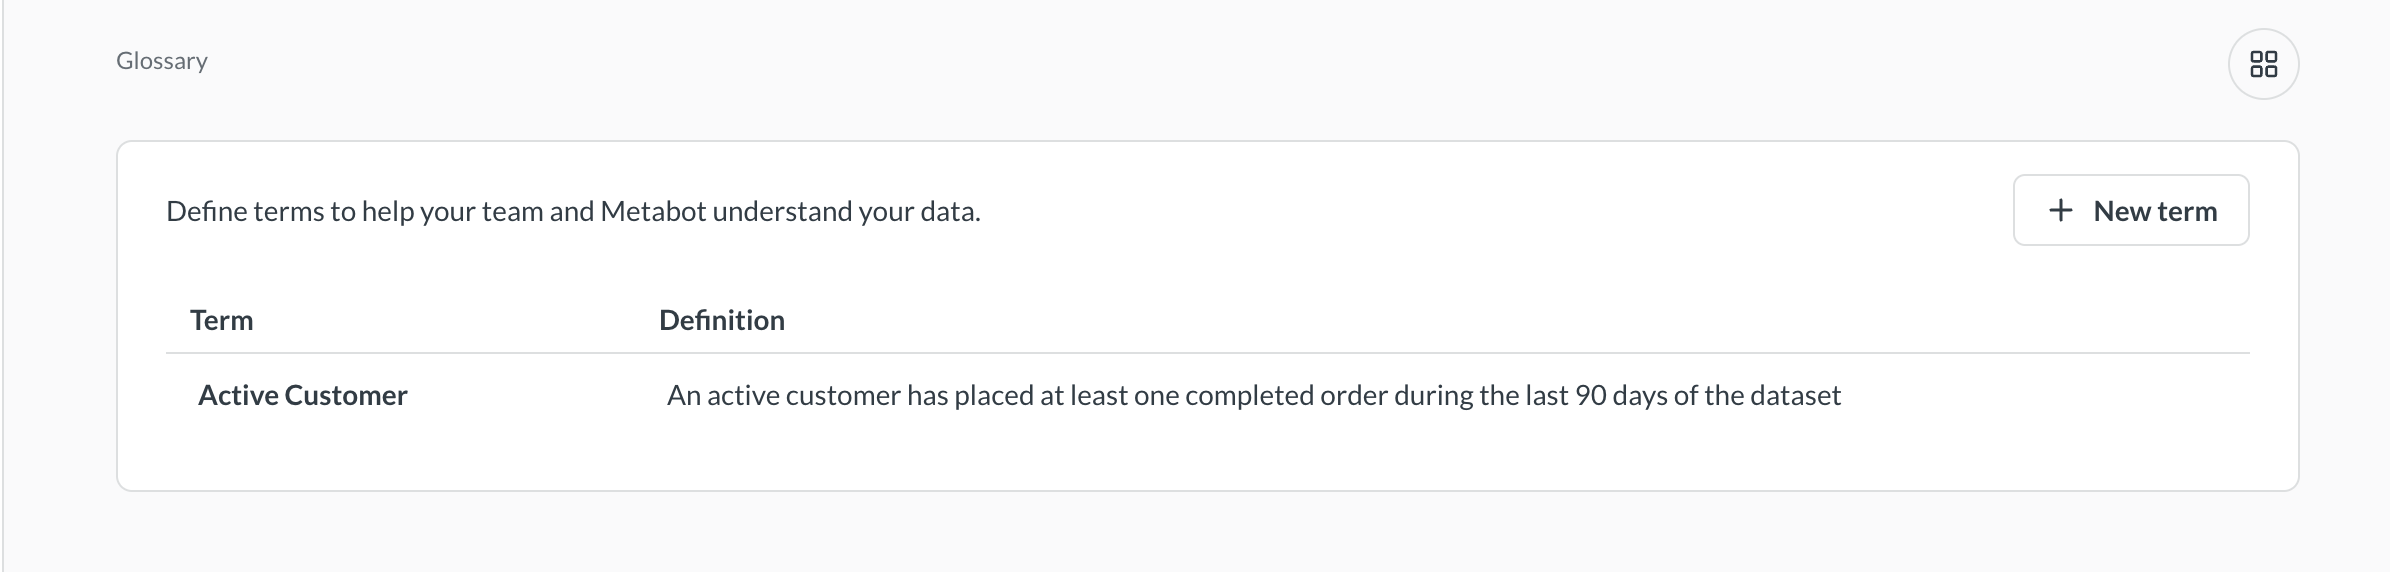
Here we can define what constitutes an active customer by creating a glossary entry for it. This helps ensure that everyone in the organization has a consistent understanding of the term.
How to work on the following questions?
- How many active customers do we have?
- How many dormant customers do we have?
- What is our repeat-customer rate?
- What is our core-product revenue?
9. Summer promotion orders
Let’s say we run a summer promotion every year and want to track the orders associated with it. You can create a question in Metabase to filter orders based on the promotion period for further analysis.
- In the top left corner click the
+ Newbutton - Select
AI Explorationfrom the dropdown menu - Prompt it to create a table with orders between July 1st and August 31st of any year.
- Click on the header of the created table to have a better view of the data
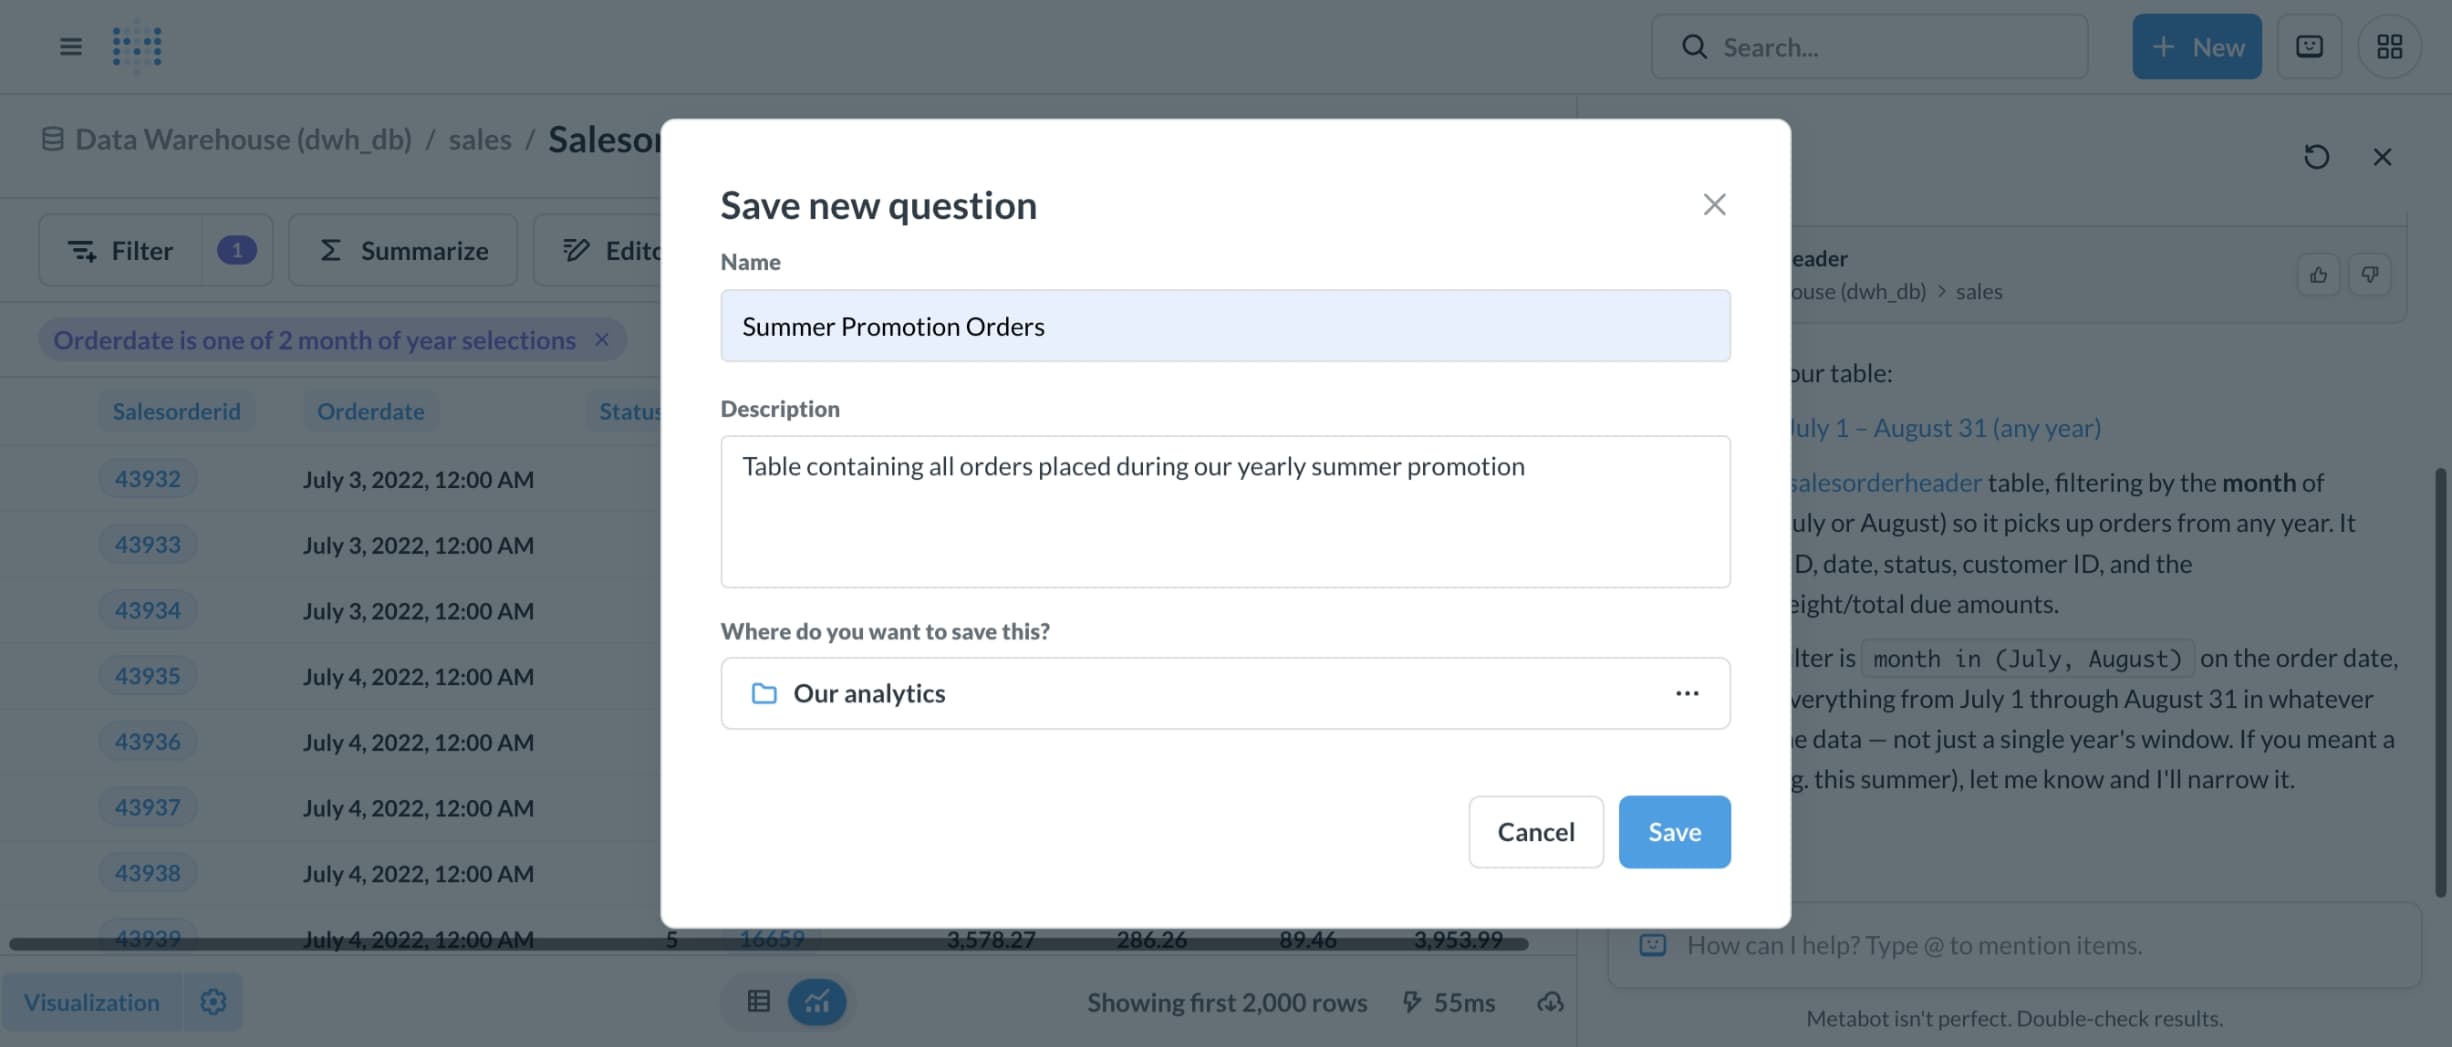
Explore the resulting table to analyze the summer promotion orders. If you agree with the data, you can save the question for future reference.
- Click
Saveto save the question for future reference -
Name:
Summer Promotion Orders -
Description:
Orders placed during our yearly summer promotion -
Collection:
Our Analytics
Go back to the Metabase homepage and ask Metabot:
How much revenue did we generate from summer promotion orders each year?
Allow the Metabot some time and then review the generated results.
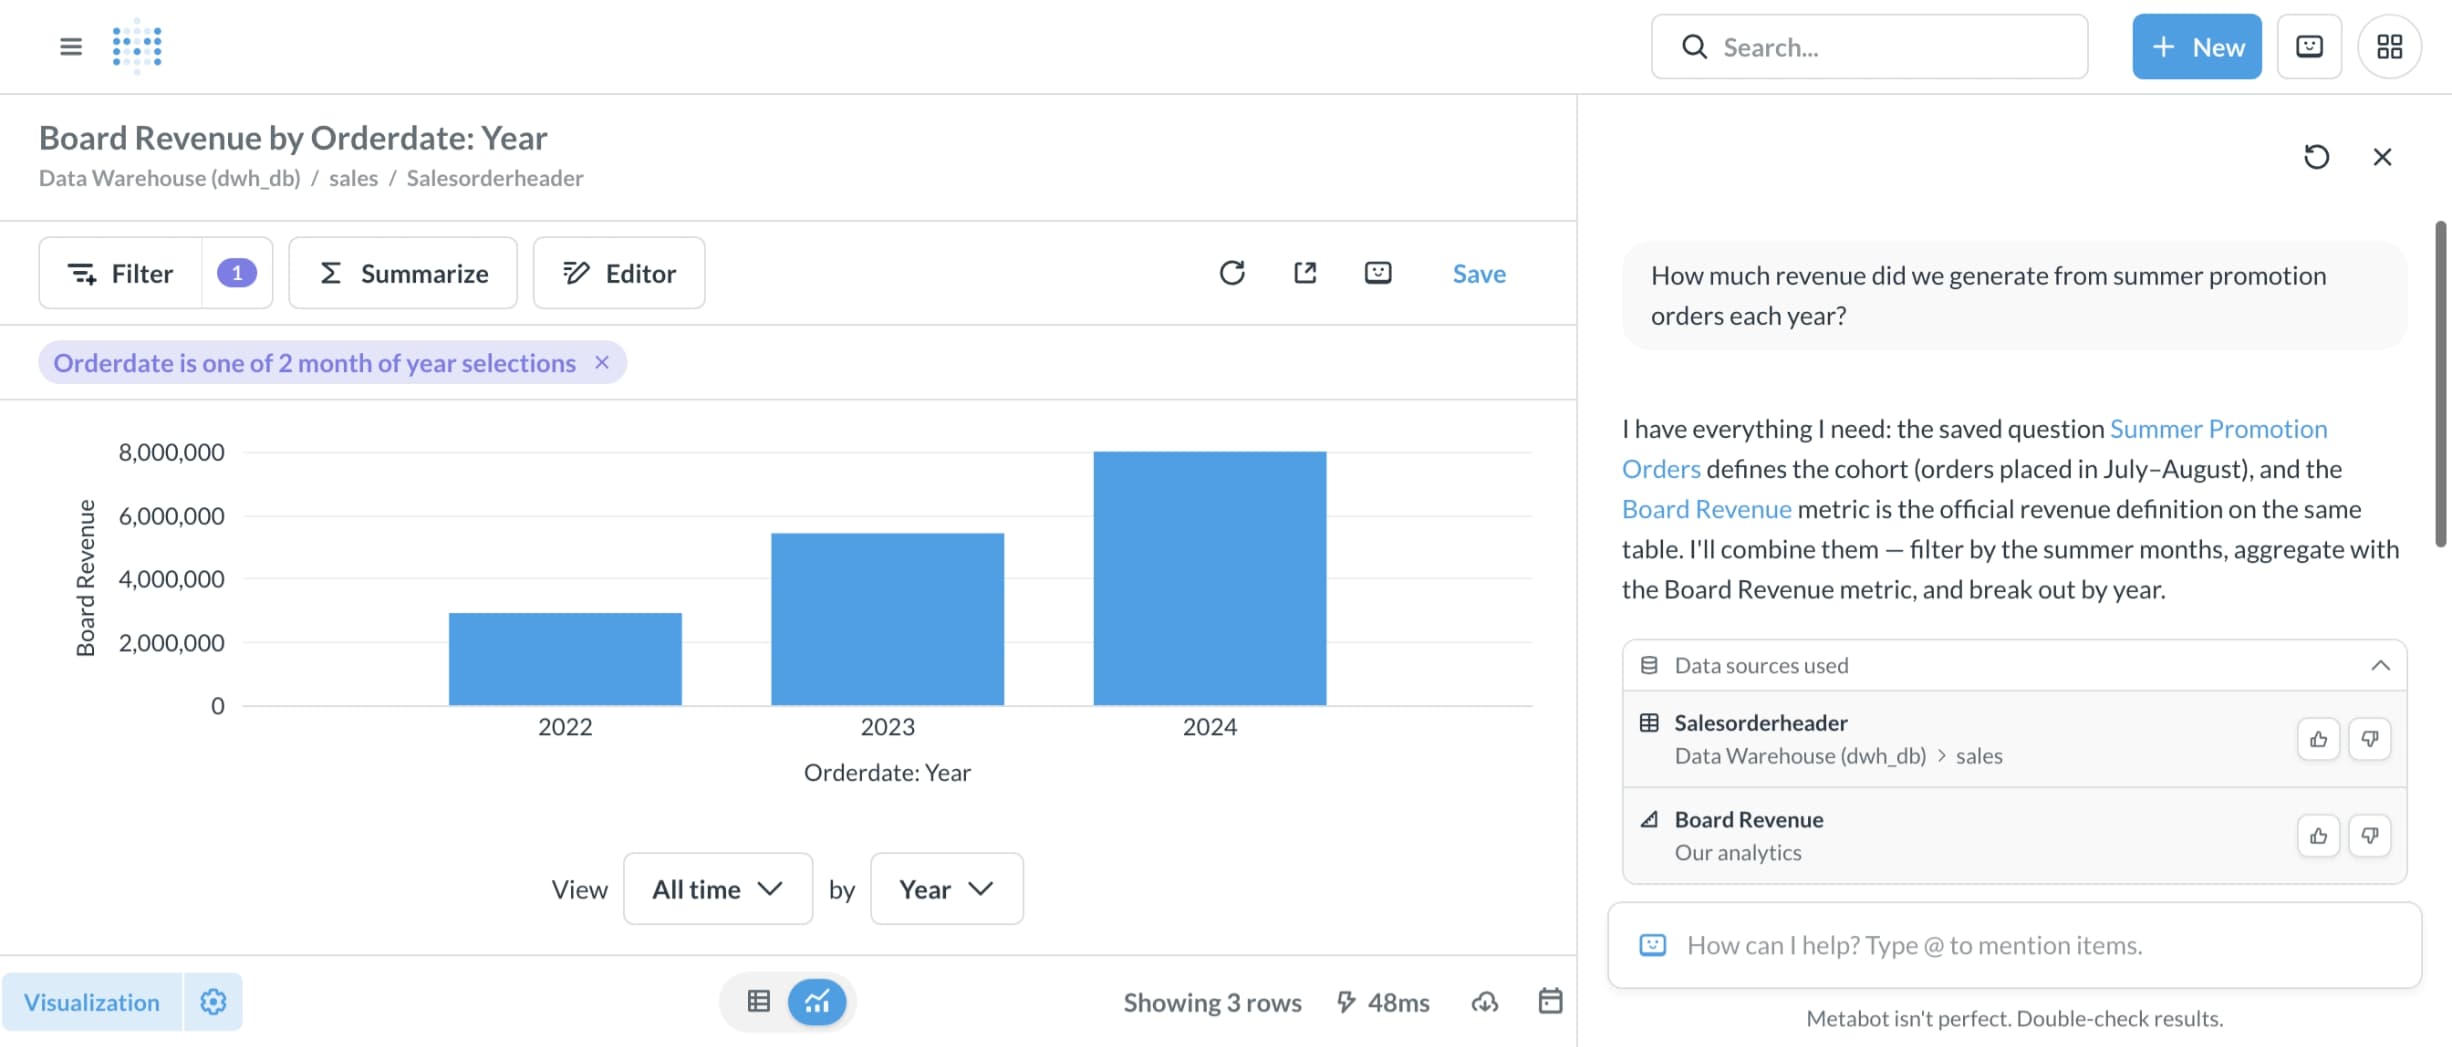
Did your Metabot also take into account the correct summer promotion period and revenue definition?
10. Level up: the Metabase MCP server
You can make your AI agent interact with your Metabase instance by using the Metabase MCP (Metabase Command Protocol). This is a feature that allows you to send commands to Metabase and get responses in natural language. You can use this feature to automate tasks, create dashboards, and get insights from your data. You can read more about it in the documentation on https://www.metabase.com/docs/latest/ai/mcp.
Find your Metabase MCP settings and URL
To find your Metabase MCP settings and URL:
- Click the four-square menu in the top right corner
- Select
Admin - Navigate to
AIin the top menu - Click on the
MCPtab and thenSettings(or just try this link)
Here you will find the MCP server URL and other relevant settings needed to connect your AI coding agent. Below are two examples of how to use these settings with different AI coding agents.
Add the Metabase MCP server to Claude Code
To add the Metabase MCP server to Claude Code, run the following command in your terminal:
1

claude mcp add --transport http metabase http://127.0.0.1:3000/api/metabase-mcp
The MCP server should now be added to Claude Code, but cannot be used without authentication.
To authenticate the MCP server, run the following command:
1

claude mcp login metabase
Then launch Claude Code.
Add the Metabase MC server to Codex via the terminal
To add the Metabase MCP server to Codex via the terminal, run the following command:
1

codex mcp add metabase --url http://127.0.0.1:3000/api/metabase-mcp
This should add the Metabase MCP server to Codex and automatically open a window to authenticate the server.
If it doesn’t open a window automatically, you may need to authenticate the server manually through the login command:
codex mcp login metabase
Add the Metabase MCP server to ChatGPT/Codex via the desktop app
Open Codex in your ChatGPT desktop app and go to
- Settings
- Plugins
- MCPs
- Click on
Add serverand fill in the following values:- Name:
Metabase MCP - Type: select
Streamable HTTP - URL:
http://127.0.0.1:3000/api/metabase-mcp
- Name:
- Click Save
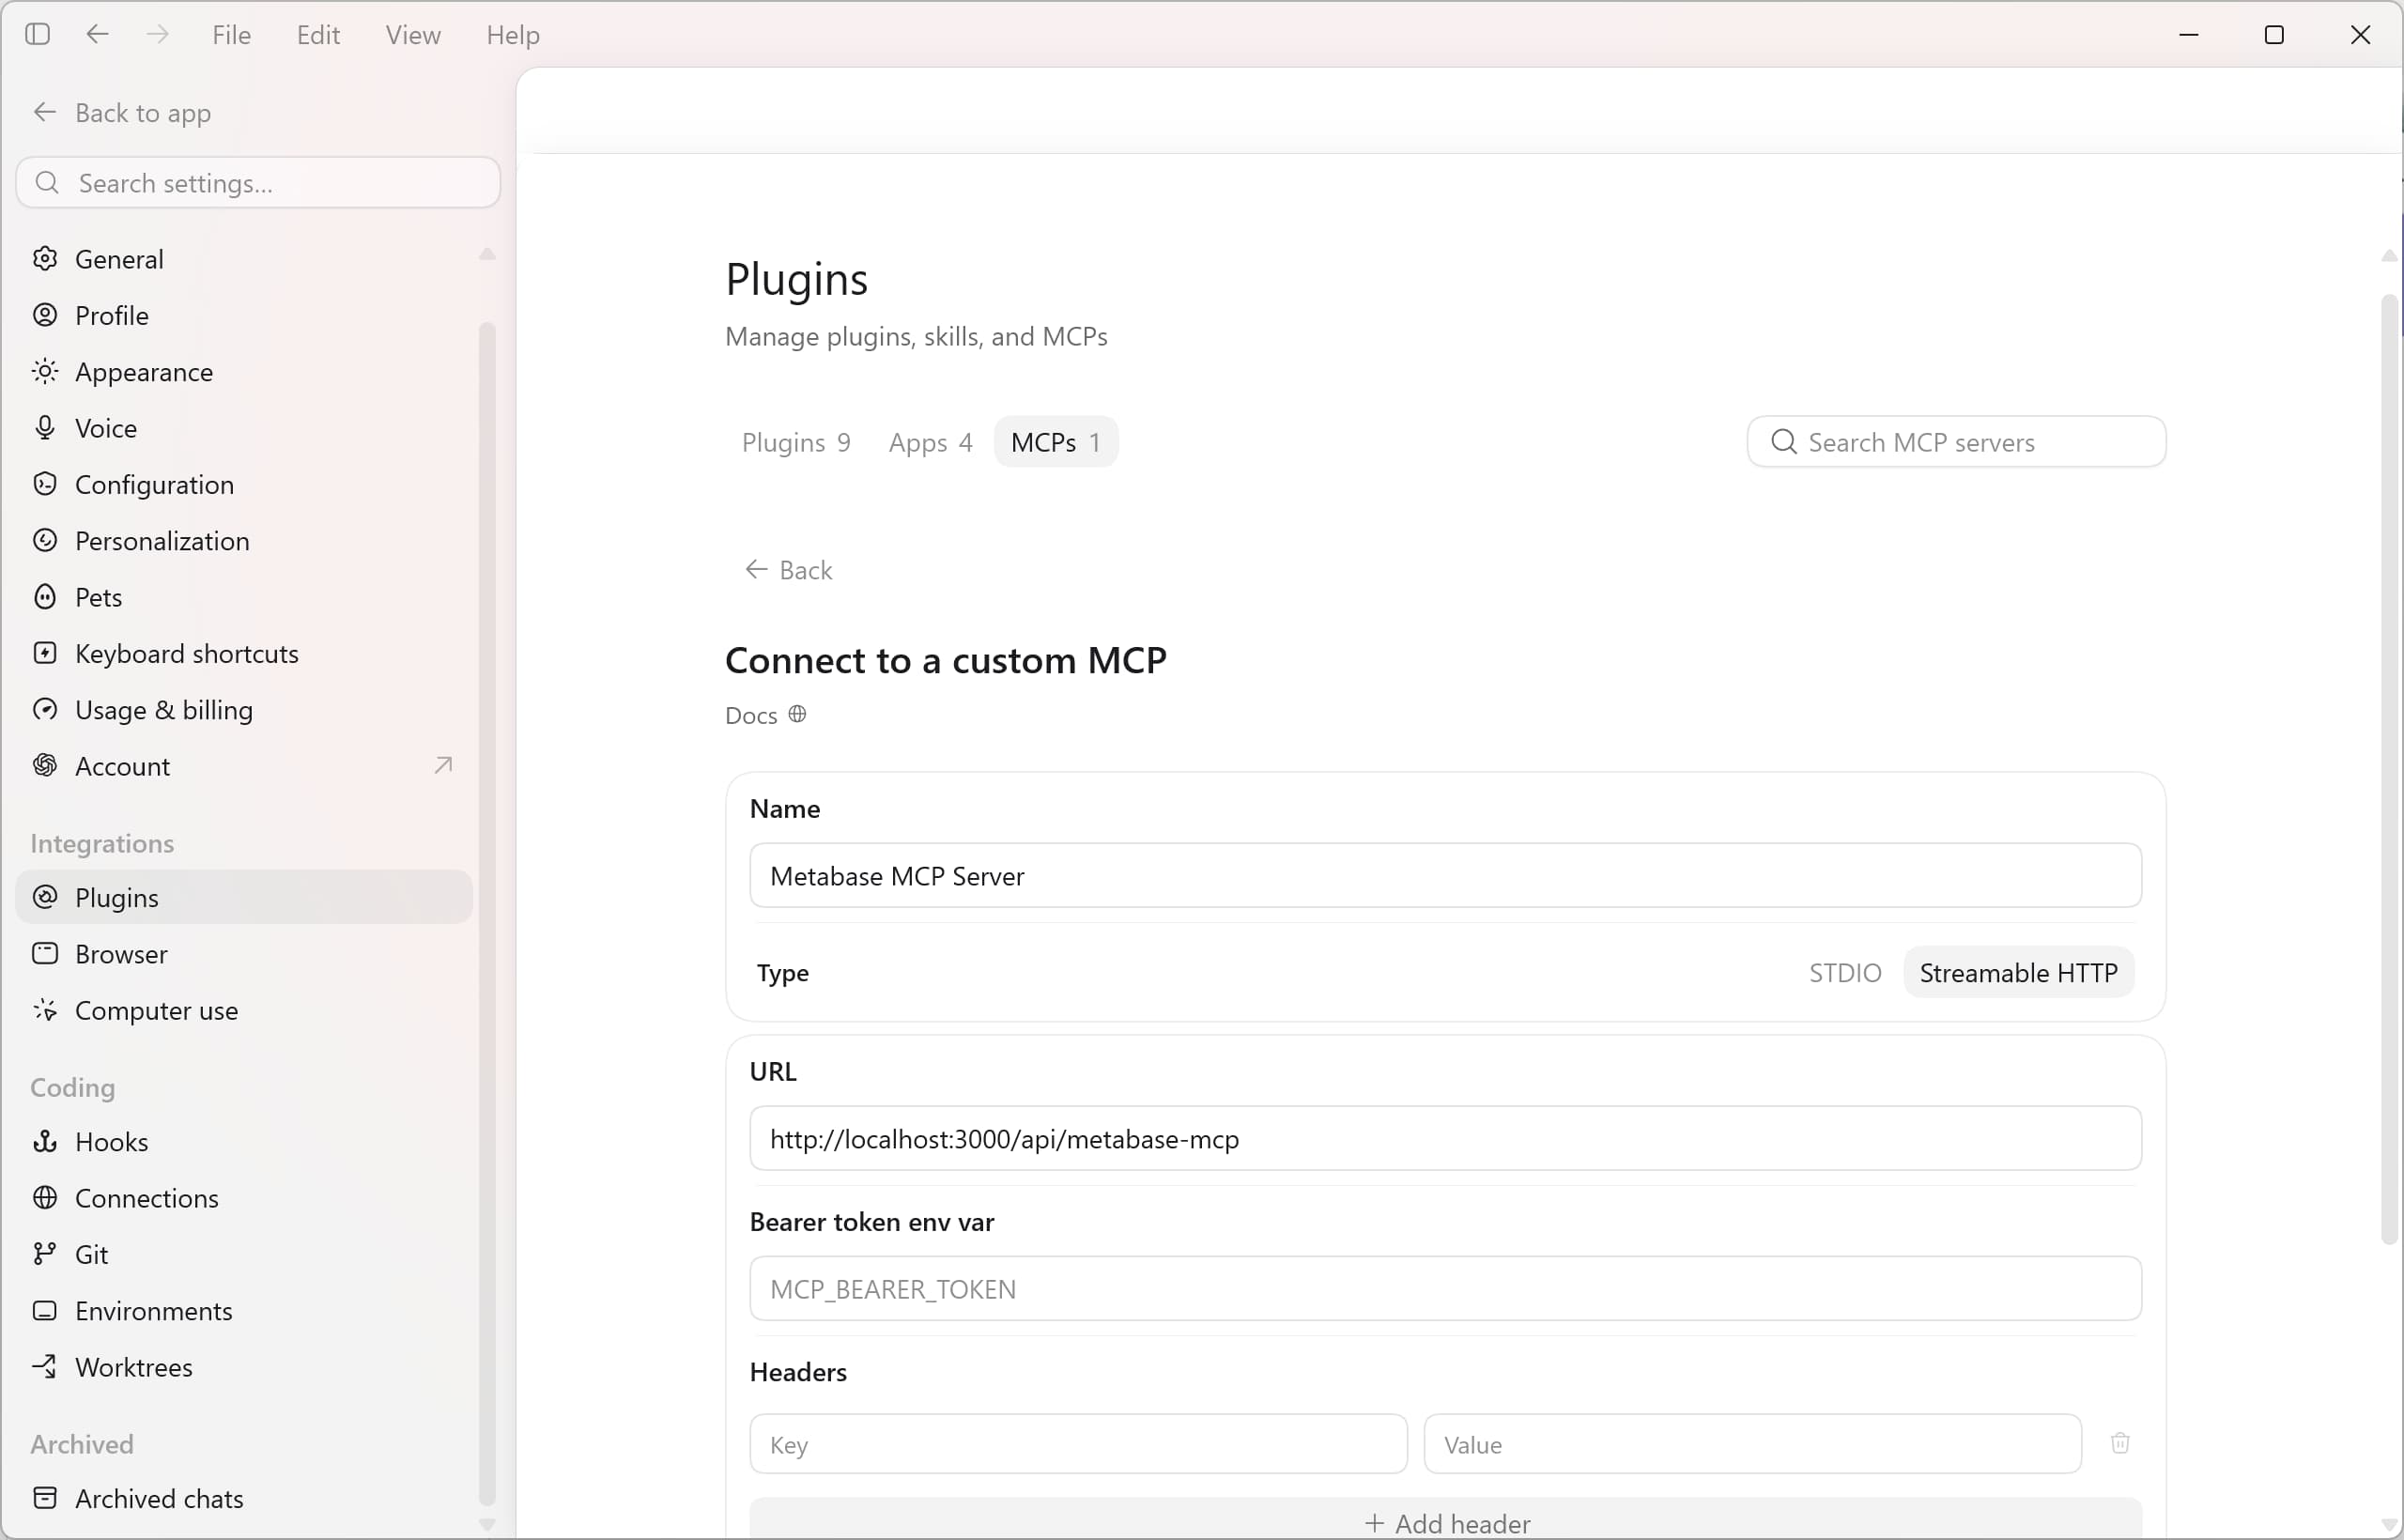
The server will show in the list and an Authenticate button will appear. Click on it to authenticate the server.
Ask some business questions using the Metabase MCP server
For example, you can ask your AI coding agent:
Which metrics are recorded in Metabase?How much revenue did we generate from summer promotion orders each year?
Prompt your AI coding agent to create a dashboard in Metabase
For example, you can prompt your AI coding agent with:
Create a new collection for our Sales team and add a Metabase dashboard for our Sales team to monitor summer promotion orders and revenue and save
11. Shut down your stack ⚠️
Docker Desktop and the BI stack will keep running in the background until you shut them down. Assuming that you want to stop them after finishing the workshop, you can follow the steps below.
To shut down the stack, go to the project’s folder and run the following command in your terminal:
1

docker compose down
Remove the data
If you’re not planning on using the stack for again, you can also remove the data by running the following command:
1

docker compose down -v
Cloudbeaver and Metabase and Quick links
- Cloudbeaver - Home
- Metabase - Metrics
- Metabase - Glossary
- Metabase - AI / Metabot settings
- Metabase - MCP settings
References
- AdventureWorks sample data: https://github.com/lorint/AdventureWorks-for-Postgres
- cloudbeaver: https://github.com/dbeaver/cloudbeaver/
- n8n: https://n8n.io/
- Metabase: https://www.metabase.com/
- Metabase - How to Build an MCP Server for AI Data Analytics
- PostgreSQL: https://www.postgresql.org/
Extra (Claude Code and DeepSeek Flash v4.1)
If you want to try out Claude Code together with DeepSeek Flash v4.1 using your class credit, you can follow the instructions below:
- Download and install Claude Code from https://claude.ai/code
- Create a folder called
gpt5137-bi-kit, for example in your documents folder - Navigate to the
gpt5137-bi-kitfolder and create the.claude/settings.local.jsonfile -
Paste the following content into the
.claude/settings.local.jsonfile:1 2 3 4 5 6 7 8 9 10 11 12 13 14 15 16
{ "env": { "OPENROUTER_API_KEY": "YOUR_OPENROUTER_API_KEY", "ANTHROPIC_BASE_URL": "https://openrouter.ai/api", "ANTHROPIC_AUTH_TOKEN": "YOUR_OPENROUTER_API_KEY", "ANTHROPIC_API_KEY": "", "ANTHROPIC_MODEL": "deepseek/deepseek-v4.1-flash", "ANTHROPIC_DEFAULT_SONNET_MODEL": "deepseek/deepseek-v4.1-flash", "ANTHROPIC_DEFAULT_OPUS_MODEL": "deepseek/deepseek-v4.1-flash", "ANTHROPIC_DEFAULT_HAIKU_MODEL": "deepseek/deepseek-v4.1-flash", "ANTHROPIC_DEFAULT_FABLE_MODEL": "deepseek/deepseek-v4.1-flash", "CLAUDE_CODE_MAX_CONTEXT_TOKENS": "384000", "CLAUDE_CODE_AUTO_COMPACT_WINDOW": "384000" }, "skipDangerousModePermissionPrompt": true }
- Change
YOUR_OPENROUTER_API_KEYto your actual OpenRouter API key twice - Save the file
-
Start Claude Code from your
gpt5137-bi-kitfolderThe code also includes the configuration for your metabase MCP server.