[HAI5014] Vibe Coding into a Kingobot
Next to the LLM at the core of our chatbot, we need to deal with memory, context, access to external knowledge, the ability to provide us with real time information, and the ability to interact with other applications. We also need to consider the need for a user-friendly interface, the importance of data privacy, and the potential for bias in AI systems. An open-source application that covers this all and allows us to explore, modify and experiment? Right, Open WebUI!
Disclaimer: This blog provides instructions and resources for the workshop part of my lectures. It is not a replacement for attending class; it may not include some critical steps and the foundational background of the techniques and methodologies used. The information may become outdated over time as I do not update the instructions after class.
In last week’s class we had a look at the Open WebUI project, which is a web-based interface for running and interacting with large language models (LLMs).
Vibe Coding, baby
Vibe coding (or vibecoding) is an approach to producing software by depending on artificial intelligence (AI), where a person describes a problem in a few sentences as a prompt to a large language model (LLM) tuned for coding. The LLM generates software based on the description, shifting the programmer’s role from manual coding to guiding, testing, and refining the AI-generated source code. Vibe coding is claimed by its advocates to allow even amateur programmers to produce software without the extensive training and skills required for software engineering.[4] The term was introduced by Andrej Karpathy in February 2025 and listed in the Merriam-Webster Dictionary the following month as a “slang & trending” noun. Wikipedia
In this week’s class we will look into customizing our chatbot by adding a few extensions to our Open WebUI instance. We will apply the principles of vibe coding and work together with GitHub’s Copilot to create the code for tools that can make our chatbot more powerful.
Idea for the coming classes: Kingobot 2.0
SKKU’s Kingobot has been mentioned in class and was categorized as a “bad chatbot”.
More often classified as a ‘Linkbot’ it only understands suggested questions and provides a list of links to the university’s website. It is not able to casually answer questions about the university, campus, or schedules. It also does not have a user-friendly interface, does not support multiple languages, and does not have memory or context.
Let’s see if we can make a better version using the tools and concepts we have learned so far. In the coming weeks let’s give the chatbot:
- User-friendly Interface: Enable intuitive and easy interaction with the chatbot
- Multi-language Support: Allowing users to interact with the chatbot in their preferred language
- Memory: The ability to remember past interactions and use that information to provide more relevant responses
- Context: The ability to understand the context of a conversation and provide more relevant responses.
- Real-time Information: The ability to provide real-time information, such as shuttlebus locations and restaurant menus
- Domain Specific Knowledge: The ability to access external knowledge sources, such as information about the university, campus, and schedules
Today we will go through the following steps to get started with our Kingobot 2.0:
- 1. Add Real Time Information
- 2. Connecting Azure OpenAI models to Open WebUI
- 3. Make a new Open WebUI model: KingoGPT
- 4. Connecting Gemini’s OpenAI compatible embeddings model
- 5. Getting to know the inner workings of Open WebUI
1. Add Real Time Information
We can use the Open WebUI to create a tool that can provide real-time information. To keep things simple, we will vibe-code tools in a Python script that can be used to access real-time information from the web, which can then be imported into the Open WebUI.
Set-up the project folder and example tools
Open your Open WebUI project in Visual Studio Code. If you are using GitHub Codespaces, you can open the project in the browser or use the built-in terminal to create a new folder and file.
- Create a folder called
toolsin the root of your Open WebUI project. - Create a new file called
example_tool.pyin thetoolsfolder.
Then, open WebUI in your browser
- Go to the
Workspacetab in the top navigation bar - Click on
Toolsin the left navigation bar - Click on the
+icon to create a new tool
This will open the tool editor with example code for a tool with some simple functionality.
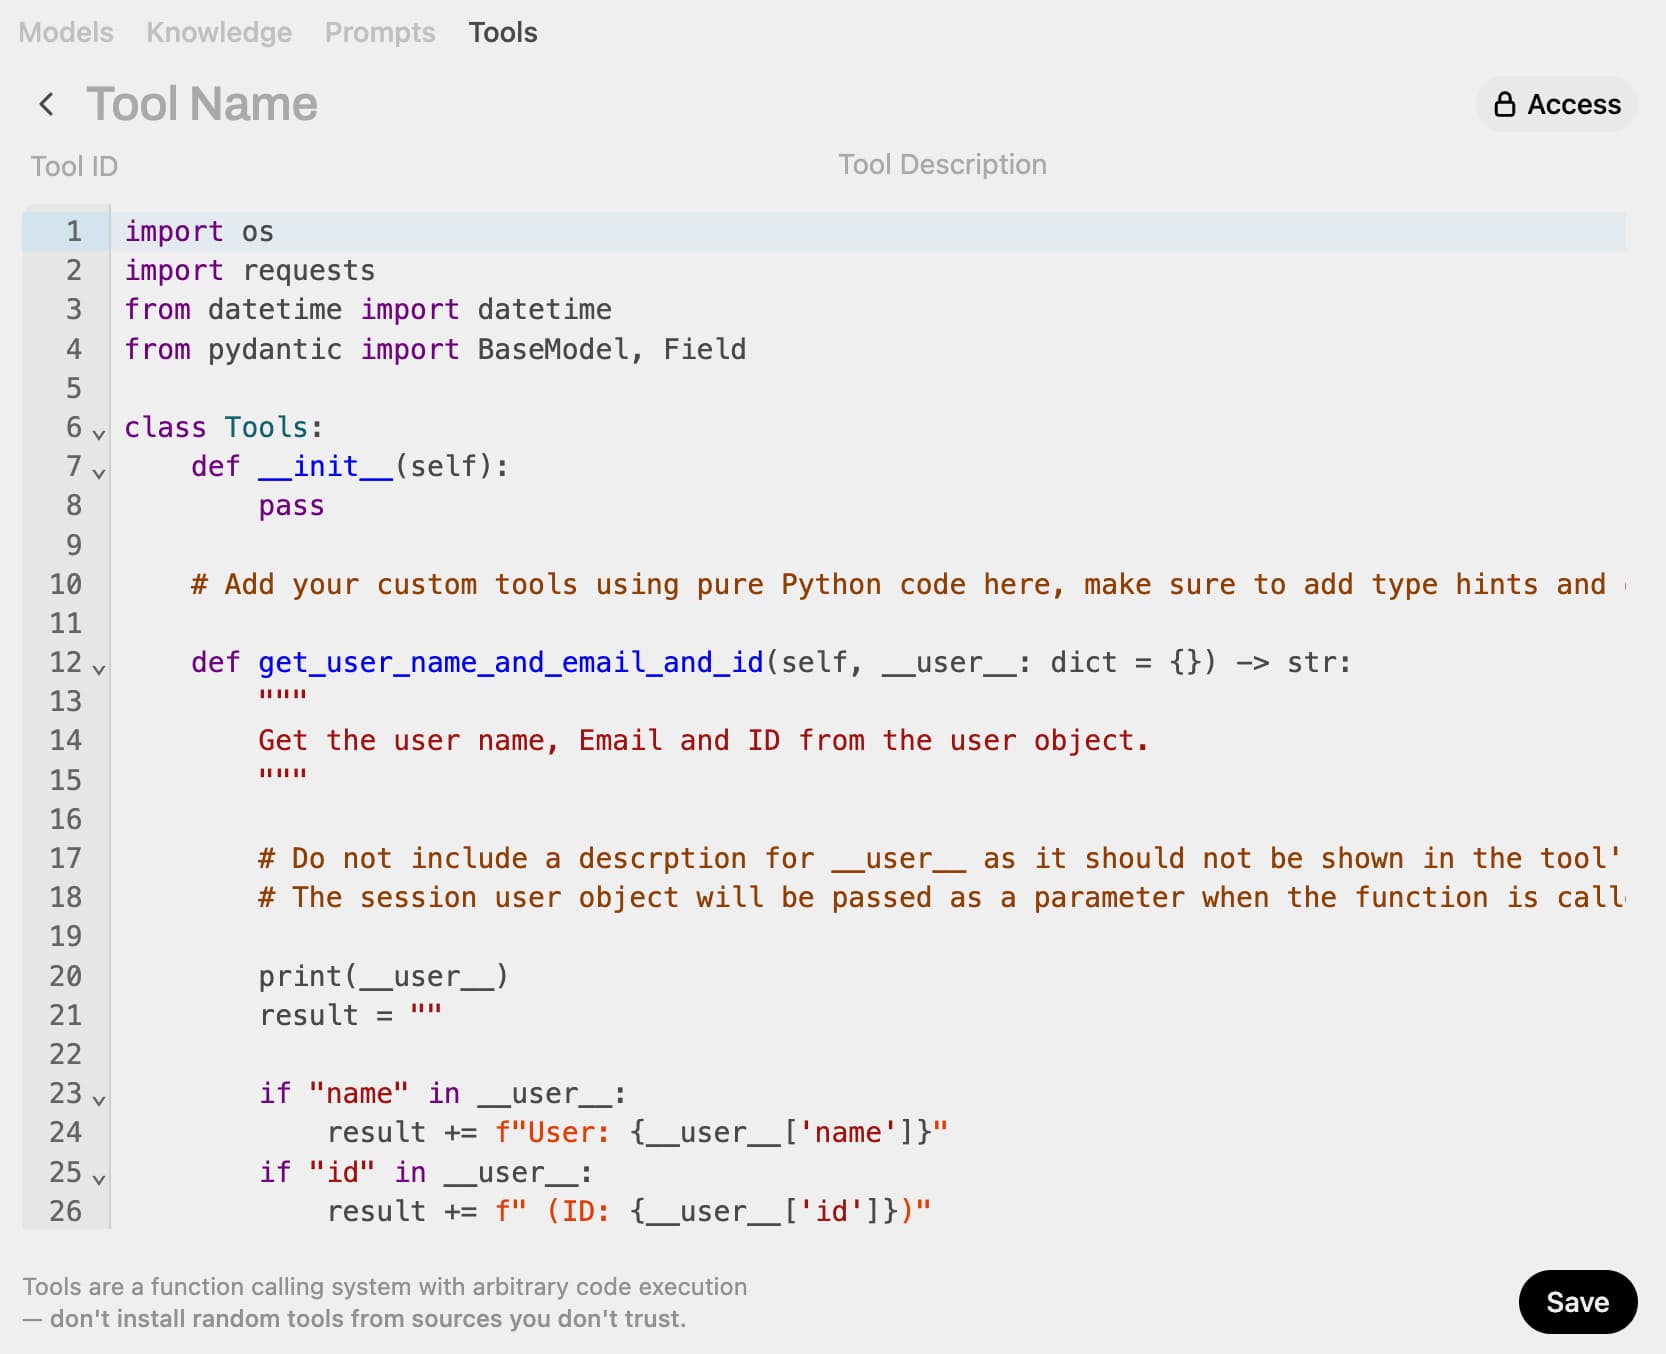
- Copy the example code and paste it into the
example_tool.pyfile you created in thetoolsfolder.
We have now created some context for GitHub Copilot to help us vibe-code our tools.
Define a source for real-time information
When giving real-time information to LLM’s, we need to provide them with a source for the information. This can be done by connecting to an API to access the information. APIs are a set of rules and protocols that allow different software applications to communicate with each other. They provide a structured and secure way for developers to access the functionality of a service or application without having to understand the underlying code.
Unfortunately, SKKU does not provide an API for their shuttlebus service, but we can try to get close to the source and scrape the information from the website. Let’s have a look at:
- SKKU Shuttlebus page
- Click on the
Real-time bus Info.link to see the real-time location of the shuttlebus - Right-click on the page and select
view page sourceto see the HTML code of the page or use theinspecttool to see the network requests that are made when the page is loaded.
It seems that the real-time information is provided by a web service that returns a JSON object with the location of the shuttlebus (http://route.hellobus.co.kr:8787/pub/routeView/skku/getSkkuLoc.aspx). We can use this information to create a tool that can provide real-time information about the shuttlebus:
1
[{ "line_no" : "32072", "inout" : "LEFT", "stop_no" : "284254", "seq" : "0", "stop_name" : "혜화역 1번출구 셔틀버스 정류소", "get_date" : "2025-05-22 오전 8:53:44" }, { "line_no" : "32151", "inout" : "ENTERED", "stop_no" : "285704", "seq" : "0", "stop_name" : "혜화역 1번출구 셔틀버스 정류소", "get_date" : "2025-05-22 오전 9:08:19" }, { "line_no" : "32149", "inout" : "ENTERED", "stop_no" : "285684", "seq" : "2", "stop_name" : "성균관대입구사거리", "get_date" : "2025-05-22 오전 9:07:54" }, { "line_no" : "32153", "inout" : "ENTERED", "stop_no" : "285726", "seq" : "0", "stop_name" : "혜화역 1번출구 셔틀버스 정류소", "get_date" : "2025-02-14 오전 8:46:36" }, { "line_no" : "32150", "inout" : "LEFT", "stop_no" : "285700", "seq" : "7", "stop_name" : "문묘입구[정문]-하교", "get_date" : "2025-05-22 오전 9:07:15" }, { "line_no" : "32152", "inout" : "LEFT", "stop_no" : "285721", "seq" : "6", "stop_name" : "600주년기념관 앞-하교", "get_date" : "2025-05-22 오전 8:08:02" }]
- The JSON object contains a list of objects, each representing a shuttlebus with the following properties:
line_no: The line number of the shuttlebusinout: The direction of the shuttlebus (LEFT or ENTERED)stop_no: The stop number of the shuttlebusseq: The sequence number of the shuttlebusstop_name: The name of the stopget_date: The date and time when the information was retrieved
Vibe-code a tool to get the real-time information
Back to your code editor. Now that we have the example code and the source for the real-time information, we can use GitHub Copilot to help us vibe-code a tool that can provide real-time information about the shuttlebus.
- In the
toolsfolder, create a new file calledshuttlebus.py - Use GitHub Copilot to make a working python script that can access the real-time information from the web service. You can use the following code as a starting point
- Check if the script provides you with the real-time information you need. If not, try to modify the code and ask GitHub Copilot for help
- Then, ask GitHub Copilot to help you create a tool that can be used in the Open WebUI, based on the example code you copied from the Open WebUI
Tip: When vibe-coding, help your assistant by providing it with as much context as possible. This can include the purpose of the code, the expected input and output, and any specific requirements or constraints. In this case, it might be helpful to make it have a look at
https://docs.openwebui.com/features/plugin/tools/development/
2. Connecting Azure OpenAI models to Open WebUI
Currently, we have connected Open WebUI to Google’s LLM service Gemini. Open WebUI also supports other LLM services and APIs, such as OpenAI and Ollama, but in-built support for Azure OpenAI was only added recently. Since the Azure OpenAI service gives us access to latest and greatest models from OpenAI, and we have some Azure credits to spend, let’s give it a try.
Release v0.6.10 of Open WebUI added Experimental Azure OpenAI Support: Instantly connect to Azure OpenAI endpoints by simply pasting your Azure OpenAI URL into the model connections—bringing flexible, enterprise-grade AI integration directly to your workflow.
- Get your Azure OpenAI API key and endpoint URL from the Azure portal: https://ai.azure.com/resource/overview
- Get the name of your deployed model by looking for
Deploymentsin the navigation pane of the Azure AI portal - In your Open WebUI project, click your name, click
Admin Panel, go toSettingsand thenConnections(or just go to http://localhost:8080/admin/settings if you are running Open WebUI locally). - Click the
+icon right next toManage OpenAI API Connectionsto add a new connection - Fill in the following fields:
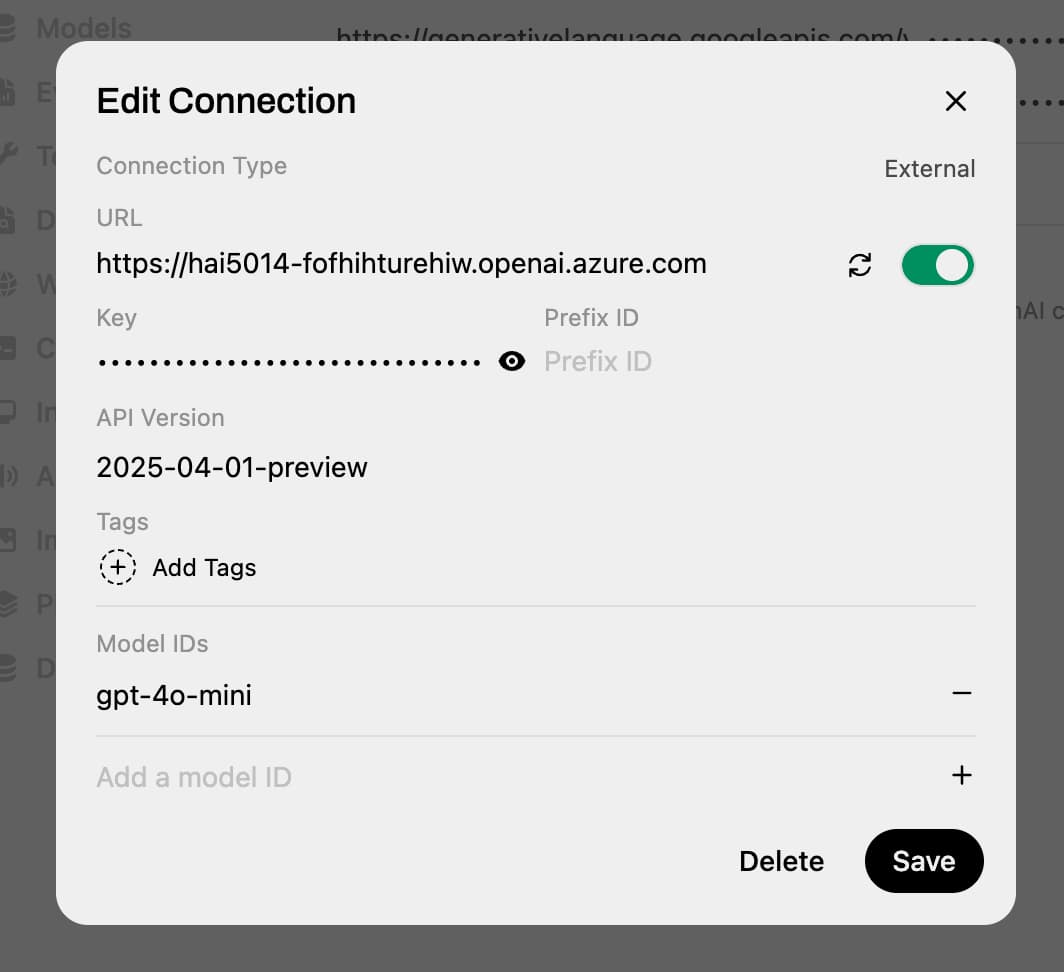
- Connection Type:
external - URL:
https://<your-azure-openai-endpoint>.openai.azure.com/(get from your Azure portal) - Prefix ID: None
- Key: your Azure OpenAI API key (get from your Azure portal)
- API Version:
2025-04-01-preview - Model IDs:
gpt-4o, orgpt-4o-mini(or whatever model you have deployed in Azure) - Click the rotating arrow icon next to your connection URL to test the connection.
- Click
Saveto save your connection.
- Connection Type:
- Open a new chat and look for the
Modeldropdown in the chat settings. You should see your new model(s) listed there. Give it a try!
3. Make a new Open WebUI model: KingoGPT
- Open your Open WebUI instance in your browser (make sure it is running)
- Click on the
Workspacetab in the top navigation bar - On the
Modelspage, click on the+icon to create a new model Open WebUI model- Model Name:
KingoGPT - Image: Not really needed, but you can use the SKKU logo or one of those beautiful AI-generated images: KingoGPT-1.jpg, KingoGPT-2.jpg
- Base model: You can select your newly added Azure OpenAI chat completion model from the dropdown list, or go with one of the Gemini models that are already connected like
gemini-2.0-flash - Description:
A KingoGPT model that can answer questions about Sungkyunkwan university, campus, and schedules. - System prompt:
You are a helpful assistant that can answer questions about Sungkyunkwan university, campus, and schedules. - Toolset: Make sure that it has access to the tools you created in the previous section
- Explore the other options and set them to your liking. You can always change them later.
- Model Name:
- Click
Saveto save your new model
4. Connecting Gemini’s OpenAI compatible embeddings model
So far, I have not yet managed to get the embeddings models deployed on Azure to work in Open WebUI. An embedding model is used to create embeddings for the text that is used in the memory and context (knowledge) of the chatbot. This is an important part of the chatbot, as it allows the chatbot to index and retrieve information that is relevant to the conversation and provide more relevant responses. Because we will focus next class on adding external knowledge to our chatbot, we will use the Open WebUI’s built-in support for Gemini’s embedding model, which are compatible with OpenAI’s embedding API.
- In Open WebUI go to the admin panel and click on
Settings - Click on
Documentsand find theEmbeddingssection and fill in the following fields:- Embedding Model Engine:
OpenAI - API Base URL:
https://generativelanguage.googleapis.com/v1beta/openai(no trailing slash) - API Key: your gemini API key
- Embedding Model:
text-embedding-004(Models are listed in the Gemini API documentation)
- Embedding Model Engine:
- Click
Saveto save your settings
Now lets try if our Open WebUI model can use this embedding model for indexing by uploading a document in the chat.
5. Getting to know the inner workings of Open WebUI
Open WebUI is an open-source project, which means that you can look at the code and see how it works. This is a great way to learn about the project and see how you can customize it to fit your needs. And in the area of AI, we have a new buddy that can help us to explore and explain the codebase: GitHub Copilot.
- Go to the GitHub Copilot in your web browser: https://github.com/copilot/
- Ask it the following question:
1
2
How does the chatbot in this repository deal with knowledge? Where do the documents get stored and indexed?
https://github.com/open-webui/open-webui
- Ask it the following question:
1
2
How does the chatbot in this repository deal with memory?
https://github.com/open-webui/open-webui
I challenge you to explore the Open WebUI codebase to understand how it works and how you can customize it to fit your needs. You can use GitHub Copilot to help you with this, from explaining the structure of the codebase to writing code for you.
References
Open WebUI:
- Open WebUI Tools library
- Open WebUI docs:
Google Gemini: