[HAI5014] Integrating lightRAG into Open WebUI

Disclaimer: This blog provides instructions and resources for the workshop part of my lectures. It is not a replacement for attending class; it may not include some critical steps and the foundational background of the techniques and methodologies used. The information may become outdated over time as I do not update the instructions after class.
Install lightRAG
As discussed in class, today we’ll explore the lightRAG package, which allows us to feed external knowledge into our Open WebUI chatbot.
Update the requirements.txt
To ensure all required Python packages (including lightRAG) are installed, add the following lines to your requirements.txt file:
1
2
3
4
5
6
beautifulsoup4
ipykernel
lightrag-hku
markdownify
stealth-requests
tqdm
Install the python packages
To install the necessary packages, run the following command in your development container terminal:
1
pip install -r requirements.txt
or, if you used the UV installation method:
1
uv pip install -r requirements.txt
Add environment variables for lightRAG
Before running lightRAG, you’ll need to configure several environment variables. Therefore, open your .env file in the root of your Open WebUI project and add the following lines:
1
2
3
4
5
6
7
8
9
10
11
12
13
14
15
16
17
18
19
20
21
22
23
24
25
26
## Environment variables for LightRAG server

# LightRAG Storage Configuration
LIGHTRAG_KV_STORAGE=PGKVStorage
LIGHTRAG_VECTOR_STORAGE=PGVectorStorage
#LIGHTRAG_GRAPH_STORAGE=PGGraphStorage
LIGHTRAG_DOC_STATUS_STORAGE=PGDocStatusStorage

# PostgreSQL Configuration (from Supabase string above)
POSTGRES_USER=supabase_database_user
POSTGRES_PASSWORD=supabase_database_password
POSTGRES_HOST=supabase_database_host
POSTGRES_PORT=5432
POSTGRES_DATABASE=postgres
POSTGRES_MAX_CONNECTIONS=12

# Azure OpenAI API Configuration (find at Azure OpenAI Studio)
LLM_BINDING=azure_openai
AZURE_OPENAI_ENDPOINT=https://<your-custom-endpoint>.openai.azure.com
AZURE_OPENAI_API_KEY=<your-azure-openai-api-key>
AZURE_OPENAI_API_VERSION=2025-01-01-preview

LLM_MODEL=gpt-4o-mini
EMBEDDING_BINDING=azure_openai
EMBEDDING_MODEL=text-embedding-3-small
EMBEDDING_DIM=1536
You can find all the information for the postgreSQL configuration as fragments in your Supabase database URL. For the Azure OpenAI configuration, you can find the necessary information in the deployments section of your Azure OpenAI Studio.
In the example above,
LIGHTRAG_GRAPH_STORAGEis commented out because Supabase does not support graph storage. Therefore, lightRAG will store the graph locally on the disk. If you want to use cloud storage for your graph, you can have a look at neo4j or other graph databases.
Explore lightRAG server
The lightRAG server offers a Web UI for document indexing, knowledge graph exploration, and a basic RAG query interface. After installing lightRAG and setting the environment variables, you can start the lightRAG server by running:
1
dotenv run lightrag-server
This will start the lightRAG server
- Check the lightRAG server web interface via
http://localhost:9621 - Upload a sample document to verify your configuration and observe how lightRAG processes it
- Delete the document again, so that you can start with a fresh library for the next steps
- Check out the lightRAG API via
http://localhost:9621/docsto see the available endpoints and their usage

Automatic document feeding using lightRAG API
In this section, we will explore how to automatically feed documents into the lightRAG server using its API. This allows you to populate or update your knowledge base automatically, without manual intervention.
For this, we will use the SKKU ISS website as an example. The goal is to scrape the website for information and feed it into the lightRAG server so that our chatbot can answer questions about the SKKU ISS.
The code for this example is available in the pimatskku / iss-to-lightrag repository.
- Create a folder called
datain your project folder - Put the text files with urls into the
datafolder - Copy or download the code from
scrape-and-index.pyand put it into your project folder - Run the script
The indexing will take a while to complete. This is where we can take a break and let the code run in the background while we enjoy student’s presentations. Do not close the terminal, as it will break the indexing process.
At this point, your token usage may increase significantly. To monitor it, use the Metrics tab in your Azure OpenAI Studio.
Update your Open WebUI instance to the latest version
To ensure you have the latest features and bug fixes, update your Open WebUI instance to the latest version. You can do this by pulling the latest changes from the GitHub repository:
Depending on your setup, you might use one of the following commands:
1
pip install open-webui --upgrade
Or if you used the UV installation method:
1
uv pip install open-webui --upgrade
Then, start your Open WebUI instance:
1
dotenv run open-webui serve
After a successful update, you’ll be greeted by confetti and the “What’s New” page in Open WebUI, which highlights recent features and improvements.
Install lightRAG tool in Open WebUI
There are two ways to use lightRAG in Open WebUI: as a tool or as a model connection.
Implement lightRAG as a model connection
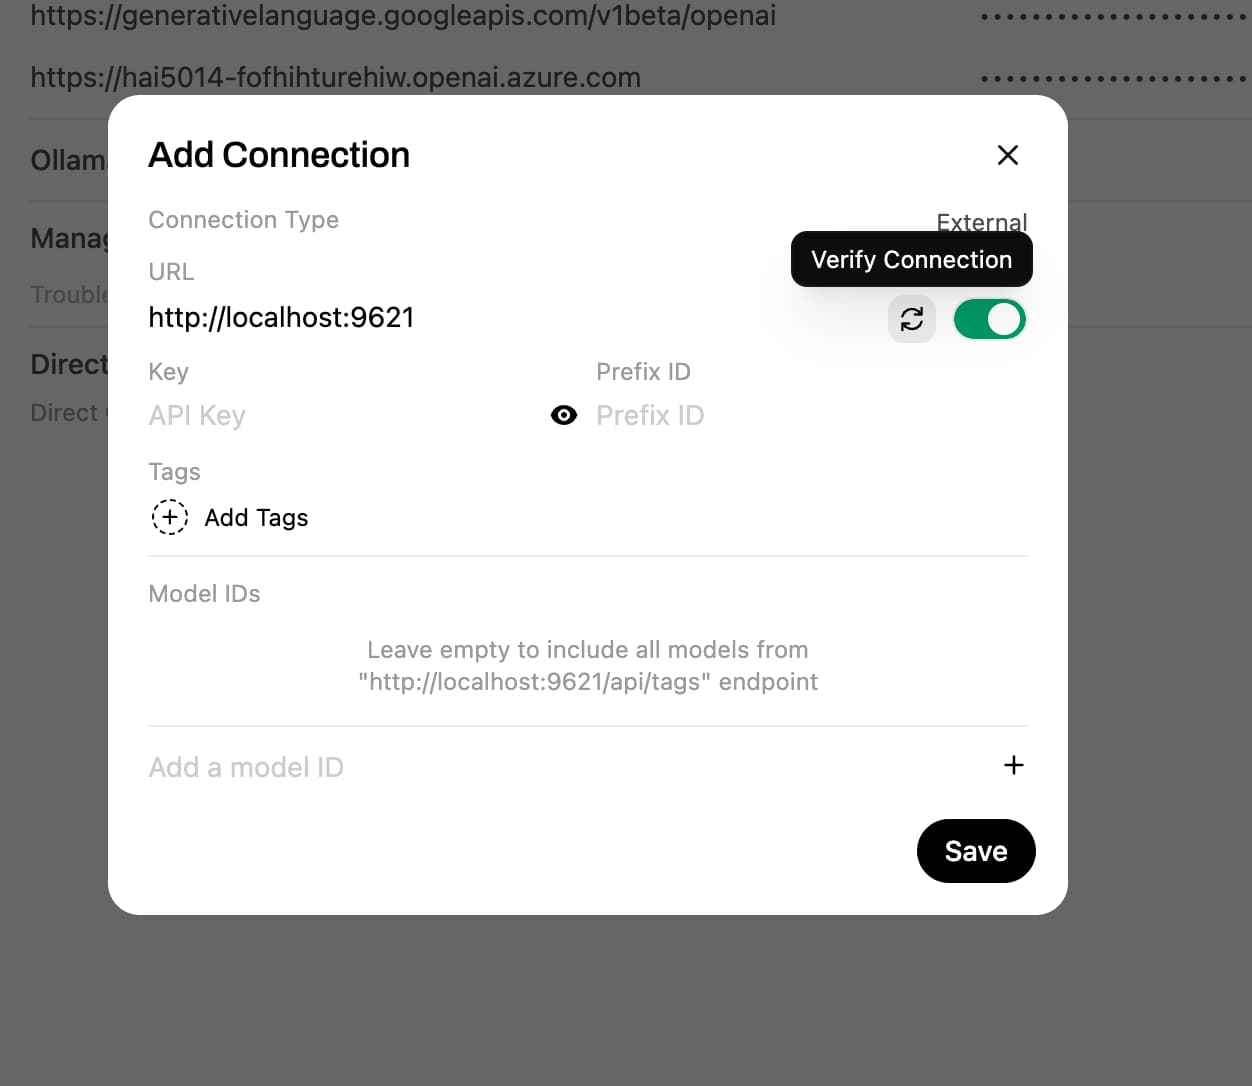
In your Open WebUI instance go to:
- Admin Panel > Settings > Connections
- Enable the
Ollama APIslider - Click on the
+button behind theManage Ollama API Connectionslabel - In the URL field, enter
http://localhost:9621(the URL of your lightRAG server) - Press the rotating arrows icon to test the connection
Implement lightRAG as an Open WebUI tool
- Open Open WebUI Tool - LightRag in a new tab
Then, in your Open WebUI instance, go to:
- Workspace > Tools > Add Tool (+ icon)
- Copy the code from the tool and paste it into the code editor in Open WebUI.
- Give the tool a name, e.g., “SKKU ISS RAG” and a description, e.g., “Tool for SKKU ISS information retrieval using lightRAG”
- Click on the Save and Confirm button to save the tool
Click on the gear icon to check on the available settings (valves) for the tool.
References
lightRAG:
- Paper: LightRAG - Simple and Fast Retrieval-Augmented Generation
- LightRAG GitHub Repository
- LightRAG Server and WebUI
Open WebUI:
More to read: