The GitHub Three: A Crash Course

If you have been curious about incorporating LLMs (large language models) in your project, or always wanted to build your own chatbot, then now is your chance! In this workshop, we will explore the GitHub platform and its features to build chatbots using LLMs. We will use GitHub Codespaces, GitHub Models, and GitHub Copilot to quickly develop our own applications and data science projects.
Disclaimer: This blog provides instructions and resources for the workshop part of my lectures. It is not a replacement for attending class; it may not include some critical steps and the foundational background of the techniques and methodologies used. The information may become outdated over time as I do not update the instructions after class.
1. Introduction to the GitHub Three
Today we are going to discover three GitHub features that will help you to quickly develop your own applications or data science projects. We will use the following features:
- GitHub Codespaces: A cloud-based development environment that allows you to write, build, test, and deploy applications directly from your browser.
- GitHub Models: A feature that brings powerful AI models like GPT-4o, Llama 3.1, Phi-3, and Mistral directly available in your GitHub project.
GitHub Copilot: An AI-powered chat and code completion tool that helps you explain and write code faster, with fewer errors.
Make sure you have a GitHub account and are logged in. Don’t have an account yet? Sign up here
Want to get Pro level access to GitHub Codespaces, CoPilot and more for free? Sign up for the GitHub Student Developer Pack which is available for students and teachers after verification.
1.1 Create a new repository in GitHub
To prepare our project for Python development, we need to create a new repository in GitHub. This will allow us to store our code and keep track of changes. We will also use this repository to create a Codespace, which is a cloud-based development environment that allows us to write, build, test, and deploy applications directly from our browser.
On the GitHub page, click on the + icon in the top right corner and select New repository or click here.
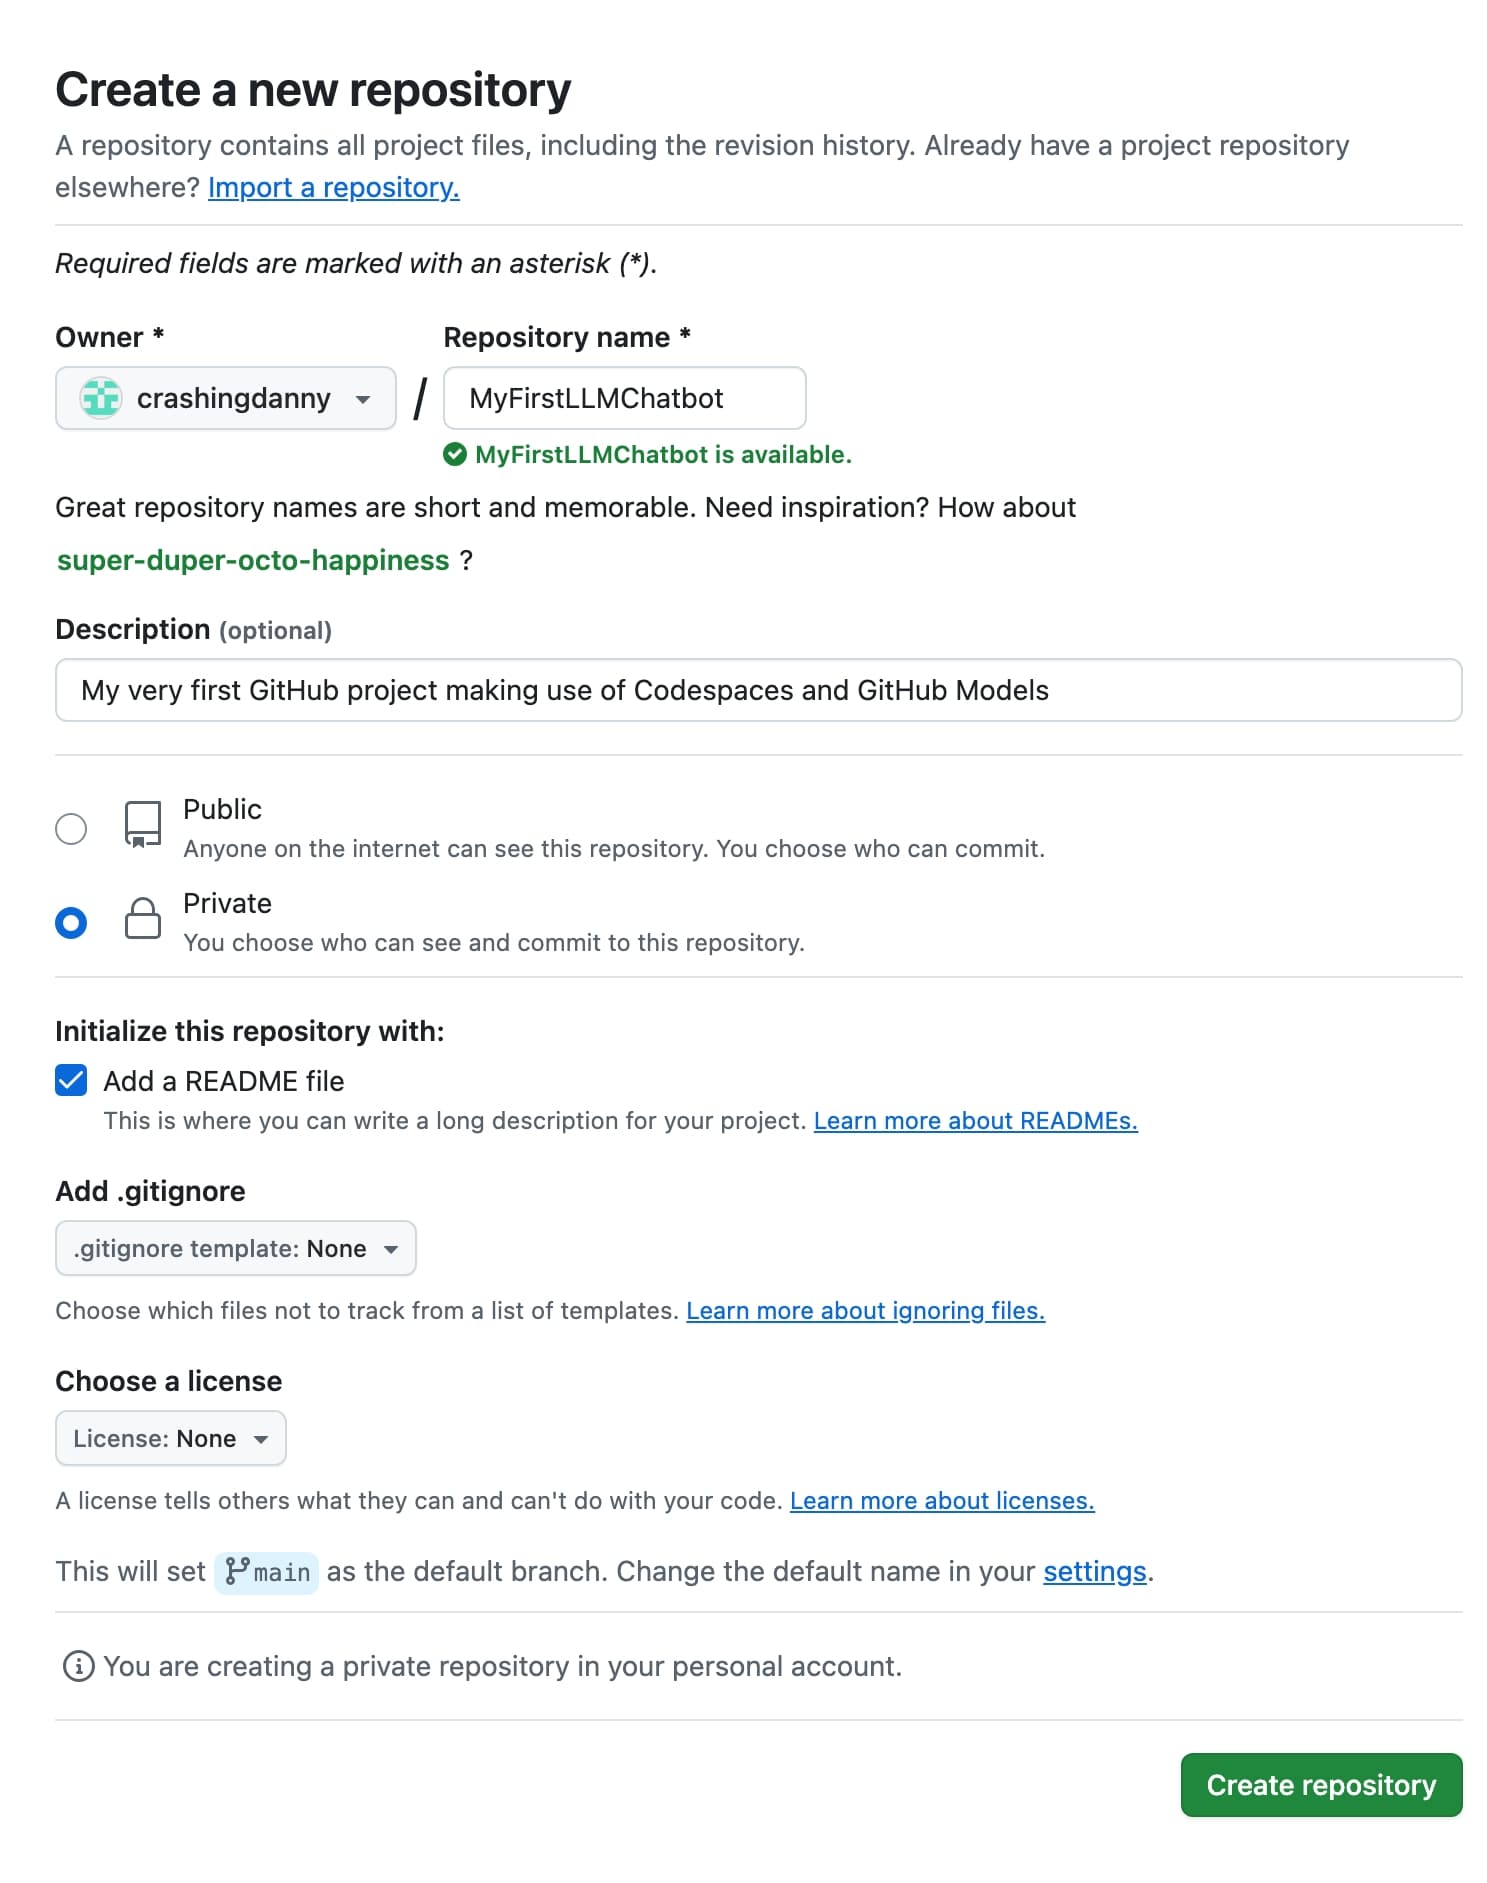
- Name the repository
MyFirstLLMChatbot - In the description, you can write
My very first GitHub project using Codespaces and GitHub Models - You can make it public or private to your liking
- Select
Add a README file - Select
Add .gitignoreand selectPython - Create the repository
🎉 Congratulations! You have created your first GitHub repository. Now let’s add some files to it.
1.2 Add dependencies to requirements.txt
To make sure that we have all the dependencies we need for our project, we will create a requirements.txt file. This file will contain a list of all the packages we use in the project, and at makes it easy to install them all at once in our development environment (Codespace, in today’s case).
- On the main page of your repository, click on the
Add filebutton and select+ Create new file - Name the file
requirements.txt - Add the following lines to the file:
1
2
3
ipykernel
openai
python-dotenv
- Click on
Commit the changes... - Keep the suggested commit message (or write
Create requirements.txt file) - Click on
Commit changes
1.3 Create a devcontainer configuration
To make sure that everyone working on the project has the same environment, we will create a devcontainer configuration. This will allow us to define the settings for a development environment in Codespaces. This is especially useful when working with different programming languages, versions, and libraries.
- From the main page of your repository, click on the
Add filebutton and select+ Create new file - Set the file name as
.devcontainer/devcontainer.json Add the following lines to the file:
1 2 3 4 5 6 7 8 9 10 11 12 13 14 15 16 17 18 19 20 21 22 23 24 25 26 27 28 29 30 31 32 33 34 35
/* * Dev container configuration file for GitHub Crash Course * Sungkyunkwan University 2025 Spring Semester - by camphouse.me */ { "name": "Python 3", // Use the official Python 3.11 image as a base "image": "mcr.microsoft.com/devcontainers/python:0-3.11-bullseye", "features": { }, // Configure the Codespaces Machine to use 2 CPUs "hostRequirements": { "cpus": 2 }, // Use 'postCreateCommand' to run commands after the container is created. "postStartCommand": "export PATH=/usr/local/python3.11/bin:$PATH", "postCreateCommand": "pip3 install --user -r requirements.txt", // Install preferred extensions into VS Code "customizations": { "vscode": { "extensions": [ "github.copilot", "ms-python.python", "ms-toolsai.datawrangler", "ms-toolsai.jupyter", "DavidAnson.vscode-markdownlint", "esbenp.prettier-vscode" ] } } }- Commit the changes (you can use the suggested commit message settings)
2. Open a new Codespace
Now that we have created our repository and added the necessary files, we can create a Codespace.
A GitHub Codespace is a cloud-based development environment (IDE) that allows us to write, build, test, and deploy applications directly from our browser. It is a great way to quickly set up a development environment without having to install anything on your local machine. And with the devcontainer configuration we just created, we can be sure that everyone working on the project has the same environment.
To create a Codespace for this repository, follow these steps:
- Go to the main page of your repository in GitHub
- Click on the
Codebutton and select theCodespacestab - Click on
Create Codespace on main - Wait for the Codespace to be created and opened
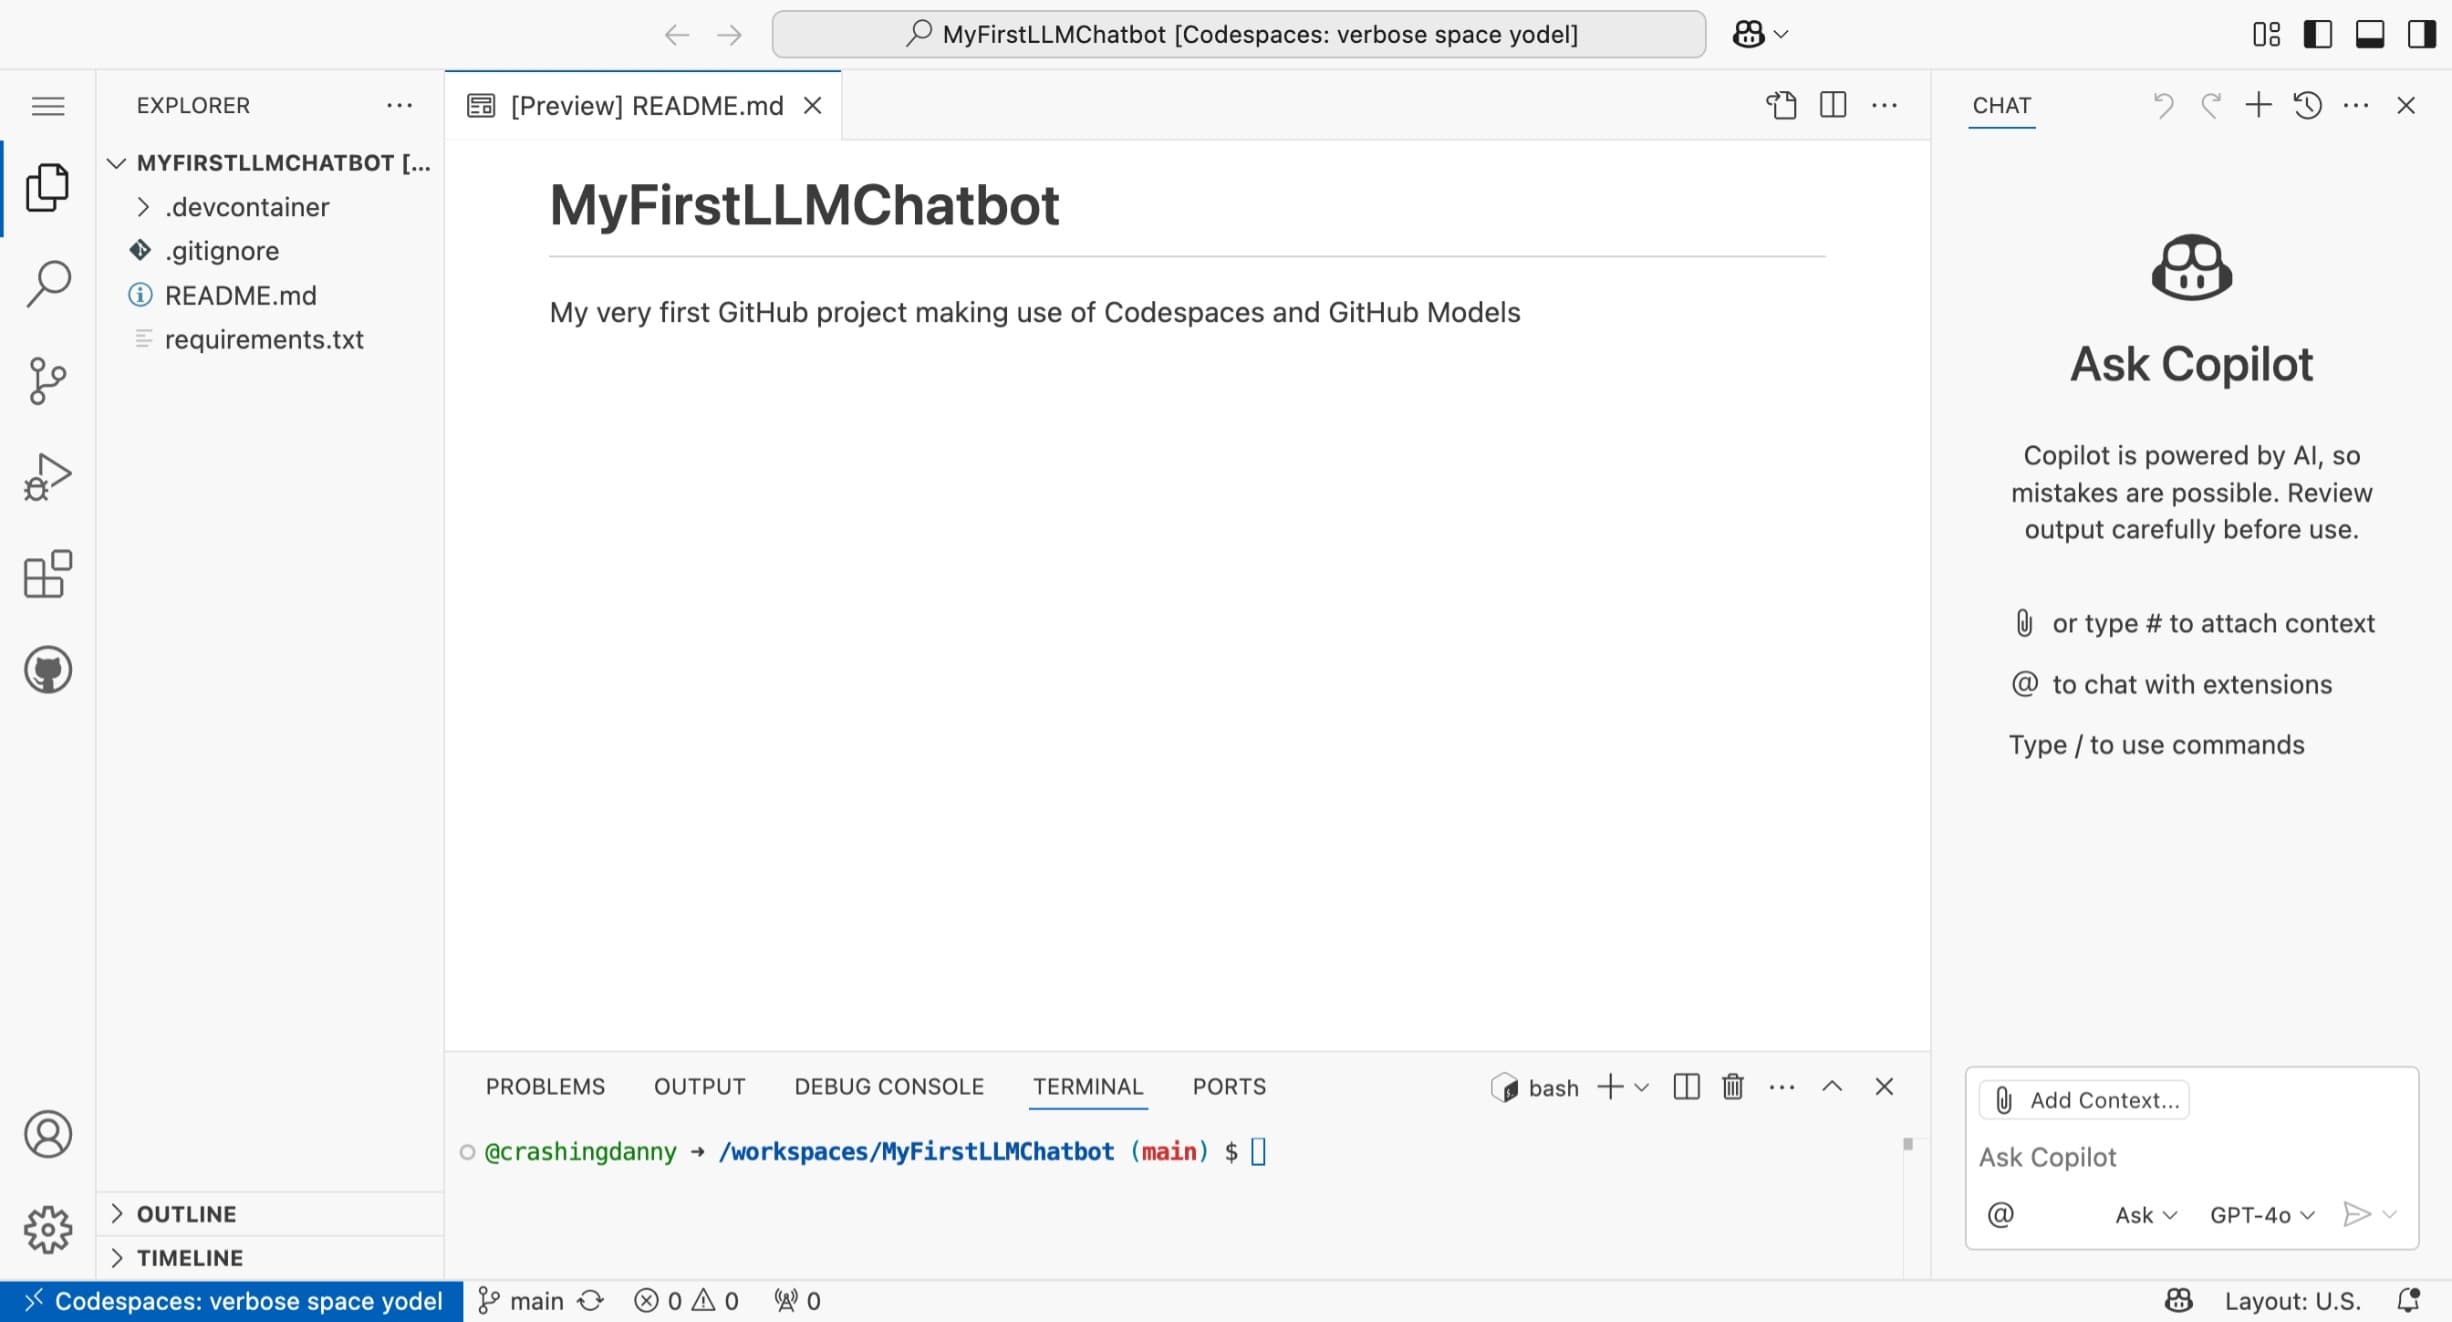
It will take a few minutes to set up the Codespace. Once it is ready, you will see a new tab open in your browser with the Codespace environment. Let’s enable GitHub Copilot by clicking the ‘Use Copilot for Free’ button and then explore the environment together.
- Command Palette: Open the command palette by pressing
Ctrl+Shift+PorCmd+Shift+Pon Mac. This is a powerful tool that allows you to run commands and access features in Visual Studio Code. You can search for commands by typing in the search bar. - File Explorer: See the files that we created in the repository
- Extensions: Discover the extensions that are installed in the Codespace
- Terminal: Check if / which version of Python is installed by running the command
python -Vin the terminal - GitHub Copilot: Click on the
Copiloticon in the top right corner of the editor to open the GitHub Copilot chat.
3. GitHub Models
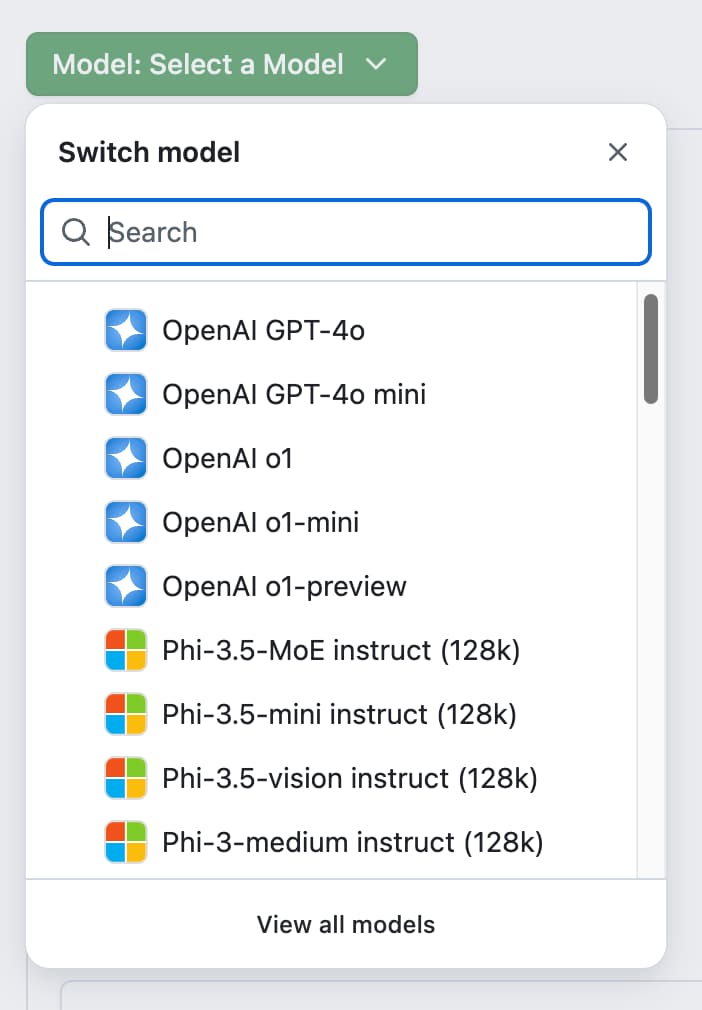
GitHub Models is a feature that brings powerful AI models like GPT-4o, Llama 3.1, Phi-3, and Mistral directly available in your GitHub project. Just like GitHub Copilot helps you write code faster, GitHub Models helps you go one step further and build your own AI-powered applications with natural language prompts and custom models.
Let’s discover some models in the GitHub Models Playground. Do they know what you know? And which of the models knows how many R’s there are in the word raspberry?
Be aware that the free version of GitHub Models has a rate limit
3.1 Use the model in your own project
When you decided on the model you want to use, you can use it in your own project. Click on the <> Use this model button on the model page. This will take you to a page where you can select the language and SDK you want to use.
If you don’t have a Github Personal Access Token (PAT) yet, click on Get developer key
- Create a new
fine-grained personal access token - In the Token name field, enter
models_token - In the Expiration field, select
No expiration - Under Repository access, select
All repositories - Under Account permissions find Models and select
Read-only - Click the
Generate tokenbutton - In the New personal access token confirmation dialog, click
Generate tokenagain
3.2 Set up the environment variables
In your Codespace, create a new file called
.env1
GITHUB_TOKEN="****"
Replace the
****with the token you just created.- Then, run the following command in the terminal:
1
 export GITHUB_TOKEN="<your-github-token-goes-here>"
- Check whether the token is set correctly by running:
1
echo $GITHUB_TOKEN
in the terminal. It should print the token you just created.
4. Running a basic LLM inference code sample
In a new tab, open the GitHub Models page. Let’s play around (did someone say raspberry?) with some of the models. After discovery, we will build our own chatbot using the OpenAI GPT-4o model:
- Create a new file called
chatbot.pyin your repository - Add the example code from GitHub Models:
- Go to the OpenAI GPT-4o model in GitHub
- Click on the
<> Use this modelbutton - Select
Pythonas the language andOpenAI SDKas SDK- Scroll through the steps until you reach the code example at step 3
- Copy the code from chapter
3. Run a basic code sample - Paste the code into your
chatbot.pyfile and save it
- Run the code by clicking on the
Runbutton in the top right corner of the editor
4.1 Commit the changes
- Click on the
Source Controlicon in the left sidebar - Have Copilot help you with the commit message by clicking the sparks icon
- Click on the
Commitbutton to commit the changes - Click on the
Pushbutton to push the changes to your repository
4.2 Some more examples
Go through section 4. Explore more samples of the GitHub Models example code page.
5. CoPilot, help me out!
You might notice that, while the code shows an example of how you can implement LLMs into your own projects, it does not ask for user input. This is a bit of a bummer, because we want to be able to ask the chatbot questions and get answers back. Let’s change that!
- Open the CoPilot chat by clicking on the
Copiloticon at the top, next to the command palette Ask CoPilot to add a function to the code that asks for user input and returns the response from the model. Your prompt could be something like:
1
I want to make a loop that asks for a user's input and then replies, until a user inputs 'bye'
Context and Memory
There is a possibility that the model will not be able to answer consecutively. This is because the model does not have any context of the conversation. To fix this, we need to add the previous messages to the input. We can ask CoPilot to help with this:
1
  It seems to forget the context, its memory. Fix the code so that it won't forget what has been said
Instructions
Let’s play around with the system message to see if we can get the model to behave differently. This concept is called instruction tuning and could help us to get better results. For example:
1
  system_message = "You are a helpful assistant. Never answer any questions related to Korea and never answer in Dutch."
References
GitHub Models
- GitHub Models (marketplace)
Prototyping with AI models (rate limit info)
- Docsbot model compare